
Do you want to win over prospects for your newsletter directly on your landing page? Then you need a signup form that fits your page perfectly. In MailChimp, you'll find the so-called Embedded Forms for this. They can be customized in shape, scope and appearance, and then built into your own website as code.
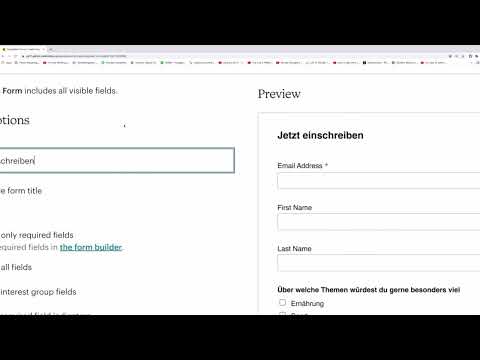
The video is only loaded from YouTube when you play it – data (including your IP address) is then transmitted to YouTube/Google. More in the privacy policy
In this guide, I'll show you step by step where to find the Embedded Forms, which options are available to you, and how to get the finished form onto your website.
Key Takeaways
- Signup Forms and landing pages are currently the same function in MailChimp and lead you to the same overview.
- Embedded Forms are your own signup forms that you can integrate into a website or landing page.
- You determine the form title, required fields, GDPR fields, width and background yourself.
- You copy the form into your website using the generated code.
Step-by-Step Guide
Opening the Signup Form
Log in to MailChimp and click "Create" at the top. Then select the "Signup Form" option at the bottom. Many people wonder at this point whether there is a difference between a landing page and a signup landing page. Currently there is none: both paths lead you to the same overview and the same editing point. However, MailChimp may change this function in the future, so it's worth taking a look at the interface.

Selecting the Embedded Form
Now you'll see several options for creating forms. To integrate it into your own website, select "Embedded Form" and then start with "Beginnen" ("Begin"). This takes you to the point where you can make all the settings.

Getting to Know the Different Form Types
MailChimp offers you several types of Embedded Forms: Classic Forms, Condensed Forms, Horizontal Forms, Unstyled Forms and Advanced Forms. The Classic Form is a traditional, complete form. The Condensed Form is a compact variant that takes up less space. The Horizontal Form arranges the fields next to each other, and with the Unstyled Form you can determine the design almost entirely yourself. Choose the variant that best fits your page layout.

Setting the Form Title
In the left area you'll find the Form Options. Under "Form title" you set the heading of your form. By default, it says "Subscribe". You can replace the text with a German wording, for example "Jetzt einschreiben" or "Jetzt eintragen". A form title with a clear call to action makes the decision easier for your visitors. If you don't want to display a title, you can leave the field empty. However, the upper area of the form will then remain without a heading.

Defining Required and Optional Fields
Next, you decide which fields are displayed. With "Show only required fields" you display only the required field, usually the email address. This makes the form look leaner, and signing up is quicker. With "Show all fields" you additionally display the optional fields, such as first name or last name. Required fields are marked with a red asterisk, all others are optional.

Setting Required Field Indicators and Format Options
With the "Show required field indicators" option, you control whether the red asterisk is visible next to required fields. If you deactivate this option, the indicator disappears. The field nevertheless remains a required field and must be filled out.
Via "Show format options" you can add the selection of the email format to the form. There, recipients specify whether they want to receive HTML or plain text.


Configure the GDPR fields
In the GDPR fields section, i.e. the fields according to the General Data Protection Regulation, you define which consents subscribers can agree to. Typical options are "Receive emails", "Receive direct mail" or "Customized Online Advertising". The fields help you obtain legally compliant confirmation of what someone is signing up for. Make sure the wording is understandable and matches your actual methods of sending.

Determine the width of the form
You specify the width in pixels. A value of around 1000 pixels is suitable for a wide display on desktop. Smaller values such as 500 or 300 pixels make the form narrower and are better suited for sidebars. Try different values and watch in the preview how the form looks. With very small values it gets cramped, and fields and texts can appear tightly packed.
Set further options
Under "Disable all JavaScript" you can turn off the use of JavaScript for the form. This is useful if visitors do not have JavaScript enabled and the form should still work.
With "Include archive link" you add a link to your previous campaigns. Visitors can thus see in advance what content to expect. This builds trust and prevents subscribers from being surprised by the content.


Customize the MailChimp badge and the background
With the "Made with MailChimp" option you add a badge. If visitors access MailChimp through it and register there, you receive a commission for it. The badge can therefore also be used as a source of income.
In the "Background" section you choose between a light and a dark background. Choose the background so that it fits your web design and the form remains easy to read.
Copy the code and embed it into the website
Once the form is finished, you click on "Generate Embedded Code". The code then appears at the bottom of the section. With "Copy Code" you copy it to the clipboard. The code essentially consists of HTML and CSS elements that you can insert directly into your website. Afterwards, the form appears exactly as you designed it in the preview. The preview on the left side shows you what the final result will look like.

Keep an eye on the Advanced Forms
The Advanced Forms offer the most extensive possibilities for individual customization. However, they are more complex. If you already work confidently with the standard options, it is worth looking into them more closely later.
Summary – Editing MailChimp Embedded Forms: Step-by-step guide
With Embedded Forms you create signup forms that fit your website or landing page perfectly. You start via "Create" and "Signup Form", choose the Embedded Form, and then set the form title, required fields, GDPR consents, width, and background. You embed the form into your website using the copied code. Take your time with the settings and test the preview before you adopt the code.


