

A sky without clouds quickly looks empty. With just a few clicks, though, you can add suitable clouds, birds or light effects to your image in Photoshop Elements. The basis for this is brushes that you can add to the program afterwards. In this tutorial, I'll show you how to find brush packs, import them into Elements and use them right away. Using a photo with a blue sky, green meadow and a tree as an example, I'll also show you how to adjust the brush settings.
The video is only loaded from YouTube when you play it – data (including your IP address) is then transmitted to YouTube/Google. More in the privacy policy
Key Takeaways
Key Takeaways
- Brushes are loaded in Photoshop Elements via the Brush tool and the options menu or via Edit > Preset Manager.
- With the "Append" option, your existing brushes are retained. The "Add" option, on the other hand, replaces them.
- Not every version of Elements supports all brushes. Large pixel brushes may require a newer version or an alternative.
- You should paint with your brush on a separate, new layer so that you can show and hide it later.
- With the brush settings, you can adjust the angle, roundness and other properties.
Step-by-Step Guide
Activating Expert Mode
Open your source image in Photoshop Elements. Then switch to Expert mode. There you have all the tools you need for loading brushes and painting with them.

Selecting the Brush Tool
Select the Brush tool in the toolbar. It's quicker with the keyboard shortcut B. You will then immediately be in the brush area and see all the brushes that are currently installed. Even the default selection is already surprisingly extensive.

Checking the Existing Brushes
Take a look at the brush selection to see which brushes are already available. You'll often find useful shapes there already. If the selection isn't enough for you, you can load more brushes. For this, the "Load Brushes" function is available in the brush selection.
Choosing a Suitable Brush Pack
For the clouds, I used a large brush pack from PS Tutorials and tutkit.com. The cloud brushes are usually located further down the list. Make sure you download the brush files with the .abr extension. Then unpack the pack into a folder that you can easily find again later, for example on the desktop.

Why Clicking Directly Doesn't Work
In Photoshop (not Elements), it is often enough to click on a brush file in the browser. The brush is then imported directly into the program. In Elements, this doesn't work reliably. The file does open, but it isn't always integrated cleanly. So go through the menu, as described in the following steps.
Loading Brushes via the Options Menu
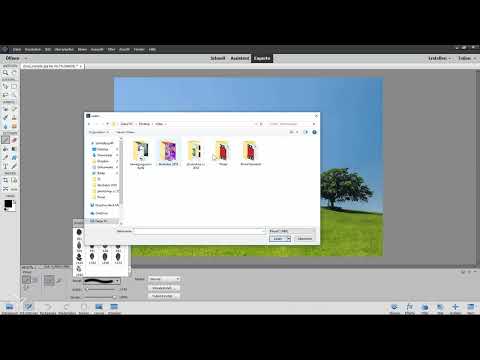
With the Brush tool active, click on the small options menu in the top bar. There you will find the entry "Load Brushes". Select it and, in the dialog window that opens, navigate to the folder where you saved the brush files. This is where, for example, the working folder with the cloud brushes is located.

Selecting the Right Brush File
Open the folder with your brushes and select the file with the clouds. A double-click is enough. The cloud brushes are then available directly in the brush selection.
Appending Brushes via the Preset Manager
Alternatively, you can load the brushes via the Edit menu and the Preset Manager. There you can manage not only brushes, but also swatches, gradients, styles, patterns and effects. Select "Brushes" as the type and click on "Append". Then select the desired file. In this way, you can also load additional light effects or other brush sets without losing your existing brushes.

Understanding the Most Important Difference: Append or Add
Pay close attention to the button when loading. With "Hinzufügen" the current brushes are replaced, and only the newly selected brushes remain. With "Anhängen" all existing brushes are kept, and the new ones are added. If you accidentally chose "Hinzufügen", simply reload the default brushes or load the desired packs again with "Anhängen". For most cases, "Anhängen" is the better choice.
Pay attention to the pixel size of the brushes
Not every version of Elements or Photoshop can handle all brushes. The large pixel brushes with 5000 pixels do not work in all versions. The pack therefore often contains two variants with different sizes. If you have an older version installed, use the smaller variant with 2500 pixels.
Create a new layer for the clouds
Before you get started, create a new empty layer via the Window and Layers menu. This approach has a big advantage: Your clouds are on their own layer and can later be hidden or moved with a single click. Your original image remains unchanged.

Adjust the brush size and paint the clouds
Select the loaded cloud brush and set the size using the slider or with the left and right square bracket keys. The default setting is often too large, so you should reduce it. Choose white as the color and paint onto the new layer with a click. One click is usually enough for a cloud. For variety, you can use a second cloud brush in a slightly smaller size.

Place a bird using brush settings
Birds can also be placed with brushes. Choose a suitable bird brush and paint it in black onto the layer. Make sure to set it a bit smaller for the background so that the perspective is right. If you don't like the effect, open the brush settings. There you can set the angle, meaning rotate the bird, but also adjust the roundness and the fading.

Use the brush settings purposefully
The brush settings are the key to lively results. You can change each setting individually until the clouds look the way you imagine. The roundness affects the shape of the brush tip, while the fading controls how quickly the color decreases. These options work the same for all brushes. Feel free to try out different combinations and step back if you don't like a result.
Correct mistakes with Undo
Not every attempt succeeds right away. If you don't like a cloud or a bird, use the Undo command. The keyboard shortcut Ctrl+Z (Windows) or Cmd+Z (Mac) undoes the last action.
Combine custom and built-in brushes
Don't forget that Elements already comes with many brushes out of the box. If you don't have access to additional packs, it's worth taking a look at the default selection. There you will often already find usable shapes for sky, clouds, and textures. The painting procedure remains the same.
Summary – Loading brushes in Photoshop Elements: step-by-step guide
Loading brushes in Photoshop Elements is easier than it first appears. You select the Brush tool, open the options menu or the Preset Manager, and load the file with the "Anhängen" option. This way your existing brushes are kept. Pay attention to the pixel size of the brushes, because not every version supports all variants. Work on a separate layer so that you can adjust your results at any time. With the brush settings you refine angle, roundness, and fading. Now nothing stands in the way of your image.
FAQ
How do I know whether I need to choose "Anhängen" or "Hinzufügen"?Always choose "Anhängen" if you want to keep your existing brushes, because "Hinzufügen" replaces the current brushes.
Why can't brushes in Elements simply be opened with a double-click?In Elements, brush files are not reliably integrated directly, so the route via the menu is the safer option.
Which brush files can I load?Brushes are usually provided as an .abr file and can be loaded via the options menu or the Preset Manager.
Why do some large pixel brushes not work for me?Some brushes with 5000 pixels do not run in all versions, so you should switch to the smaller variant.
Why should I paint clouds on a new layer?On a separate layer, you can show and hide the clouds at any time later without changing your original image.
How do I rotate a brush, for example a bird?Open the brush settings and set the angle there, then the brush will rotate accordingly when painting.
How can I undo a brush stroke?Use the keyboard shortcut Ctrl+Z on Windows or Cmd+Z on Mac.
