
Fluffy paws, a bushy tail, and a soft ground shadow turn simple shapes into a lively cat. In this tutorial, the instructor shows you how to work out exactly these details using ellipses, gradients, brushes, and effects. You will work with layers, clipping masks, and transparency, which are techniques you can also apply to other animal motifs.
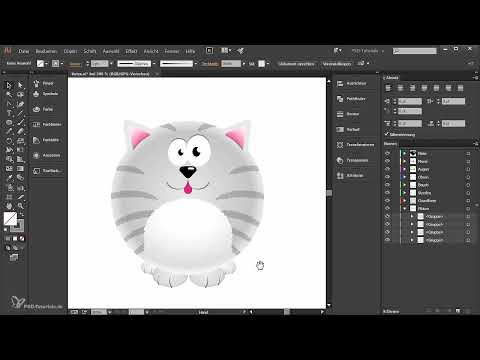
The video is only loaded from YouTube when you play it – data (including your IP address) is then transmitted to YouTube/Google. More in the privacy policy
Key Takeaways
- You work with layers that you name immediately. This way you keep an overview of a complex cat.
- A circular grayscale gradient in an ellipse creates the volume of the paws.
- The "Roughen" effect makes shapes organic and fluffy without you having to draw by hand.
- With Ctrl+C and Ctrl+B you paste copies exactly behind the original. This is the basis for staggered paws and tail colors.
- An image brush created from a shape makes the tail look three-dimensional.
- With a clipping mask, you place stripes precisely within a shape without painting over the edge.
- A shadow is created from several staggered ellipses that you connect with "Blend Objects" and then weaken.
Step 1: Create a layer for the paws
Start by creating a new layer at the very bottom of the Layers panel. Name it "Paws" right away so you don't have to search through chaos later. This organization pays off with every other part of the cat.

Step 2: Draw the basic shape with the Ellipse tool
Select the Ellipse tool and drag out an ellipse that has roughly the shape of a paw. While dragging, hold down the spacebar if you still want to move the ellipse. After that, you can continue dragging. The ellipse initially gets a white fill, which you will replace in the next step.
Step 3: Create a circular grayscale gradient
Open the Gradient panel and select the gradient type "Radial". Set the color stops at three positions: on the left at 11%, in the middle at 22%, and on the right at 38%. The values are in the grayscale range and create a smooth transition from light to dark. This already makes the paw look slightly three-dimensional.

Step 4: Adjust the gradient to the shape
At this stage, the gradient does not yet fit the ellipse. Activate the Gradient tool and compress the gradient so that it fits the shape of the paw. Enlarge it if necessary and move it so that the light source looks convincing. Feel free to take your time with this step, because the fine-tuning determines the impression of volume.

Step 5: Suggest toes with the Pen
To give the paw toes, switch back to the "Paws" layer and draw lines into the image with the Pen tool. Use a medium gray as the fill color. Draw two strokes and press down a bit harder so that they protrude slightly beyond the shape at the edges. This irregularity gives the motif the desired comic character.

Step 6: Refine strokes with the brush
Now select a brush that you have already used and redraw the strokes with it. Variable pressure results in thicker and thinner areas. If you don't like the shape, you can rework the strokes at any time with the Selection tool and adjust the size.

Step 7: Create a fluffy texture with the "Roughen" effect
Select the paw and, via the "Appearance" panel, open the "Roughen" effect in the "Distort & Transform" menu. Activate the preview and set the size to about 1%. Drag the detail slider up until the edges gain fluffiness. Confirm with "OK". Now you have finished the first fluffy paw.

Step 8: Duplicate the paw as a group
So that you don't have to build each paw individually, select all parts of the paw and group them together with Ctrl+G. With Ctrl+C and Ctrl+B, you paste a copy directly behind the original. With the arrow keys, you move it in small steps. If you also hold down the Shift key, the selection jumps in large steps.

Step 9: Shrink and darken the hind paws
The hind paws should stand further in the background and therefore appear smaller. Scale the copy accordingly and place it appropriately under the cat. Afterwards, it is made lighter so that it visually recedes into the background. To do this, open the dialog box for editing colors in the "Edit" menu, activate the option for linking the colors, and adjust the brightness. Make sure that the paw becomes only slightly lighter so that the contrast stays harmonious.
Step 10: Mirror the paws to the left side
So that the cat has paws on both sides, copy the right paws with Ctrl+C and paste them directly in front with Ctrl+F. Then move the copies to the left. Via "Object", "Transform" and "Reflect", you flip them horizontally. Then place them as suits the posture of the body. With that, the cat's paws are finished.

Step 11: Create a layer for the tail
Create a new layer below the paws and name it "Tail". Draw a rectangle on it in a relatively light gray. This shape forms the basic framework of the tail. The exact shape only emerges through editing the anchor points.

Step 12: Edit the shape of the tail with anchor points
Select the Direct Selection tool and click on an upper anchor point. Hold down the Shift key and move it upward. You proceed in the same way with the lower handle, only downward. Then round off the corners at the anchor points, both on the right and on the left. Finally, you squash the shape until it looks like a bushy tail.
Step 13: Build the tail from copies
With Ctrl+C and Ctrl+B, create a copy behind the original. Enlarge it by holding down the Shift key and the Alt key while dragging. Move the copy slightly to the right with the arrow keys and fill it with a somewhat darker shade of gray. Repeat this process, but this time use a lighter shade of gray. In the end, you have several staggered areas that make the tail look three-dimensional.

Step 14: Connect areas with "Blend Objects"
Select all tail shapes and choose "Object", "Blend" and "Make". The color transitions between the shapes thereby become smooth. Then select everything once more and choose "Object" and "Expand". This gives you a separate shape for each individual color step, which you can continue working with.

Step 15: Create an art brush for the tail
Select the group and open the Brushes panel. Via "New Brush", create an art brush and name it, for example, "Tail". Set the pressure to 30% to 100% and choose hue shift as the method. Confirm with "OK". Afterwards, you can delete the original brush template, since the new brush is already available in the Brush tool.

Step 16: Draw the tail with the brush
Select the Brush tool and activate your new tail brush. Draw the tail with an arc-shaped stroke. If you press harder, the line becomes thicker. If individual areas are too narrow or too wide, you can correct them with another stroke. With a double-click on the brush, you open the options and can adjust the size if needed.

Step 17: Finish the tail shape with Roughen
So far, the tail consists of a simple line. Switch to Outline view to check this. Then, with the selection active, choose the command "Object", "Expand Appearance". Select the outermost shape and apply the "Roughen" effect again with 1% and increased detail. Confirm with "OK". The tail now looks fluffy and matches the paws.

Step 18: Insert Stripes as a Clipping Mask
Create a new layer above the tail layer and name it "Tail Stripes". Copy the outermost shape of the tail onto this layer while holding down the Alt key, and make the copy visible. Then select the "Tail Stripes" layer and click "Create Clipping Mask". This way, stripes will later only be visible within the tail.

Step 19: Paint Stripes with a Black Brush
Select the Brush tool and activate the stripe brush. Set black as the foreground and fill color. Paint the stripes so that they follow the curve of the tail. If a stroke goes wrong, you can undo it or remove it with the eraser. The clipping mask ensures that nothing extends beyond the tail.

Step 20: Adjust Stripes with Transparency and "Multiply" Mode
Select all black stripes and open the Transparency palette. Set the opacity to 20% and choose "Multiply" as the blending mode. This makes the stripes look subtle and lets the gray shading of the tail show through. The tail is now finished.

Step 21: Create a Layer for the Shadow
The shadow completes the illustration. To do this, create a new layer at the very bottom and name it "Shadow". This way it sits behind all other elements and doesn't cover anything.

Step 22: Create Ellipses for the Shadow
Select the Ellipse tool and draw a black ellipse beneath the cat. Position it in the right place while holding down the space bar. Then create a copy with Ctrl+C and Ctrl+B, enlarge it slightly and move it a little downward. This copy gets a slightly darker gray. Repeat this process with another, even larger copy in a lighter gray. Fill the last copy with white.
Step 23: Blend and Soften the Shadow Shapes
Select all shadow shapes and choose "Object", "Blend" and "Make". This creates a soft transition. The shadow then still looks a bit too strong, so you reduce the opacity to 50% in the Transparency palette. Move it slightly if needed until it sits harmoniously beneath the cat.

Step 24: Final Check of the Cat's Position
Look at the overall picture and consider whether the cat should be placed a little higher. If the hind paws are not touching the ground, she looks more lively. Move all elements together until you like the balance.

Summary ??? Designing a Cat in Illustrator: Paws, Tail and Shadow
With layers, gradients, brushes and effects, you build a cat with character. The paws are created from ellipses with a grayscale gradient and the Roughen effect. The tail grows from staggered shapes and a custom image brush. You apply stripes cleanly via a clipping mask, and the shadow is inserted harmoniously using blended ellipses and transparency. Once you have internalized these steps, you can also create other animals using the same techniques.
FAQ
How do I create a radial gradient for a paw?In the Gradient panel, choose the Radial type, set three color stops at 11%, 22% and 38% in the grayscale range, and then adjust the gradient to the shape with the Gradient tool.
What does the Roughen effect do?It randomly distorts the edges of a shape and thus makes it fluffy, without you having to edit each edge by hand.
How do I copy a shape directly behind the original?Press Ctrl+C and then Ctrl+B, and the copy sits exactly behind the original so you can edit it specifically.
Why do I use a clipping mask for the tail stripes?The mask restricts the stripes to the shape of the tail so that nothing extends beyond the edge.
How do I reduce the intensity of the shadow?Select the shadow, open the Transparency palette and set the opacity to about 50%.


