
Imagine you draw an angular off-road vehicle made up of nothing but individual surfaces in just a few minutes. You can do exactly that with Adobe Illustrator if you set up the basic shapes cleanly and then assemble them with the Pathfinder. This tutorial guides you through the first part of the project: from the new document and the template to the first finished body surfaces.
The video is only loaded from YouTube when you play it – data (including your IP address) is then transmitted to YouTube/Google. More in the privacy policy
The time stamps in the screenshot variables refer to the video tutorial in seconds.
Key Takeaways
- Create each component of the pickup on its own layer so that you can edit it individually later.
- Lock the template layer at 60% opacity so that you don't accidentally move anything, while still being able to clearly see the shape underneath.
- Change anchor points with the Direct Selection Tool to round off corners in a targeted way.
- With the Pathfinder, you punch out cutouts such as wheel arches or cleanly divide surfaces into several parts.
- Always pay attention to whether you are currently working with the fill or the stroke, because that is the only way to reliably see changes.
Step-by-Step Guide
Create a new document with the right settings
Open a new document via "File > New" and give it a suitable name, for example "Pickup". As the format, choose A4 in landscape orientation. You can adjust the size of the artboard at any time later. For the color mode, choose RGB if you mainly want to view the graphic on a monitor. If you are planning to print it, CMYK is recommended. In that case, however, first check with the print shop which mode they want.

Name the template layer and place the image
The new document automatically contains a Layer 1. You can find the Layers panel via "Window > Layers". Double-click the name to rename the layer to "Template". Then place your drawing of the pickup on this layer. To shrink or enlarge it, hold down the Shift key while dragging a corner. This way you scale the image proportionally and can position it appropriately in the document.

Make the template transparent and lock it
So that you can use the drawing as a guide, you reduce its opacity. To do this, open the Transparency panel via "Window > Transparency" while the image is selected, and set the opacity to about 60%. Then lock the layer. You can either click the small lock icon in front of the layer or lock the linked file in the Layers panel. This way you won't accidentally move the template while you draw the individual objects on top of it.

Create the first shape with the Pen Tool
Create a new layer, which in this case you deliberately do not name, because you will be creating many small shapes. Select the Pen Tool or press the P key. Each click sets an anchor point, and with each further click a line to the next point is created. If you hold down the Shift key while placing points, the lines snap in 45° steps. This is handy for drawing straight edges. Close the path at the end. The shape still looks angular, which you will correct in the next step.

Clearly distinguish between fill and stroke
Your new shape initially has a white fill and a black stroke. By double-clicking the fill box at the bottom of the toolbar, you change the color of the surface. For the stroke box, you set the stroke to "None" as soon as you no longer need an outline. Pay attention to which box is currently active. If you change a color and see no change in the image, you are often working with the thin stroke instead of the fill. Then color the shape with a red and, if needed, reduce the opacity to about 60 to 80%.

Round off anchor points in a targeted way
Select the Direct Selection Tool, with which you can select individual anchor points. A selected point is displayed filled, while the others remain white. If you move the mouse pointer over an anchor point, a small circle with a curve appears. If you now drag while holding down the mouse button, a rounding is created. Repeat this at the remaining corners and adjust the strength of the rounding until the shape matches the template. Keep in mind: less is often more, because overly strong rounding blurs the contours of the vehicle.

Preparing the wheel cutout with the ellipse
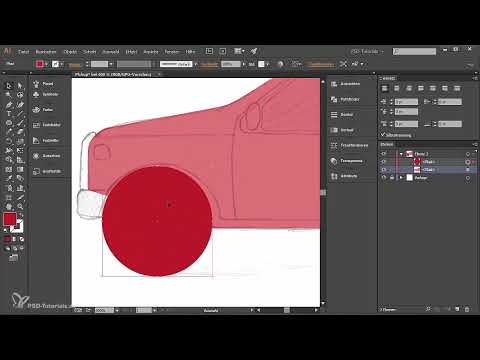
For the wheel arch you need a circle. You will find the Ellipse Tool in the menu of the Rectangle Tool, which you hold down. Hold down the Shift key to draw a perfect circle. Position it so that it roughly follows the curve of the template. You can fine-tune the position with the arrow keys on your keyboard. The best way to check whether the circle is too large or too small is to compare it directly with the drawing underneath.

Selecting both shapes and punching them out with the Pathfinder
Hold down the Shift key while you click both objects, or select them in the Layers panel via the empty area. Then open the Pathfinder via "Window > Pathfinder". The "Minus Front" icon is the crucial command here. The upper object, in this case the circle, is cut out of the lower one. This creates a clean cutout for the wheel without you having to trace the edges by hand.

Separating areas with "Divide"
To split an area into several parts, you draw a line or a rectangle as a cutting shape with the Rectangle Tool. Select both objects and click "Divide" in the Pathfinder. Illustrator then creates a group with several paths. At first glance nothing happens, because the parts adopt the original color. With the Direct Selection Tool you can click, move or delete the individual areas. Simply remove parts you don't need. Afterwards, you give the areas different shades of blue so that you can tell them apart.

Ungrouping groups and organizing layers
You ungroup the resulting group via "Object > Ungroup" or with the keyboard shortcut Ctrl + Shift + G. For a clean structure, you place each element on its own layer. If you simply drag a path into the new layer, it is sorted in there. This way you keep an overview when many components are added later.

Aligning rectangles flush with Smart Guides
For straight areas such as side panels, Smart Guides are a great help. Activate them via "View > Smart Guides". If you then drag a rectangle near an existing object, it snaps to the edge. This creates continuous lines without offset. Reduce the opacity of the rectangle back to about 60% and adjust the color so that you can clearly see the transitions.

Correcting individual corners
When you drag the circle at the anchor point while rounding a rectangle, all corners may change at the same time. This is because all anchor points are selected. With the Direct Selection Tool, first activate only the desired point. If you want to round two corners equally, hold down the Shift key while you click both points. This way the radius stays identical.

Adding further elements with the Pen Tool
For more complex shapes such as the driver's cab, you can use the Pen Tool again. Set the anchor points while holding down the Shift key so that the lines stay straight. If necessary, set the fill to "None" and use a thin stroke of about 0.5 pt so that you can still see the areas underneath. Afterwards, you correct the corners as usual with the Direct Selection Tool and drag the anchor points until the radii look coherent. Make sure that radii that belong together are the same size.

Repeating the wheel cutout for further components
For the remaining wheels, too, you work with a circle that you place over the component. If the circle is on the correct layer above the shape, select both objects and apply "Minus Front" in the Pathfinder again. This procedure works equally for all round cutouts in the pickup.

Reset opacity and check the result
Once all components are in place, you deactivate the template or hide it. Then you select each layer individually and set the opacity back to 100%. Now you can see the pickup in full color. You can choose the colors so that related parts, such as the upper section or the wheels, get the same color. The next part is about filling the individual areas with patterns and gradients.

Summary – Drawing a pickup in Illustrator: Creating shapes with the Pathfinder
In this first part, you laid the foundation for your pickup. You created a suitable document, placed the template, made it transparent, and locked it. Then you created the first shapes with the Pen tool and the Ellipse tool and rounded them off with anchor points. The Pathfinder helped you punch out wheel cutouts and divide shapes cleanly. With one layer per component, your project stays organized and is easy to edit further later on.
FAQ
Why can't I see my color change in the image?You are probably editing the stroke instead of the fill. Check in the toolbar which box is active, and select the fill if necessary.
How do I draw a perfect circle?Select the Ellipse tool and hold down the Shift key while dragging. You can also move the shape while dragging by using the spacebar.
Why do all corners change at the same time when rounding?That means all anchor points are selected. Use the Direct Selection tool to select only the desired point before editing it.
What does the "Minus Front" function do?The top object is punched out of the bottom one. This creates clean cutouts, for example for wheels or windows.
How do I keep my lines straight while drawing?Hold down the Shift key while placing the anchor points. The lines will then snap in 45° steps.
Can I still edit the template after locking it?Yes, you unlock the layer via the lock icon in the Layers panel. As long as it is locked, however, it remains unchanged.


