
A lettering only looks alive when every letter gets its own character. That is exactly what you will learn in this second part. First you lock your background layer so you don't change it by accident, and then you place individual letters as text objects on the background. Afterwards you style each letter with its own gradients, colors, and multiple strokes. At the end you duplicate the letters, offset and rotate them, creating a dynamic greeting card design that you can adjust non-destructively at any time.
The video is only loaded from YouTube when you play it – data (including your IP address) is then transmitted to YouTube/Google. More in the privacy policy
Key Takeaways
The background layer should be locked before designing the text so that you don't accidentally move or change it. Each letter can be edited as its own text object, and fills and strokes are controlled via the Appearance panel. With the Alt key you duplicate objects, and you can change the order of the letters at any time via the Layers panel.
Step 1: Securing the Background Layer
Before you create text, you should protect your background. To do so, open the Layers panel and take a close look at the "Background" layer. To the left of the thumbnail you will find an eye, with which you can show and hide the layer. To the right of it is an empty field, which you click to lock the object. A small lock appears. The object can no longer be clicked or changed, but remains visible.
It is also helpful to take a look at the outline view under "View". There you can see that the background consists merely of a rectangle as a path, to which strokes and gradients will be assigned later.

Step 2: Creating a New Layer for the Text
Once the background is protected, you create a new layer using the icon at the bottom of the Layers panel. It is automatically inserted above the most recently selected layer. Make sure that the text is above the background and not below it, as otherwise it would be invisible.
Step 3: Navigating and Zooming in the Document
For precise work, you should adjust the view. Hold down the Alt key and use the mouse wheel to zoom in or out. Alternatively, select the Zoom tool, click in the image, and hold down the Alt key to zoom out again.

Step 4: Placing the First Letter and Setting the Size
Select the Type tool and click in the document. First write a single letter, for example the "H". Then select it and set the font size. In the video a value of 97 pt is used, but you can choose any size that suits your design.

Step 5: Choosing a Font and Rotating Letters
A simple letter in a default font quickly looks boring. While the letter remains selected, simply change the font. In the video, an arbitrary font serves as an example, so you are free to decide.
Afterwards you can freely move or rotate the letter in the document. If you move the mouse close to the edge of the selection frame, a rotation icon appears. With this icon you rotate the object intuitively.
Step 6: Setting the Fill as a Gradient
Open the Appearance panel while the letter is active. There you will see that the text initially has only a fill, which is filled with black, and no stroke. Click on the fill field and select the gradient instead of a solid color. Choose the "radial" shape. The gradient that you used previously for the background is automatically available to you.

Step 7: Aligning the Gradient with the Gradient Tool
If you don't like the placement of the gradient, take the Gradient tool. With the letter active, you can grab the gradient boundaries directly in the document, enlarge, move, and rotate them. The goal is for the arc of the gradient to run roughly through the center of the letter. This makes the color effect more targeted and harmonious.

Step 8: Adjusting Colors via the Edit Function
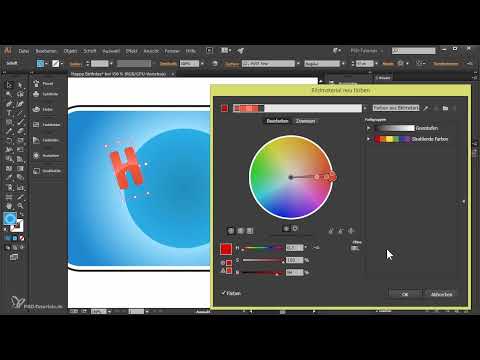
The color dialog is well suited for color design. Click the inconspicuous icon at the top to open the large dialog, and select "Edit". There you can see all available colors as well as the colors used in the current gradient.
The option for harmonious colors is particularly handy. When it is active, all other colors in the gradient shift along with it as soon as you change one color. If you deactivate the option, only the selected color moves, while the others stay in their position. In the example, the letter is colored red. The brightness can be adjusted directly in the preview, so you can assess the result immediately.

Step 9: Adding Multiple Strokes
Now the letter gets strokes. Select the letter and open the Appearance palette again. Since it has no stroke yet, you click the corresponding icon and set a black stroke with a thickness of 3.6 points. Drag the fill all the way to the top in the palette so that it covers the stroke and the stroke is only visible at the edge.
In the next step, you add a new stroke at the bottom. It will be white and 13 points thick. Another stroke follows in black with a thickness of 19 points. This creates a multi-level frame that makes the letter look three-dimensional.

Step 10: Offsetting the Outer Stroke
So that the outermost stroke doesn't look rigid, you offset it. Select the stroke in the Appearance palette and open the "Distort & Transform" section via the FX icon. Select "Transform" there.
In the dialog, you leave the scale at 100 percent, since you don't want to scale. The horizontal offset stays at 0. For the vertical offset, you enter a small value of 0.415 mm. The preview immediately shows you how the stroke is shifted to the bottom left. You can adjust the value individually until you like the effect.

The letter is thus basically finished, but remains editable. You can change it at any time, for example by rewriting the H as an E or entering a whole word. This approach is non-destructive, since all effects are retained.
Step 11: Duplicating and Offsetting Letters
Lettering on a straight line quickly looks stiff. To make the letters look more lively, you duplicate them. With the selection active, hold down the Alt key and drag the object to the right. The mouse pointer indicates that a duplicate is being created. In the Layers palette, you will then see two layers with the same letter.
You can now convert the duplicate into a different letter, for example an "a" for the words "Happy Birthday". The design characteristics are retained. Also rotate the duplicate slightly so that it doesn't stand upright.

Step 12: Giving Each Letter Its Own Color
To make the lettering look varied, each letter gets its own color. For the new duplicate, you choose green, for example. To do this, open the color dialog again via "Edit", activate the harmonious colors, and select a darker shade of green. Afterwards, you can shift the gradient again with the Gradient tool, for example upward and slightly larger.
You proceed in the same way with the next letter. You duplicate it by holding down the Alt key, set it to blue, and adjust the brightness. In the gradient, you bring in additional variation with the Gradient tool. In this way, the complete word is created step by step.


Step 13: Changing the Order of the Letters
Not every letter always has to lie above the previous one. You can change the stacking order at any time. A letter can be moved up or down in the Layers palette, or you select it in the document and bring it forward or send it backward. For example, you can bring the "y" to the front to create an overlap. If the result doesn't fit, you simply undo the step.

In the end, you will have a small greeting card whose letters can all be individually customized. Change text, color, gradient, or outline at any time without starting over.
Summary ??? Designing a Happy Birthday Lettering in Illustrator
You have learned how to lock the background layer, create a new text layer, and style individual letters with font, size, and rotation. You have aligned gradients with the Gradient tool, harmoniously adjusted colors via the dialog, and created multiple outlines with an offset transform effect. You also know how to duplicate letters with the Alt key and change their order. This keeps your lettering editable at all times.
FAQ
How do I lock the background layer?In the Layers panel, click the empty field to the right of the object until a lock appears.
How do I change the size of a letter?Select the letter with the Type tool and enter the desired point size in the Character panel.
How do I rotate a letter?Move the mouse to the edge of the bounding box until the rotation icon appears, then drag in the desired direction.
How do I change the gradient?Use the Gradient tool with the letter active and drag the handles to adjust position, size, and direction.
How do I duplicate a letter?Hold down the Alt key while moving the object with the mouse.
How do I change the order of the letters?Move the layer up or down in the Layers panel or use the arrange functions for the selected object.
How do I avoid accidentally changing the text?Lock the background layer and work with individual text objects that you can edit at any time using the Type tool.

