
Glossy lips only look truly alive when light, shadow and surface texture work together. That is exactly what you build up step by step in this tutorial in Adobe Illustrator. The fourth part of the series is devoted to the final finishing touches: you apply the lip gloss to the three-dimensionally designed lips, refine it with wrinkles and light reflections, and round off the overall picture with a colored background and a soft shadow.
The video is only loaded from YouTube when you play it – data (including your IP address) is then transmitted to YouTube/Google. More in the privacy policy
You should be familiar with the first three parts of the series, as the upper and lower lip and their basic shapes are assumed here. A graphics tablet is helpful, but it also works with a mouse.
Key Takeaways
- Lip gloss is created from white, irregular shapes that reflect the light and give the lip depth.
- With the Pencil tool and its smoothing settings, you control how precise or shaky your strokes look.
- The Pathfinder allows you to punch holes into shapes with the "Minus Front" command, for example for light reflections or small wrinkles.
- A shadow with the exact shape of the mouth is created by offsetting the path, merging it and then blurring it.
- The blend mode "Multiply" provides a natural gradient shadow that darkens the background without distorting the rest.
Step-by-Step Guide
Create a Layer for the Lower Lip
Start by creating a new layer and naming it "Lower Lip". Place the lower lip there, exactly below the upper lip. Make sure both shapes connect cleanly to each other so that the mouth looks coherent later. The smart guides help you hit the position precisely.

Draw a Shadow on the Upper Lip with the Pencil
Now open the layers of the upper and lower lip again and select the Pencil tool on the upper lip layer. Use it to draw a rough, irregular shape in the image that will serve as a small shadow on the upper lip. Close the shape. It is initially transparent, which you will change in the next step.

Set the Color for the Shadow
Double-click the fill to set the color. Enter the value 207 for red, 23 for green and 47 for blue. Then confirm with "OK". If the shadow stands out too strongly in one spot, you can move individual anchor points with the Direct Selection tool and adjust the contour that way.

Blur the Shadow
So that the edges don't look hard, select the shape and open the Appearance panel. There, under FX, choose the blur filter "Gaussian Blur". Activate the preview so you can see the change directly, and set the radius to about six pixels. The edges are now softened and look more natural.

Reduce the Opacity of the Shadow
At full opacity, the shadow is too strong. Therefore, open the Transparency panel and reduce the opacity by about 30 percent, i.e. to around 70 percent. Feel free to compare the result several times by briefly showing and hiding the layer. This way you can see whether the shadow blends harmoniously into the lip.

Create and Prepare the Lip Gloss Layer
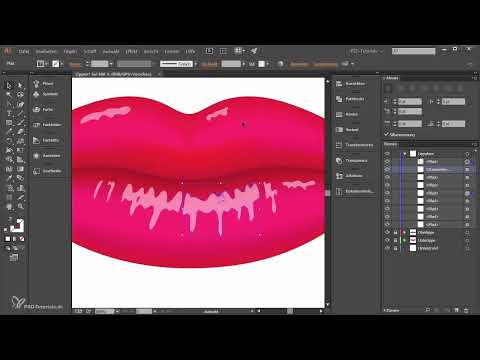
Create a new layer and name it "Lip Gloss". Lock the two lip layers so that you don't accidentally change anything while drawing. Then select the Pencil tool and set the foreground color to white. Now paint the first glossy areas along the lip contour. Keep in mind the light coming from above, and draw the glossy areas mainly on the upper edges.

Refine the Lip Gloss with Grooves and Curves
A lip is never completely smooth. Therefore, let the lip gloss trace the course of the lip contour and fine grooves. Work with short, curvy strokes and close the shapes again and again to fill them with white. Afterwards, make the lip gloss shapes a bit narrower and reduce the transparency to 50 percent via the Transparency panel. If you rotate the glossy area slightly, it follows the shape of the lips more closely.

Setting the Pencil Smoothing Correctly
Double-clicking the Pencil tool opens the settings. There you determine how strongly the pencil smooths your movements. With low smoothing, you get lively, slightly shaky lines that look natural. High smoothing, on the other hand, irons the curves flat. For the highlights on the lip, the second setting is usually suitable. If your result is too erratic, undo the last step with "Undo" and draw again.

Additional Fine Lines for More Depth
To make the lip look more alive, you add further dots and lines that support the wrinkled effect. The shapes don't have to be connected, because irregular individual elements in particular look believable. Make sure you don't create these lines too large or too uniform, otherwise the result looks artificial. Work more carefully here and zoom in closer to the image. Set the strokes to white and also reduce them to about 50 percent opacity.

Punching Out Gaps with the Pathfinder
Some gloss areas look better when they have small gaps. To do this, draw an additional shape above the topmost path that you want to punch out. Select this shape together with the object beneath it, holding down the Shift key, and choose "Minus Front" in the Pathfinder. This creates a hole in the lip gloss that loosens up the shine. You can repeat the same technique on the other side of the lip.

Fine-Tuning All Lip Gloss Objects Together
Select all lip gloss objects together by holding down the Shift key and clicking the shapes. Then reduce the transparency to about 50 percent so that the shine doesn't look too intrusive. With this technique, you can gradually refine the lip and add details. Always keep an eye on the transparency, because overly strong gloss areas quickly look unnatural.

Creating a Colored Background
Unlock the background and draw a rectangle with the Rectangle tool. The smart guides help you align exactly at the top so that the background is completely filled. Then choose a shade of red with the values 164 for red, 0 for green, and 22 for blue. With that, you have the foundation for the final look.

Creating a Shadow Layer with the Exact Mouth Shape
Create a new layer "Shadow" and briefly lock the background. Select the complete mouth shape, go to "Object", then to "Path", and choose "Offset Path". Activate the preview and set the offset to 0 millimeters. Although the path doesn't change in the process, a new shape is created. Confirm with "OK" and then combine the new paths in the Pathfinder. Drag the resulting object onto the shadow layer and remove superfluous anchor points with the Delete key.

Coloring and Blurring the Shadow
Fill the mouth shape with the color 67 for red, 32 for green, and 30 for blue. This results in a rather dark shade. Then apply the Gaussian Blur again via the Appearance palette until you see a light, soft edge. Then reduce the opacity in the Transparency palette until the shadow looks strong but not too dominant.

Darkening the Background with a Circular Gradient
Create a large ellipse on the background. Fill it with a circular gradient that runs from black to white. Quickly check that the color is really black, as this is crucial for the effect. To make the gradient elliptical, select the Gradient tool and drag the gradient downward. This makes it narrower and looks like a natural falloff of shadow. You can also drag it wider and adjust it until it looks coherent.

Incorporating the Gradient via Blend Mode
In the Transparency panel, switch the mode from "Normal" to "Multiply". This mode makes everything white transparent and leaves darker areas visible. The effect is very strong at first, so reduce the opacity to about 30 percent. Compare the result with and without the shadow until you like the gradation.

Finishing and Fine-Tuning
Take another calm look at your complete work. The lips with upper lip shadow, lip gloss, highlights, and the mouth shadow on the colored background should now look three-dimensional. If something seems too strong, simply reduce the transparency of the relevant layer. The tutorial ends here, and you can now export your work as a file or develop it further.

Summary ??? Creating Lip Gloss in Illustrator: Glossy Lips Step by Step
In the last part of the series, you learned how to design lip gloss with white pencil shapes, highlights, and little wrinkles. You kept the lip gloss subtle with transparencies and used the Pathfinder to punch out holes that loosen up the shine. Then you created a colored background and generated depth with a shadow object in the exact shape of the mouth as well as a gradient shadow in Multiply mode. If you combine these techniques, a lip motif with a plastic look emerges, which can easily be adapted to your own colors and shapes.
FAQ
Do I have to use a graphics tablet?No, you can also carry out all the steps with the mouse. However, a graphics tablet makes it easier to freely draw shine lines and little wrinkles.
Why does the shadow still have an effect with an offset of 0 millimeters?The "Offset Path" command with 0 millimeters does not change the shape, but it creates a new, independent copy of the path. You can then process it further, for example unite or color it.
How can I tell if my pencil lines are too shaky?Double-click the Pencil tool and adjust the smoothing. Low smoothing produces lively, slightly uneven lines, while high smoothing makes the curves even.
What does the "Multiply" blend mode do?It hides everything white and makes darker colors visible. This makes it well suited for shadows that blend naturally into the background.
Can I also design the lip gloss in a different color?Yes, the lip gloss is white in the tutorial because shine reflects light. However, you can adjust it with a light color or a slight tint if you want a different style.


