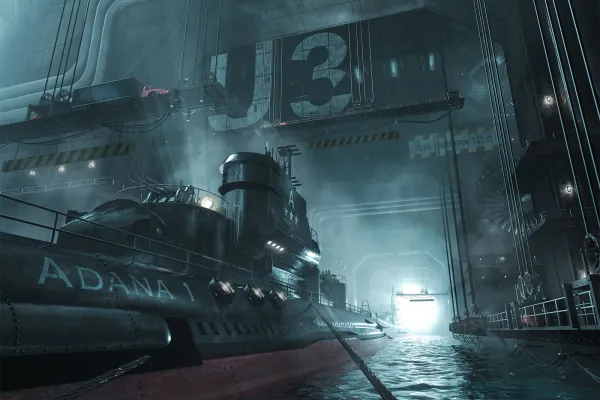
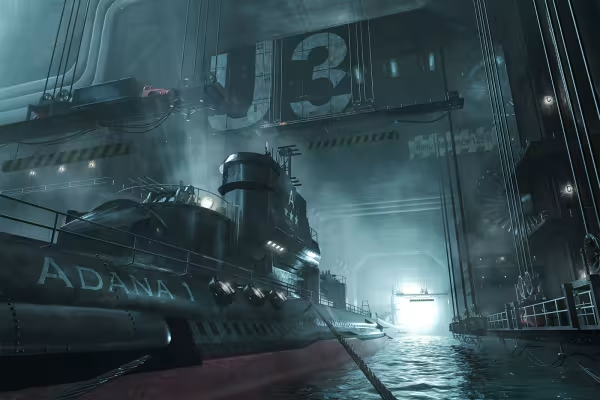
After this training, the lights will come on in your scenes! Grab the course, open Cinema 4D and light up your projects (even) better.
Here you can get an overview of the training. What is it about? Light and lighting, of course. After a few basics about the use and handling of different light sources, we start with lighting the main scene. Rendering also plays a role, the transfer to Photoshop and, of course, post-production, which involves amplifying existing lights and adjusting color and contrasts.
Cinema 4D recognizes a number of different light source types and shapes. The most important are all-round light sources such as the point light or the (target) spot and the area light source, which is required for soft gradients in the illumination. In addition, luminous materials can be used to create a light source from any conceivable object.
Light colors control perception when viewing images. While warm colors are reminiscent of candles and light bulbs and are therefore interpreted as "close to the viewer", cool light colors indicate a greater distance. The fact that blue is interpreted as "further away" also has to do with the aerial perspective: The further away an object in the landscape is, the paler and bluer it appears to the viewer.
The direction from which the main light shines is also very important for the perception of a scene. In this film, we compare incident light, side light and backlighting. Only light that comes from the side or is set up as backlighting creates tension and enough shadow to model a scene and make it appear three-dimensional.
Light sources that create a shadow can shine through polygon objects under certain circumstances. This can be prevented by assigning a wall thickness to the objects, i.e. not leaving them at a polygon thickness. But even then, the distance of the light source plays a role, as you can see in this video.
The main scene is presented in this movie. In contrast to an animation scene, this one is only modeled in the visible areas. This requires a fixed camera, but makes it easier to decide at which point in the scene which level of detail needs to be achieved. You will also find two shortcuts that allow you to navigate through the scene quite quickly.
Since version R17, Cinema 4D has a direct import of SketchUp models. These can be obtained from https://3dwarehouse.sketchup.com. You will learn about the advantages and disadvantages of the models, what they are good for and where they are less suitable.
If you often need water surfaces but don't necessarily want to manage RealFlow's range of functions, you might find the "Infinite Ocean" plug-in useful. It is practically self-explanatory and is often sufficient for simple animations of water surfaces.
Although the wall lights are only a tiny detail in the structure of the submarine bunker, they provide important lighting accents and thus help to structure the motif. The light source can be conveniently moved into place using the "Apply" command and adjusted there so that it only illuminates the immediate surroundings.
Before instantiation, the wall light must be made more visible. The easiest way to do this is by assigning a decrease and visibility. The lamp is then duplicated and the instances are distributed in the scene using the move tool and holding down the Ctrl key. Caution: Render instances do not support the embedded light sources.
Lighting is always closely linked to rendering. In order to be able to assess the effect of the light sources, the scene must be rendered again and again. So we create two render presets that can be activated with a single click: One preset works without effects but quickly, the other renders with GI and AO, which takes longer but gives a more realistic impression of the scene.
The main light is used as a backlight source. This allows it to model the scene with highlights and shadows. A target light source takes on this task. It is positioned so that it can shine through a filigree polygon structure to produce effective beams of light.
After placing the light source, we adjust it more precisely. Brightness, fall-off and various visibility options such as the outer distance and noise are variables that can be used to adjust the effect of the main light precisely to the needs of the scene.
Light does not always only illuminate objects, but, as in this case, only the atmosphere. It thus creates a separation between the foreground and background, i.e. between the boat and the bunker, and seemingly expands the space to the rear considerably.
The more light sources there are in a scene, the brighter it tends to become. However, to prevent this effect from completely illuminating everything, we reduce the beam angle of the light source. We also control the visibility via an inner and outer reduction and assign a noise to it.
So far, the light sources appear more or less indirect, one marks the background, another creates a separation from the foreground. What is missing is an area light source that models the boat and its superstructure from the left with light and reflections. So that the rest of the scene is not unnecessarily brightened, we limit the light source to the boat and exclude everything else.
A small detail often makes a big difference. That's why in this movie you will learn how to assign a gradient to a light source. This does not change anything significant about the light itself, but ensures that a slight color gradient is created in the highlights. This makes the reflection look less clean, which makes the scene appear more realistic.
The bunker must appear gigantic, so details located in the upper area of the bunker hall should be illuminated. We use two point light sources. The left one illuminates the upper left corner, the second one the right corner. However, as it is placed behind the first arch, it creates an immense depth of space.
We illuminate the truck with a polygon sphere to which luminous material is assigned. This means that there is no need to set a drop or a shadow, as both are created automatically during rendering. Only one thing is important: luminous material only works when "Global Illumination" is activated.
The render settings should be created in such a way that further processing in Photoshop is optimally prepared. So we create an object channel for the boat, and the diffuse channel, highlights and shadows should be output separately for each light source, whose three channels will appear in a separate group in Photoshop. This means that working with the post-production remains flexible.
You can specify a save path before rendering or afterwards. Two things are very important when saving: Firstly, you should click on "Layers" in the save dialog and select a color depth of 16-bit. Secondly, you should only exit Cinema 4D once you have checked in Photoshop that all layers, groups and channels are present. If something is missing, you can simply save again, but if Cinema 4D had already been closed, the unsaved rendering would also be lost.
Not all light sources that you have created are visible in all layers of their group. You should therefore click through all the layers, possibly change the fill method of individual layers and delete unimportant layers. You can find out how this data cleaning works in this movie.
There are some highlights and reflections that have become too bright. If you click through the individual layers, you will quickly find out in which layers you need to create a layer mask and attenuate the corresponding highlight with a black brush. Reducing the opacity of an entire layer is also an option, as is duplicating a highlight or reflection layer to enhance its effect.
The boat model is formally interesting, but not modeled in great detail. It also lacks beveled edges, which therefore could not catch any highlights. So we paint shiny edges onto the boat with a brush using shift-click. This looks more organic if you work on the ends of the edges with your wiping finger. Existing reflections are enhanced with a soft tool tip, which gives the metal in particular a more realistic appearance.
A little more separation between the boat and the background would be good. As we have saved the boat as an alpha channel using a render tag, you can simply load this as a selection and make a layer mask from it. This hides the boat completely, while you can paint the atmosphere around the boat as brightly as you like.
Unfortunately, there are slight tonal breaks in the shadows, which has to do with Photoshop's interpretation of the colors. However, if you reduce all the layers to one, the tonal aberrations disappear. Then, if desired, the colour space is converted from Maxon's "Linear Color Space" to Adobe RGB, after which the subject is optimized in terms of color, colour saturation and clarity using the Camera Raw filter.
Comment now „Light & Lighting in Cinema 4D - the practical course“