
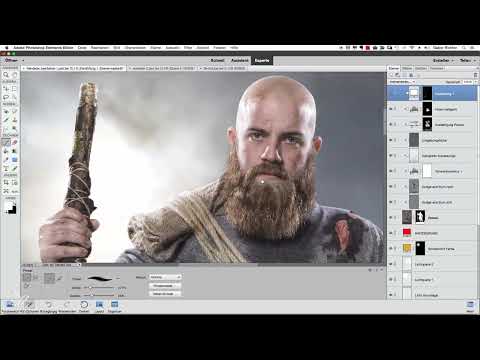
Do you know this? When taking photos, you keep an eye on the light, but in the end the desired rim light is missing on the shoulder or at the edge of the hair. Afterwards, you often wish there were a bit more contour in the image. There is a simple solution for exactly that: you simply paint the light edges in afterwards in Photoshop Elements.
The video is only loaded from YouTube when you play it – data (including your IP address) is then transmitted to YouTube/Google. More in the privacy policy
The method requires only a few steps, but demands a certain feel for opacity and brush hardness. There is one prerequisite you should meet: your subject should be available as a cutout, meaning separated from its background. Only then can the light be limited specifically to the person.
Key Takeaways
The light is created on an adjustment layer of the Solid Color type, which you set up in white and apply as a clipping mask to your subject. Then you invert the mask so that everything is hidden at first. With a soft brush at low opacity, you paint the light piece by piece onto the contours. The color can be changed at any time later by double-clicking. A graphics tablet makes the work significantly easier, and you should start subtly, because too much light quickly looks artificial.
Step-by-Step Guide
Step 1: Create a Solid Color Fill as an Adjustment Layer
First, switch to the top layer of your document. Then create a new adjustment layer via the menu and select the Solid Color type. Choose white as the color, because you are painting with light, and in this layer light is simply white.

Step 2: Apply the Solid Color Fill as a Clipping Mask to the Person
Position the solid color fill as a clipping mask on the layer of your person. This way, the white field affects only the subject and not the background. Then change the blend mode to Overlay. Strong light edges already appear on the contours, which often look quite dramatic.


Step 3: Evaluate the Effect and Invert the Mask
The result in this form is usually too strong, because the light shouldn't lie evenly across the whole person. That is exactly why you invert the layer mask. On Windows, press Ctrl+I; on a Mac, Cmd+I. Afterwards, the light has completely disappeared, and you can paint it back in selectively.

Step 4: Set the Brush and Basic Settings
Zoom in close to the subject so that you can work precisely. Choose a brush and initially set the opacity to about 15 percent. This lets you assess the effect calmly. Reduce the size for fine contours; in this tutorial, about 27 pixels was suitable. The hardness is around 40 percent. The brush shouldn't be too hard, so that no unsightly edges appear, but also not too soft, so that the light gets a clear contour.


Step 5: Paint Rim Light on the Head and Arms
Now paint with a white foreground color on the mask along the edges, for example on the head and arms. Each stroke reveals the light at the respective spot. Use a few even strokes rather than lingering for a long time in one place, otherwise the light quickly becomes too strong. To check the difference, briefly hide the layer and show it again.

Step 6: Add More Lights with Adjusted Opacity
For additional rim lights, an opacity of about 25 percent is often suitable. However, every material reacts differently to light, so you should check each spot individually. On the thumb, the ears, or the skin, you can set nice accents with small highlights. If you find the effect too strong in individual areas, it is often enough to lower the opacity and apply the brush only lightly.

Step 7: Refining harsh transitions on the cutout
If the cutout fits too sharply in some places, the light edges show it immediately. In that case, you use the brush on the mask to soften the affected transitions. This way the light blends better into the surroundings and doesn't look pasted on.

Step 8: Working more precisely with a graphics tablet
For fine contours, I strongly recommend a graphics tablet. With a mouse, it is hard to control pressure and therefore stroke thickness, and the result is often less precise. This is mostly a matter of practice. Which device you buy is up to you, but for detailed work like this, the purchase is worthwhile.

Step 9: Changing the light color afterwards
A major advantage of this method is its flexibility. If the light should not be white but, for example, blue, yellow, or warm like sunlight, you simply double-click the color fill and choose a new color. The change takes effect immediately on all painted rim lights. This is especially practical for subjects with disco or stage lighting.

Step 10: Alternative with a separate layer
If you would rather do without the color fill, you can also paint with a white brush on an empty layer. This works just as well. However, you lose the convenient option of changing the color with a double-click.

Step 11: Changing the shape of the background and ground
Sometimes contours in the background look too straight or too uniform. In that case, you can use a textured brush on the person's layer mask to selectively remove areas that are distracting. For this, choose a brush with a slightly uneven texture, an opacity of 100 percent, and the color black. Increase the size until you can work quickly. With several strokes, the ground becomes less straight, and the mountain contour gets a more natural progression.

Step 12: Adding highlights to the tree trunk and the ground
Lights can also be added to the tree trunk. An opacity of about 20 percent and a hardness of around 70 percent are suitable for this. With white as the foreground color, paint a few highlights onto the mask so that the trunk looks as if it received the same light as the person. On the ground, a subtle effect is usually enough, for example with 34 percent opacity. This makes the subject stand out from the background.


Step 13: Naming the layer meaningfully
Finally, give the layer a meaningful name. If you want to change the color later or readjust the mask, you can find it again without searching.

Summary ??? Painting rim lights in Photoshop Elements
With a white color fill as a clipping mask, an inverted layer mask, and a soft brush, you can paint rim lights into your subject after the fact in Photoshop Elements. You begin with low opacity, work your way step by step toward the contours, and adapt light, color, and shape to each spot. The ability to change the light color at any time in particular makes this technique flexible and practical for everyday use.
FAQ
Can I also paint rim lights without a cutout?It is possible, but the light then quickly looks uncontrolled because it also falls on the background. A clean cutout makes the work much easier.
Which opacity should I choose at the beginning?Start with about 15 percent so you can assess the effect calmly. For further accents, around 25 percent is often enough.
Why do I invert the mask?After inverting, the light is initially invisible. You then paint it in precisely where you really want it, instead of laboriously removing it.
Can I still change the color of the rim light later?Yes, if you use the color fill as an adjustment layer, a double-click on the layer is enough, and you choose a new color.
Do I absolutely need a graphics tablet?No, it also works with a mouse. However, a graphics tablet makes fine contours and controlling stroke thickness considerably easier.
How do I avoid the light looking unnatural?Paint with restraint, use a soft brush edge, and check the result regularly by showing and hiding the layer. Less is usually more here.


