
If you want to combine two objects in ZBrush so that a clean mask is created exactly at their intersection, you quickly run into limits with lasso tools. The Intersection Masker is a ZPlugin that automates this task. It detects where two meshes touch and creates a mask there. In this tutorial, I guide you step by step through the process, show you the typical error messages and how to fix them, and demonstrate an application example with Polypainting.
The video is only loaded from YouTube when you play it – data (including your IP address) is then transmitted to YouTube/Google. More in the privacy policy
Key Takeaways
- The Intersection Masker requires two Subtools that are connected to each other and touching.
- The geometry must be watertight. Open holes lead to an error message.
- The subdivision levels must be removed on all Subtools before you start the plugin.
- The quality of the mask depends directly on the polygon count. For clean results, you often need several million polygons per Subtool.
- With Split to Parts, you separate the result back into individual Subtools, so you can check the masking in Solo mode.
- The mask is excellent for Polypainting, such as lettering on objects, without needing an external renderer.
Step-by-Step Guide
1. Creating the Starting Geometry
Start with a sphere that you load via the Tool menu. Make sure it is editable, and then convert it into a PolyMesh. Only then can the geometry be properly edited further in ZBrush. This sphere serves as the first object, with which you will later create the mask.

2. Understanding the Typical Error of Non-Watertight Geometry
Before you continue, the tutorial deliberately shows you an error. A clean sphere is watertight, meaning it could theoretically be filled with water without anything leaking out. To change that, you switch to the ZModeler, which you find in the Brush palette. With the spacebar, you open the menu and choose the Delete variant. Then you remove a single polygon. The sphere is now no longer watertight, and this is exactly what later leads to the plugin's error message. At the end, go back with Ctrl+Z before you continue.

3. Adding a Second Object and Increasing the Density
For the plugin to calculate an intersection, you need a second object. Add a cylinder, drag it to the side, and enlarge it a bit so that it overlaps the sphere at one point. Then increase the subdivision levels with Ctrl+D until both objects have about two million polygons. That is a lot for a scene like this, but it shows how strongly the polygon count affects the quality of the mask.

4. Connecting the Subtools with Merge Down
For the plugin to detect an intersection surface, the two Subtools must be connected. The easiest way to do this is via Tool, Merge, and Merge Down. Confirm the prompt with Yes. Afterwards, you have one object with around four million polygons that consists of two parts. At the point where the sphere and cylinder touch, an edge is created. Note that the two parts still have different PolyGroups. This is important for the later result.

5. Starting the Plugin and Understanding the Error Message
Now open the Zplugin menu and select the Intersection Masker. You first get an error message, and for two reasons. First, the Subtools still have subdivision levels, which must be removed before starting. Second, the sphere is not watertight because you deleted a polygon earlier. The error message does not always clearly name both problems, so it is worth checking the causes specifically.

6. Closing Gaps and Removing Subdivision Levels
To close the hole, go to Geometry, Modify Topology, and choose Close Holes. ZBrush then places a patch over the opening. This patch is not perfect, but it is sufficient for the masking. Then remove the subdivision levels on both Subtools. Afterwards, you can start the plugin without an error message. Depending on your computer, it takes a moment until the calculation is complete.

7. Separating the result with Split to Parts
After the calculation, you have only one Subtool again, and the masking is hardly recognizable at first glance. To make it visible, go to Tool, Split and select Split to Parts. Confirm the dialog. Now you have two Subtools again, namely the two original objects, each with its respective masking.

8. Checking the masking in Solo mode
Activate Solo mode so that only the selected Subtool is displayed. Now you can clearly see the masking: the sphere carries the mask at the intersection surface, and the cylinder does too. This check is important because it lets you immediately see whether the cut was successful and clean or whether you still need to make improvements.

9. Keeping the limits imposed by the polygon count in mind
The quality of the masking depends heavily on the polygon count. In this demonstration, you had to go up to about two million polygons per Subtool to get a clean cut. This makes the Intersection Masker unsuitable for every task. For exact masking of two intersecting objects, however, it is the right way to go, while other Lasso tools are sufficient for simpler cases.

10. An application example: Polypainting on a stretched object
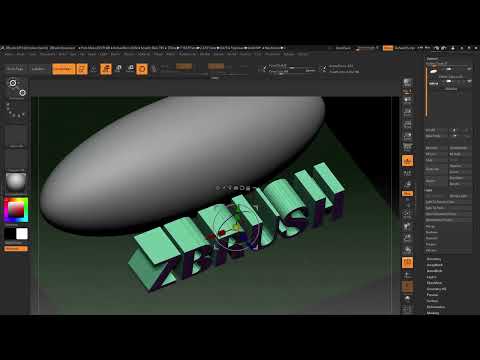
Imagine you want to write lettering on an object without using an external renderer. To do this, you take a sphere and stretch it lengthwise so that an ellipse is created. With the Smooth tool, you remove unsightly areas. Then you increase the resolution to around 4.6 million polygons. That is a lot, but it is the only way to transfer details cleanly.

11. Creating the 3D text as the intersection object
For the lettering, you use the ZPlugin 3D Text. Enter the desired text, for example ZBrush, and confirm the input. If the text doesn't fit right away, you can replace it or recreate it later. Make sure that the geometry of the text is also sufficiently fine so that the cut will be clean later.

12. Aligning the text and preparing the geometry
Place the text on the front of the object. To do this, rotate the tablet by 90 degrees so you can better see the position. Then reduce the size of the text slightly until it fits well on the surface. Also arrange the Subtools so that the object and the lettering overlap. Don't forget to smooth the geometry of the text as well and to combine the PolyGroups with Ctrl+W so that no unnecessary subdivisions arise.

13. Filling the material and preparing the cut
In the next step, the object and the lettering should become golden. To do this, switch to Draw mode, select the object and fill it with the desired material. The lettering does not need to be filled, since only the object is to be cut later. Then go into the details once more so that the intersection surface is really clean.

14. Applying the Intersection Masker to the text and object
Now connect the upper object with Merge Down so that both parts are again present as one Subtool. Then start the Intersection Masker via the Zplugin menu. Once the calculation is complete, you will see that the error message about subdivision levels no longer appears, since you removed them beforehand. With Split to Parts, you separate the result again. Each letter is then present as its own Subtool, which doesn't matter for this purpose, though.

15. Inverting the mask and coloring the lettering
Switch to Solo mode and check the masking. With Ctrl and click, you can invert the mask so that the part in the middle is selected. Then color this area with Polypainting in a clearly visible color, such as red. After that, you remove the mask. Now the object carries the lettering ZBrush in red letters, and the result is based entirely on Polypainting.

16. Checking the result with BPR rendering
Polypainting often looks not quite as clean with a high polygon count, since each polygon was painted individually. Therefore, activate BPR rendering to display the result more realistically. The display will be significantly better as a result. If you work with programs like Keyshot, you can also transfer the color information as a label onto an object with fewer polygons. This saves processing power, and the masking is still preserved.

Summary ??? ZBrush Intersection Masker: Creating complex masks between two meshes
The Intersection Masker is a powerful ZPlugin with which you create precise masks at the contact surfaces of two objects. Watertight geometry, removed subdivision levels, and a sufficient polygon count are crucial. With Split to Parts, you check the result in Solo mode. Afterwards, you can use the mask for polypainting, for example for lettering on simple shapes.
FAQ
Why do I get an error message when starting the Intersection Masker?The error message usually occurs when subdivision levels are still present or the geometry is not watertight. Remove the subdivision levels and close holes with Close Holes.
Why do I have to connect the Subtools with Merge Down?The plugin requires a shared intersection surface between the objects. Merge Down creates a connection at which the plugin can calculate the mask.
Why does the masking look unclean with a low polygon count?The quality of the mask depends directly on the polygon count. With too few polygons, the intersection edge is rendered roughly, which is why you should increase the resolution.
Can I also use the mask without an external renderer?Yes, the mask is suitable for polypainting directly in ZBrush. With BPR rendering, the result can be improved further.


