
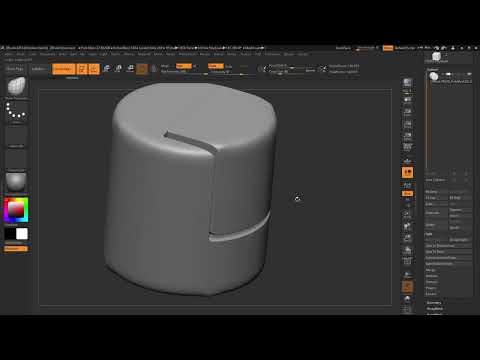
Imagine you need clean panel cuts with rounded edges on a hard-surface model, and the result should still be modifiable later. This is exactly what Live Booleans in ZBrush are designed for. In this video, the instructor shows how you work with Live Booleans using ZBrush 2018 and the 4R8 update. You will learn about two application examples: a cut through a cylinder using a cube, and the combination of Live Booleans and Array Mesh.
The video is only loaded from YouTube when you play it – data (including your IP address) is then transmitted to YouTube/Google. More in the privacy policy
Introduction
Since update 7.2, Live Booleans have been a powerful tool with which you can subtract shapes from one another non-destructively. This means you don't have to permanently calculate the geometry at every intermediate step. The video is aimed at everyone who already has a grasp of the basics in ZBrush, such as Polymeshes, Subtools and Dynamic Subdivision. You will find a step-by-step guide below, and the timestamps help you look things up in the original video.
Key Takeaways
Live Booleans work non-destructively, and you can adjust cuts at any time. With Split to Mask Points, you separate the result into individual Subtools. An Array Mesh can be combined with Live Booleans, so you can create multiple cuts with just a few clicks. Dynamic Subdivision ensures soft edges without permanently altering the base object.
Step-by-Step Guide
Step 1: Prepare the starting object as a Polymesh
Begin with a Polymesh to which you want to apply Live Booleans. In the video, the instructor creates a cylinder using the Gizmo 3D. Compared to a normal cylinder, a poly cylinder has less pronounced poles, which doesn't matter for the later cuts, though. The dashed lines in the viewport are guide lines for the Polyframes. If they bother you, you can hide them without losing the function.

Step 2: Add a cutting tool as a cube
For the cut, you need a second object. Add a cube, which you bring to the desired size with the Gizmo 3D and move to the right position. The cube is then masked and converted into a clean Polymesh with PolyCube. After that, you can shrink it a bit more and move it up or down until it sits exactly where the cut should be made.

Step 3: Separate the cube and cylinder into Subtools
As long as both objects are in the same tool, they cannot be edited separately. Therefore, use the Split to Mask Points function. This turns the cube and the cylinder into two independent Subtools. Then switch back to the cube to continue editing it.

Step 4: Round off the cube with Dynamic Subdivision
So that the cut doesn't produce hard edges later, you round off the cube using Dynamic Subdivision. Activate it under Geometry, set the subdivision level to about four, and increase the Coverage value if needed. This makes the edges softer, and the result looks significantly more high-quality.

Step 5: Turn the cube into a volume
The next step is about giving the cube a volume. To do this, the instructor removes the subdivisions, switches to the CModeler and first deletes a single polygon. This creates an open mesh that can be viewed from both sides with Display Properties. You create the desired wall thickness by selecting all polygons and pulling them outward in the CModeler. After that, you can use the cube as a cutting tool.

Step 6: Apply the Live Boolean
Once the cube exists as a volume, you cut it out of the cylinder using the Live Boolean function. Thanks to the Polyframes, you see the result immediately. The edges at the cut initially still look somewhat angular, but can be smoothed afterwards. For this, you can also edit the cylinder with Dynamic Subdivision and watch out for unsightly edges.

Step 7: Transferring the cut into its own group
If you want to edit the inner area of the cut separately, you need a new Subtool. To do this, allow the Subdivisions and create a separate mesh from it. With Auto Groups, ZBrush recognizes the geometry on its own and divides the model into groups, for example the inner area, the clean cut, and the rest. You can split the groups off as separate Subtools using Group Split. If you would rather keep everything on one Subtool, use the Move Topological Brush instead. With a large brush, you then pull the inner area out and edit it separately, without changing the base object.

Step 8: Creating multiple cuts with Array Mesh
The second part of the video shows how to combine Live Booleans with Array Mesh. Create a cube again, clean it up with PolyCube, and scale it down so that it fits as a cutting tool. Instead of duplicating the cube multiple times, you use the Array Mesh. In the settings, set the number of pieces and choose the Y axis as the direction. With the Offset, you pull the copies apart along the axis. With a negative value, for example minus 200, you arrange the copies in the opposite direction. Once the cuts are aligned, you subtract them from the object as an Array Mesh.

Step 9: Extending and refining the Array Mesh
You can additionally repeat the Array Mesh on a second layer. With Append New, you add a new layer and set another repetition at Z Amount. This creates cuts in the height as well. Afterwards, the edges can be made softer with Dynamic Subdivision. The big advantage of this combination is that you can move, round off, or adjust everything at any time. You simply test how much subdivision the result needs until it looks good. The entire process remains non-destructive.

Summary – Live Booleans in ZBrush: Combining cuts, Subtools, and Array Mesh
Live Booleans open up many possibilities in ZBrush for quickly creating panel cuts and cutouts. You begin with a Polymesh and a cutting tool made from a cube. Then you separate the objects with Split at Mask Points, round them off with Dynamic Subdivision, and create a volume with the CModeler. With Auto Groups, Group Split, or the Move Topological Brush, you work on individual areas. Combining it with Array Mesh saves you a lot of time when you need several evenly spaced cuts. Try out the techniques on your own models, because it is precisely free experimentation that makes working with Live Booleans so flexible.


