
Imagine you need a 3D lettering for a logo or a vector graphic as a spatial object in just a few minutes. That is exactly what the 3D Text and Shape Creator is designed for, a plugin that is available from ZBrush 2018 with update 4R8 and version 5.1. It converts text and vector graphics directly into editable meshes and offers numerous settings along the way. In this guide, I will walk you step by step through the Creator, show you the most important sliders, and explain how to continue working on the results afterwards.
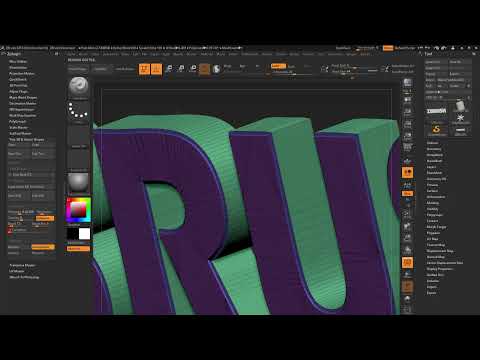
The video is only loaded from YouTube when you play it – data (including your IP address) is then transmitted to YouTube/Google. More in the privacy policy
Key Takeaways
- The Creator is a standalone plugin. You open it via the Plugin palette and either create text or import an SVG vector graphic.
- Extrusion (thickness), resolution, bevel (rounding) and curvature determine the shape and the polygon count. The changes can be adjusted at any time.
- With the "Auto Update" option, changes are applied immediately. If it is turned off, you have to press "Replace".
- Manual deformations made with the Move brush are reset every time you change the parameters. Therefore, plan your order of work carefully.
- After conversion, a Dynamic Subdivision can trigger warnings about unused points. You can fix this problem with "Mesh Integrity Fix".
Step-by-Step Guide
Opening the Creator and creating a text
First, open the plugin via the Plugin palette. You will then see two options: you can either create a text or work with a vector graphic. To get started, choose the text, enter "ZBrush" for example, and confirm the input. A new object appears in the Subtool area, which at first still seems empty. This is normal, because as with any other mesh, you first have to draw the text out, that is, make the object visible on the screen and, if necessary, make it editable.

Adjusting the font and view
With the font slider, you select any installed font. The shape of the letters changes immediately, and you can switch to a different font at any time. The entire Creator is very flexible: you can change settings as often as you like and, if needed, feel your way back step by step.

Setting the extrusion
The extrusion determines the thickness of the text. Drag the corresponding slider up or down until the depth matches your vision. Make sure that Auto Update is activated. If it is turned off, nothing happens at first after a change. In this case, you press the "Replace" button, and the change is applied.


Defining the resolution and the polygon count
With the resolution, you control how many polygons the mesh receives. For better control, display the Polyframes so that you can see the structure. A high resolution such as 10 produces very clean curves, but puts a strain on the computer and generates many polygons. For small elements, a lower value, such as 4, is usually enough. So think in advance about what you want to use the object for. For background elements, you need fewer polygons than for a main motif in the foreground.


Choosing adaptive or uniform meshing
The Creator offers two options for the surface structure. The adaptive option analyzes the mesh and optimizes it to the lowest possible number of polygons. However, this sometimes produces unattractive triangles. The uniform option delivers a more regular distribution, but is not perfectly even. Try both options and decide based on the result which one suits your project better.

Adjusting the letter spacing
The Spacing controls the distance between the letters. For numbers, this is referred to as number spacing. Normally, you leave the value at zero. If you need more space, you increase it. You can also drag the value into the negative, causing the letters to overlap. This is not a problem, because you can return to the original value at any time.

Rounding the edges with the Bevel
With the Bevel, you make the edges softer. In the video, a value of about 0.36 is used, which already creates a noticeable rounding. Note that values that are too strong can cause overlaps at the edges. Therefore, you should apply the Bevel carefully. With the resolution of the Bevel, you set the quality of the rounding, and with the Curvature, you choose between convex and concave edges. The combination of Bevel and Curvature largely determines what the text looks like in the end.


Manually editing the text
The finished text can be edited like any other mesh. In the video, the Move Brush is used to move parts of the object. This is very practical, but it has a catch: If you change the extrusion afterwards, the text jumps back to its original shape, and all manual deformations are lost. Therefore, work out the parameters first and only deform the object once the text is in the desired shape.


Inserting a vector graphic
In addition to text, you can also use your own vector graphics. To do this, you click on "New SVG" and select the desired SVG file. In the video, the file is located in the working folder. A new Subtool then appears. The Creator automatically adopts its settings from your text, that is, resolution, extrusion, and Bevel. This is practical because you don't have to work through all the sliders again. However, you can adjust the values for this object at any time.


Fine-tuning the parameters for the vector shape
With vector graphics, it is worth taking a look at the settings. Often it is enough to reduce the Bevel a bit and deactivate the Curvature if you don't need it. With shapes, the resolution usually has less of an effect than with text, since the Creator essentially only calculates the polygons that are necessary. With text, on the other hand, the difference is clearly visible. So only increase the resolution if you really need it.

In the video, the resolution is increased once more after these adjustments. The instructor reduces the extrusion to about 0.2, and the Bevel ends up at a value of 5. This results in a balanced shape.

Smoothing the object with a Subdivision
If you want the object to be even softer, a Dynamic Subdivision is a good option. With vector graphics, a message about unused points often appears, in the video it is 88. The reason is that certain points are not used during creation in the generator. The solution is simple: Select "Mesh Integrity Fix". After that, the unused points disappear, and you can smooth the surface further with the Smooth Brush.

Note that problem areas can show up when smoothing, especially in places with an unfavorable Bevel. If smoothing doesn't help, change the Bevel or its resolution and try again. With the F key, you frame the object on the screen again.

Deforming the object
The result can also be put into a Deformer. To do this, you first select the Move mode, after which the Gizmo appears. Then you use a bending Deformer (referred to as "Bender" in the video) and deform the object in all desired directions. The result often looks very interesting, but the geometry on the back can look messy. In this case, you have the polygons recalculated until the surface looks clean.


Changing the Extrusion Afterwards
The object remains adjustable even after deformation. If you reduce the extrusion to 0.1, for example, the deformation is reset, but the subdivision is retained. However, this creates new, unused points, which you have to clean up again with the Mesh Integrity Fix.

Planning the Right Workflow
The most important principle of the Creator is: Think about which change you make at which step. First define extrusion, resolution, bevel, and font. Only once the basic shape is right do subdivision, sculpting, and deformation follow. This way you avoid unnecessary rework.

Summary ??? ZBrush: Creating 3D Text and Vector Shapes with the Text and Shape Creator
The 3D Text and Shape Creator in ZBrush 2018 with update 4R8 and version 5.1 is a powerful tool for converting text and vector graphics into editable meshes. You can freely adjust font, extrusion, resolution, spacing, bevel, and curvature, and so react to your result at any time. Keep two things in mind: manual deformations are reset by parameter changes, and after subdivision the Mesh Integrity Fix helps with unused points. So plan your workflow from the basic shape to the fine detail work, and you will achieve a clean result.


