
When you pull out shapes with the Snake Hook in ZBrush, you know the problem: the polygons get stretched, become distorted and can hardly be edited cleanly anymore. The Sculptris Pro mode solves this problem by automatically creating new polygons as you pull. This keeps the mesh even, even with strong deformations.
The video is only loaded from YouTube when you play it – data (including your IP address) is then transmitted to YouTube/Google. More in the privacy policy
In this tutorial, you will learn how to activate the Sculptris Pro mode, set the resolution correctly and which brushes are particularly well suited for it. These include the Snake Hook in three variants, the Cactus brush and the Spiral brush. I will also show you how to clean up the geometry afterwards with the ZRemesher and why you should be careful with extreme values.
Key Takeaways
- The Sculptris Pro mode automatically creates new polygons when pulling with the Snake Hook, thus preventing distorted surfaces.
- With a low resolution of 0.2, you achieve fine, organic details. However, extreme values can inflate the mesh significantly.
- You can detach parts of the object, smooth them and push them back. This is hardly possible with the classic mode.
- After working with a low resolution, you should reset the value to a normal range around 1 so that ZBrush does not become unnecessarily slow.
- With the ZRemesher and an Adaptive Size of 100, you get clean, even geometry for further editing.
- The Sculptris Pro mode is particularly suitable for exotic characters and special shapes. For standard work, the dynamic mode often remains the better choice.
Step-by-Step Guide
1. Prepare the starting object
Start with a simple sphere on the canvas. Drag it out and convert it into a Polymesh. This is the only way you can work with the Sculptris Pro mode. You don't need to do any preparatory work, because the mode creates the required geometry itself while you sculpt.

2. Recognize the problem in the classic mode
Select the Snake Hook and pull on the surface with it in the standard mode. You will quickly notice that the polygons become heavily distorted. The surface gets stretched, and the details can hardly be worked out cleanly anymore. It is exactly this behavior that often makes working with these brushes frustrating. During this test, pay particular attention to the shape of the polygons so that you can immediately recognize the difference in the next step.


3. Activate Sculptris Pro and create polygons automatically
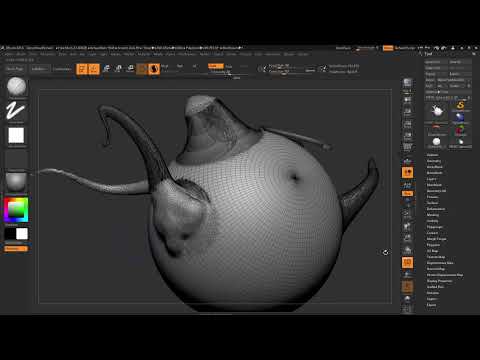
Now activate the Sculptris Pro mode. If you pull with the Snake Hook again now, ZBrush automatically creates additional polygons as you pull. The result looks much more even. To make the new density visible, turn on the Polyframe display. Then you can see how the mesh becomes finer with each stroke. In the end, the density may still be too low in some places, which you will correct in the next steps.


4. Set the resolution and pull clean geometry
The resolution determines how strongly the mesh is subdivided when pulling. To do this, open the settings under Stroke and look for the slider for the size or resolution. Set it to the value 0.2. Then pull on the object again. You will see that the mesh now grows along cleanly and organically, without the surfaces being pulled apart. This low value is the key to fine results.


5. Smooth and detach free-standing parts
Hold down the Shift key to smooth areas. With a larger brush, you can smooth transitions and edges this way. It gets especially exciting when you detach parts from the object. With classic methods, this was difficult in ZBrush for a long time. In the Sculptris Pro mode, you can pull a part out with the Snake Hook, detach it and then push it back again. This creates free-standing objects, such as spikes or flying fragments.


6. Adjust the resolution for finer details
To work out finer structures, you can also choose a slightly higher resolution. The result will be less dense, but you retain more control over the shape. In this step, try out different values and observe how the mesh changes. This way you can quickly find out which value suits your object.


7. Reset the resolution after pulling
This step is often forgotten, but it is very important. If you switch back to a Clay Buildup brush after working with a low resolution, you should set the value back to about 1. Otherwise, the brush adds an excessive amount of geometry at every spot. A value of 0.2 with Clay Buildup can cover almost the entire object with polygons and put a heavy load on your computer. So make sure to use extreme values only deliberately.

8. Rebuild the geometry with ZRemesher
If you want to continue working with the object, the geometry may be irregular after pulling. In that case, open the ZRemesher in the Geometry menu. Set the Adaptive Size to 100. ZBrush then takes the existing polygon density into account and creates an even mesh. The process takes only a few seconds. After that, you can continue refining the model cleanly, without gaps or distortions remaining.

9. Comparing the Snake Hook variants
There are several variants of the Snake Hook that behave differently. Snake Hook 1 follows your pulling direction. With it, you can draw straight lines or control movements precisely. Snake Hook 2, on the other hand, always pulls out along the surface normals. This is ideal for spikes or hairs that stick out perpendicularly from the object. For softer, blob-like shapes, Snake Hook 4 is suitable, which tends to pull a sphere out of the surface. With all variants, make sure to set the resolution to 0.2, and keep an eye on the polygon density.


10. Using the cactus brush and Polypaint
Sculptris Pro mode also allows you to place color directly in the model. To do this, activate Polypaint and choose a color, such as a rich green. With the cactus brush, which works with an alpha, you then pull cactus-like structures out of the sphere. The combination of shape and color is well suited for quickly creating lively plants or fantasy creatures.


11. Spiral brush for hair-like structures
The spiral brush opens up another area of use. To do this, load a demo object in the Lightbox and select the spiral brush using the B key. Increase the resolution of the brush tip so that the spiral is built up cleanly. Then you can draw several lines that look like hair or fibers. The result is not perfect yet, but it shows how versatile the mode is. Afterwards, the ZRemesher with an Adaptive Size of 100 helps again to unify the geometry.


12. Choosing the right mode for your project
In the end, the question arises of when Sculptris Pro mode is worthwhile. It is particularly strong when you create exotic figures, model special shapes, or want to detach parts from the body. For standard work on figures with even topology, Dynamic mode is often more practical. So consider before each project what goal you are pursuing, and then choose the appropriate method.

Summary ??? Sculptris Pro in ZBrush: Using the Snake Hook Without Distorted Polygons
Sculptris Pro mode is a valuable tool for anyone working with the Snake Hook. It prevents distorted polygons by automatically generating new geometry as you pull. The key factors are the right resolution, resetting it after extreme values, and the subsequent cleanup with ZRemesher. With the different Snake Hook variants, the Cactus brush, and the Spiral brush, you can create extraordinary shapes. Try out the techniques on simple objects before applying them to larger projects.
FAQ
What is Sculptris Pro mode used for in ZBrush?It automatically generates new polygons as you pull, so the mesh is not distorted and brushes like the Snake Hook work cleanly.
Which resolution is suitable for fine details?A value of 0.2 delivers very organic and fine results, but should only be used selectively.
Why should I reset the resolution after pulling?With a low value, a Clay Buildup brush adds too much geometry in many places, which bloats the object and slows down the computer. A value around 1 is a good starting point.
How can I unify the geometry after modeling?Use ZRemesher in the Geometry menu and set the Adaptive Size to 100. This creates an even mesh.
How do Snake Hook 1 and Snake Hook 2 differ?Snake Hook 1 follows your pulling direction, while Snake Hook 2 pulls out along the surface normals. This is particularly suitable for spikes or hair.
Can I also apply color with Sculptris Pro?Yes, with Polypaint you can paint color directly onto the model, for example when designing a cactus.
When should I use dynamic mode instead?For standard work with even topology, such as characters with clearly defined shapes, dynamic mode is often more practical.


