
Imagine starting not with an empty sphere, but with a finished head that you reshape into a distinctive creature in just a few minutes. That is exactly what I'll show you in this little mini project: You reshape a head with Vector Displacement Meshes (VDMs), refine details, and finally optimize the topology for a clean mesh.
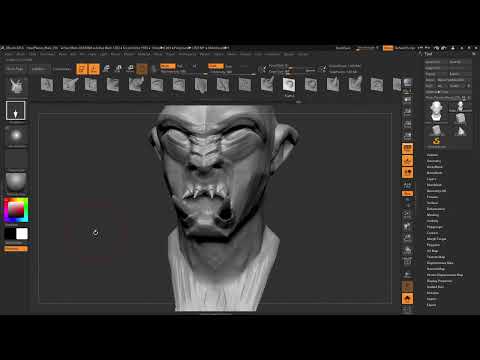
The video is only loaded from YouTube when you play it – data (including your IP address) is then transmitted to YouTube/Google. More in the privacy policy
Introduction
The project is deliberately kept small. The result is not meant to be a finished model, but a head start that you can continue working on. In technical jargon, this is called kitbashing: You take existing elements, modify them, and combine them into a new object. The starting point is a VDM head from the project folder, which you can swap for a sphere at any time. However, the route via the head is faster.
Key Takeaways
- A VDM head from the project folder serves as a quick starting point and saves you the basic setup.
- With the Clay Buildup Brush and the Alt key held down, you smooth overdrawn edges and shapes without remodeling.
- You can deliberately turn symmetry off and on again with the X key when individual elements should be asymmetrical.
- With the Chisel Creature Brush and other tools, you shape the nose, eyes, ears, mouth, and horns.
- ZRemesher creates a low-poly mesh with even topology from the high-resolution model, which is well suited for UVs.
- Using Geometry Divide and projection, you bring the details from the original model back into the clean mesh.
Step 1: Load the Starting Head
In the project folder, open the folder with the head mesh and load it into ZBrush. Here you are not working with a demo project, but with the file from your own project folder, so you can follow the steps at any time.

Step 2: Smooth Overdrawn Shapes
The head looks too strongly deformed in some places. The edges are too sharp and the nose sticks out too far. For this, take the Clay Buildup Brush and hold down the Alt key. This way you have a smoothing effect and reduce the exaggeration without destroying the basic shape. You remove the ears completely in this step, since you will rebuild them later. You will notice that not much of the original head remains. That's fine, because that is exactly what kitbashing is about.


Step 3: Increase the Resolution
Before you work in details, you increase the resolution via the Subdivision Levels. One million points give you enough room for fine modeling. So that the model is not distorted too much when increasing, the basic shape is preserved. At this stage, the resolution is sufficient for the next work steps.

Step 4: Shape the Nose and Control the Symmetry
For the nose, you use the Nose brush and place a new shape with it. A trick is worthwhile here: Briefly deactivate symmetry with the X key. This allows you to design the nose crooked or asymmetrical without the opposite side automatically following. When you are satisfied with the result, you reactivate symmetry with X. A crooked nose is perfectly fine, by the way, since the character shouldn't look like a model.

Step 5: Insert Eyes and Adjust the Expression
For the eyes, you use the variant without an eyeball. You increase the C-Intensity value a bit so that the indentations are clearly defined. Then you look for the right position. A tip: Try out the position several times, because the effect of the face arises to a large extent from the distance of the eyes from each other.
If the facial expression is too sad, you change it with the Move Brush. Pull the middle of the face slightly downward until you like the expression. The character can quickly shift from sad to evil. You decide which direction you want to go.

Step 6: Rebuild the Ears
You put the ears back in after removing them. For this, you use the Chisel Creature Brush again. The existing ear holes serve as a guide, and the new ears fit in quickly. This makes the figure look much more alive right away and reminiscent of well-known fantasy creatures.

Step 7: Add Mouth, Teeth, and Horns
For the mouth, you first look in the library for suitable templates. If none of them fit, you model it yourself with the Clay Buildup Brush. With a few indentations, you get an opening that you fill with teeth. Make sure the teeth don't get too big, otherwise the mouth quickly looks unnatural. You can remove the upper teeth again if necessary if they are not convincing.


Finally, you add horns. At this point, it becomes clear how far you can push the resolution without the distortion becoming unsightly. The result is already very decent for a mini project and provides a good foundation for further work.

Step 8: Create a Low-Poly Version with ZRemesher
The model now has about a million points. For UVs and materials, that is too dense. So you duplicate the Subtool, temporarily hide the original, and apply ZRemesher to the copy. You'll find the command in the Geometry menu. Depending on your computer, the process takes a few seconds to minutes. The result in the example has about 15,000 points and a much more even topology.


Step 9: Create UVs with UV Master
With the UV Master plugin, which you'll find in the Zplugin menu, you create a UV map on the new low-poly mesh. The map is clean and even, which helps later when painting or texturing. The details are not lost in the process, because they are still in the original model.

Step 10: Project Details Back onto the Low-Poly Mesh
Now you bring the details back. Activate Solo mode so you can view the original and the new mesh separately. Subdivide the low-poly mesh several times with Geometry Divide so that enough polygons are available for the projection. Then switch to the Subtool menu and choose Project. The first projection already brings the model to about a quarter of a million points, and the first details are visible.


Repeat the projection at a higher resolution level. In the example, the mesh reaches a million points without the program crashing. So you can increase the resolution step by step and project each time until the desired level of detail is reached.

Step 11: Check the Result
Finally, take a look at the polygon structure. The low-poly mesh stays regular, even when the details are very fine. However, the topology can look uneven, especially in the nose. This can cause problems with materials or with polypainting. If needed, you rework these areas specifically. With a remesher at the end and another projection, you bring the model back into order. This way you can also implement extreme deformations cleanly.


Summary ??? Creating a Figure with VDMs in ZBrush: From Base Body to Clean Mesh
You have seen how to quickly develop an independent figure with a VDM head. You smoothed exaggerated shapes, worked out the nose, eyes, ears, mouth, and horns, and adjusted the expression using Move and Clay brushes. Then you created a low-poly mesh with ZRemesher, set up the UV map with UV Master, and brought the details back through projection. For a clean result, what matters most is control over the topology, especially in areas with strong deformation.
FAQ
Can I use a sphere instead of the VDM head?Yes, that's possible. However, the head saves you part of the basic setup and is therefore ready to use faster.
What do I turn off symmetry for?With symmetry deactivated, you can shape individual elements like the nose asymmetrically without the other side following along.
Why do you use ZRemesher if the model is already detailed?A model with a million points is too dense for UVs and materials. ZRemesher creates a low-poly mesh with even topology onto which you can project the details again.
What does the projection do?The projection transfers the details of the high-resolution original onto the new, clean mesh. This way the fine structures are preserved while the topology stays clear.
Why do you repeat the projection several times?With each resolution level, more details are added. Projecting step by step increases the level of detail without unnecessarily overloading the mesh.
What do I do if the topology around the nose is messy?You can rework this area specifically, refine it with a remesher, and then project again.


