
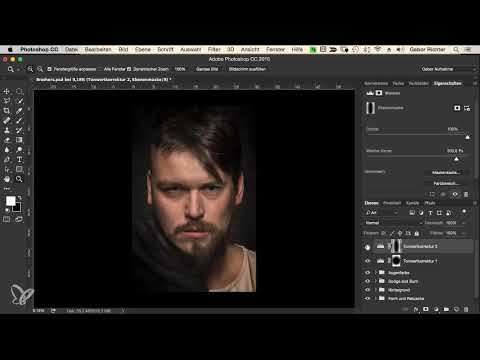
A portrait quickly looks flat when all areas of the image are equally bright and the eye finds no clear starting point. This is exactly where this tutorial comes in. You will learn how to use three simple adjustment layers in Photoshop to distribute brightness in a targeted way, stage the face as a focal point, and give the image a dark, somewhat mysterious mood. The technique does not require elaborate retouching and can be applied to almost any portrait.
The video is only loaded from YouTube when you play it – data (including your IP address) is then transmitted to YouTube/Google. More in the privacy policy
Key Takeaways
- A circular selection around the face forms the basis for a vignette that guides the viewer's gaze.
- The mask must be inverted so that the darkening takes place on the outside and not in the face.
- Soft mask edges are crucial for a natural transition. You set the softness in the mask's properties.
- With a gradient mask, the neck area can be darkened in a targeted way without affecting the rest of the image.
- Grouped and clearly named layers keep things organized even with multiple corrections.
Step-by-Step Guide
Step 1: Drawing the First Selection Around the Face
Select the Elliptical Marquee Tool. Hold down the Shift key while dragging so that the selection becomes an exact circle. Position it roughly over the face. You don't have to hit the exact placement perfectly, since you can still adjust the mask later.

Step 2: Creating the Levels Adjustment Layer
Via the Layer menu, create a new adjustment layer of the Levels type. Then move the black slider to the right. The image area becomes darker as a result. Note that the face initially darkens as well. This is not a mistake in the process, but an indication regarding the mask.

Step 3: Inverting the Mask
The cause of the darkened face is a mask that is the wrong way around. The white area of the selection is in the center, but you want the correction on the outside. Select the layer mask and press Command plus I (Mac) or Ctrl plus I (Windows). The mask flips, the face stays bright and everything around the circle becomes darker. A vignette is created.

Step 4: Softening the Edges of the Mask
The selection still has hard edges that look artificial. Open the mask's properties and increase the value for softness (Feather) there. Feel free to start with a large value, for example around 500 to 600 pixels, to see the effect clearly. The result will then often look too intense, which you will correct in the next step.

Step 5: Fine-Tuning the Softness
Hold down the Alt key and click on the mask to display it in isolation. The black area shows you where the correction takes effect, the white area where it is excluded. Then adjust the softness to a value of around 300 to 400 pixels. Afterwards, compare the result in the normal image mode until the transition looks harmonious.
Step 6: Enlarging and Aligning the Mask
To place the face even more strongly in the center, you transform the mask. To do this, activate the Transform function and drag the mask slightly larger from the center. Then confirm the transformation. The light area becomes wider and the darkening moves toward the edge of the image. This step is done very quickly and has a great influence on the effect.

Step 7: Creating the Second Layer with a Narrow Ellipse
The first vignette is not enough yet, because you want to darken the sides of the image more strongly. Select the Elliptical Marquee Tool again, this time as a more elongated shape, and position it vertically over the face. Then create a Levels adjustment again and immediately invert its mask with Command plus I or Ctrl plus I. This way the correction only affects the area outside the ellipse.

Step 8: Control the darkening and softness of the second layer
Drag the black slider further to the right than you did for the first layer, because the sides should become significantly darker. In the mask properties, set a feather of about 400 pixels. Afterwards, drag the ellipse upward and make it a bit wider so that the light strip neatly encloses the face.

Step 9: Fine-tune the mask in a targeted way
Look at the mask again while holding down the Alt key. It still looks a bit narrow and can safely extend beyond the face at the edges. Therefore, widen it once more and check whether the focus is now clearly on the face. The effect should blend into the image without harsh transitions.

Step 10: Position the third layer subtly
The previous layers are strong, so you slightly reduce the size of the lower adjustment layer by transforming the mask and placing it a bit higher. Make sure the darkening on the left and right does not become too strong. If necessary, reduce the layer's opacity. A value of around 50 percent is a good starting point, because otherwise the effect quickly looks exaggerated.

Step 11: Darken the neck area with a gradient
For the final correction, you need a new Levels adjustment, which you initially do not apply to the entire image. Select the Gradient tool and drag a line from the bottom edge of the image upward in the layer's mask. The gradient looks harsh at first. Therefore, make it a bit softer using the gradient options or a soft transition zone so that the neck fades gently into the shadow.

Step 12: Balance the brightness of the overall image
Since the darkening has become very strong overall, you scale back the Levels adjustment a little. To do this, move the slider so far that the image looks a bit brighter again without losing the mood. This way you keep the dark character but avoid important details disappearing into the black.

Step 13: Group and name the layers
Select the three adjustment layers in the Layers panel and combine them into a group using the folder icon. Name the group, for example, "Brightness". This seems trivial at first glance, but it later makes it easier for you to show and hide the entire look in a targeted way and makes the file understandable for others.

Step 14: Narrow the light area and make the spot softer
Finally, you narrow the ellipse of the second layer a bit more until the bright area extends to the ears. This additionally darkens the contours of the head and pushes the background into the shadows. The spot then often still looks too harsh. Therefore, make it a little bit softer in the mask properties until the transition looks subtle and harmonious.

Step 15: Critically review the result
Hide the group once and show it again for comparison. Pay attention to the difference between the flat original image and the result with the new lighting. The mood should be dark, but not gloomy to the point of being unrecognizable. If something seems too strong to you, do not reduce the face, but rather the opacity or the intensity of the corresponding layer.
Summary ??? Photoshop Light Mood: Dark Vignette with Three Layers
With an elliptical selection, three Levels adjustments, and properly configured masks, you direct your viewer's gaze specifically to the face. The most important levers are inverting the mask, the softness of the edges, and the gradient mask on the neck. If you group the layers at the end and name them appropriately, your workflow remains clear even with later adjustments.
FAQ
Do I absolutely have to use a circle as the selection?No, you can also use an ellipse or a freeform shape, as long as the selection reliably encloses the face.
Why is my face also darkened by the Levels adjustment?Usually the mask is the wrong way around. Press Command plus I or Ctrl plus I to invert it.
How do I tell which area is affected by the correction?Hold down the Alt key while clicking on the layer mask. Black shows the affected areas, white the excluded ones.
What softness makes sense for masks?Start with a large value to see the effect, and then reduce it to about 300 to 400 pixels until the transition looks natural.
Why should I group the layers?A group keeps the Layers panel organized and can be shown or hidden with one click, which makes the before-and-after comparison easier.
Can I adjust the opacity of a layer?Yes, you reduce the opacity directly in the Layers panel. It is well suited for subtly weakening a correction that is too strong.


