
If your framing turned out too tight and the coat or cape is missing at the edge, you don't have to reshoot right away. With a second shot from the same series, you can complete the garment in Photoshop. I'll show you this procedure here step by step, including the typical pitfalls.
The video is only loaded from YouTube when you play it – data (including your IP address) is then transmitted to YouTube/Google. More in the privacy policy
Key Takeaways
- A shot from the same series with identical Raw settings matches much better in color and tone than an image from a different situation.
- A Smart Object with a Smart Filter allows you to readjust the blur at any time without having to edit the image again.
- Soft masks with low hardness ensure inconspicuous transitions. Paint in one continuous stroke so that no blotches appear.
- The transition doesn't have to be perfect, because texture and subsequent editing conceal small irregularities.
Step 1: Open the second shot in Camera Raw
The starting point is a second shot that shows the coat completely and at a matching head height. Open it in Camera Raw and choose exactly the same preset you already used for your main image. This way, exposure, white balance, and contrast match from the start. Then you click on "Open Object," and the image lands directly as a layer in Photoshop.

Step 2: Move the layer into the main image and reduce the opacity
Drag the new layer into your main document with the Move tool. First set the opacity to about 50 percent. This lets you see both shots at the same time and align the position of the coat cleanly. Don't pay attention to every detail of the eyes, but above all to the transition at the edge where the two subjects meet.

Step 3: Fine-tune the position and reset the opacity
Move the layer until the flow of the fabric folds at the edge matches. It often helps to shift the layer just a few pixels up or down. Once the position is right, set the opacity back to 100 percent. Compare the result with the previous state to see how big the difference really is.

Step 4: Match the blur with the Gaussian Blur
You will notice that the second shot is sharper than the original. To make the coat look homogeneous, you can blur it slightly. To do this, convert the layer into a Smart Object, if that hasn't happened yet. Then go via the Filter menu to Blur Filters and choose Gaussian Blur. Approach the radius slowly. A value of about 8 was too strong in this case, which is why I reduced it to about 2.5. The Smart Object makes the decisive difference here: you can reopen and adjust the filter at any time later by double-clicking the Smart Filter.

Step 5: Compare the result with the Smart Filter
To check the effect, you deactivate the Smart Filter via the eye icon. Then switch it back on and compare both states. This way you quickly see whether the sharpness of the coat matches the rest of the shot. If the difference is hardly visible anymore, the filter is set correctly.

Step 6: Create a layer mask and invert it
So that the coat becomes visible only at the desired spot, you need a layer mask. To do this, click the mask icon in the Layers panel. Then you invert the mask with Command + I (Mac) or Ctrl + I (Windows). The layer now disappears completely, and you paint it back into the image selectively.

Step 7: Paint the coat back in with a white brush
Choose white as the foreground color, because white makes things visible on the mask. Take a soft brush with about 50 percent opacity and a size of around 350 pixels. The medium opacity allows you to build up the transitions step by step without them becoming too hard. It's best to paint in one continuous stroke. If you lift off with every stroke, blotchy spots quickly appear. Repeat the process a few times until the coat extends subtly beyond the edge.

Step 8: Correct Excess Blending with a Black Brush
It's best to compare the result with a before-and-after view. Often the coat shows up in places in the image where it doesn't belong, for example in the upper transition area. Therefore, switch the foreground color to black and mask these areas away again. With black you hide, with white you reveal. This way you can switch between both directions at any time without losing anything.

Step 9: Make the Fabric Transition Soft and Organic
For a natural finish at the end of the fabric, you need a softer, somewhat smaller brush tip. I initially used a hardness of 80 percent, which looked too hard. I then reduced the hardness to about 50 percent and slightly decreased the size. Apply the brush subtly and follow the folds of the fabric so that the coat looks like loosely draped fabric. You don't need to worry about shadows on the chest at this point, since they can be added separately later.

Step 10: Selectively Bring Back the Sharpness of the Coat
If the coat looks too soft overall because of the filter, you can bring back the sharpness directly on the filter mask. Set the brush to black, lower the opacity to about 30 percent, and paint over the areas where more sharpness is desired. The blur is reduced there without undoing the filter as a whole. A little sharpness in the fabric folds is usually more convincing than a completely sharp coat.

Step 11: Soften the Transition of the Face Half with the Alexander Layer
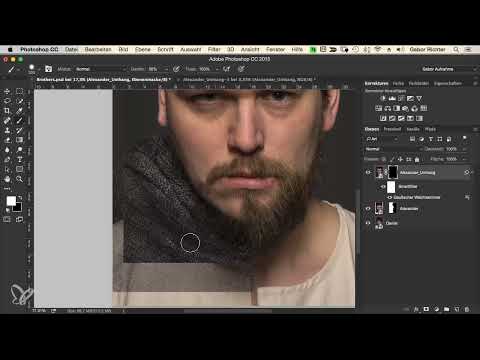
Besides the coat, the transition to the half of the face on the lower layer can also stand out. To fix this, select the layer with the Alexander cape, activate the mask, and paint with a brush at 50 percent opacity and 0 percent hardness. You can increase the size to about 700 pixels so you can get around corners more easily. The transition becomes so soft that it is hardly noticeable anymore. If you notice small inaccuracies, you don't need to worry, because a texture layer will be placed on top later anyway.

Step 12: Keep the Layers Panel Organized
If the many layers become too cluttered, you can collapse the Layers panel. One click on the icon at the top of the panel is enough to free up space. If you need the settings again later, for example to readjust the sharpness, simply reopen the panel using the same button.

Outlook: The Next Step
With this basic framework, you have a solid foundation for further retouching. Afterwards, you can work with Dodge and Burn to fine-tune light and shadow on the coat. We will look at this step in more detail in a later video.
Summary ??? Lengthening Clothing in Photoshop: Extending a Coat with a Second Shot
You have seen how a coat that turned out too short can be extended with a second shot from the same series. Crucial are identical Raw settings, a smart object for flexible blur, and soft masks that you build up in several passes. Small residual blurriness in the transition can easily be concealed later with texture and retouching.
FAQ
Does the second shot have to come from the same series?Yes, ideally it should. Only then do exposure, color, sharpness, and perspective largely match.
Why should I use a smart object?A smart object saves the filter as a smart filter. You can adjust settings such as the blur radius at any time with a double-click, without having to edit the image again.
Which opacity and hardness are suitable for the mask?For the first blending, an opacity of about 50 percent and a medium hardness have proven effective. For the fabric transition, 50 percent hardness and a smaller brush size are suitable.
What do I do if the transition is still visible?Paint over the transition with a soft brush and work with white and black on the mask. Small unevenness can be further softened later with texture and retouching.
How can I keep the layers organized?Simply collapse the Layers panel when you don't need it. You can reopen it at any time to correct settings.


