
Anyone who wanted to create circularly growing patterns in After Effects until now could hardly avoid additional plugins. Since version CC 2020, the concentric shape repeater has been included directly in the program. It is hardware-accelerated and therefore works quickly, even with complex compositions. In this tutorial, I'll show you how to build impressive patterns with a simple star and a text stroke and animate them with keyframes. All you need are the functions Offset Paths, Copies, and Copy Offset.
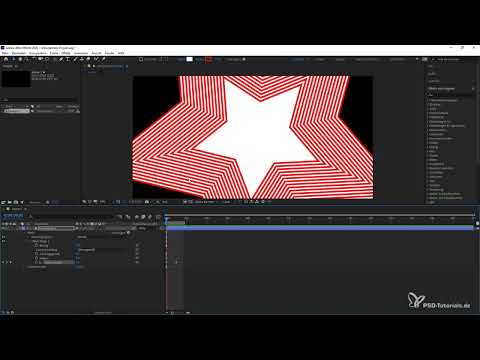
The video is only loaded from YouTube when you play it – data (including your IP address) is then transmitted to YouTube/Google. More in the privacy policy
Key Takeaways
- The effect is located in the "Add" group of the shape layer and consists of Offset Paths, Copies, and Copy Offset.
- The amount of the offset path determines how far the shape expands. The copies determine how often the pattern repeats.
- The copy offset controls where the copies originate from and in which direction.
- Keyframes on the copy offset or the amount create growth and plop animations.
- Text must be converted into shapes and used as a shape layer for the effect to work.
Step-by-Step Guide
Drawing a star as the starting shape
First, create a new composition. In the shape tool, select the star tool and draw a star. Give it a white fill so that it is clearly visible. Then add a red stroke and reduce its thickness a little. After that, make the star slightly smaller so that there is enough room left for the duplication later on.

Activating offset paths via the "Add" menu
Expand the shape layer and open the "Contents" group. There you will find the "Add" section. Click on it and select the "Offset Paths" entry. This effect is not new, but it forms the basis for everything that follows. Only with the copies and the copy offset does it become the concentric shape repeater.
Setting the number of copies
Now add the "Copies" property. Here you determine how often the shape repeats. Increase the amount of the offset path to control the expansion. You will immediately see how the star multiplies outward and a star-shaped pattern emerges. This already looks impressive, without any further settings.

Controlling the direction with the copy offset
The copy offset is the real key to the effect. With it, you determine where the copies originate and in which direction they travel. You can work from the inside out or from the outside in. If you reduce the offset completely, the star in the center disappears. Feel free to try both variants, as they produce very different patterns.
Building an animation with keyframes
Activate the stopwatch on the copy offset. Set the value to zero so that the pattern is not visible at the start. Then switch to the end position with the N key, as shown in the video, and set the desired value there. Playing it back shows you how the pattern builds up step by step. You can also stop the effect at a certain moment or reverse the order to give it a different impact.

Refining the plop effect with Easy Ease
So that the movement doesn't look stiff, select the keyframes and apply a soft interpolation. You can do this via the context menu with a right-click or faster with the F9 key for Easy Ease. After that, the value glides smoothly back and forth, creating an elegant plop effect. Especially with short animations, this small change makes a big difference.

Readjusting color and stroke width
The effect can be adjusted at any time. Open the stroke settings and change the color as well as the stroke width. This way you can adapt the pattern to your design, for example for a subtle background or an eye-catching title transition. Fine changes to the stroke width often have a stronger effect than big jumps in the copies.

Writing a Text as a Starting Point
The effect also works with type. First delete the existing shape layer and select the Type tool. Write a short word, for example "PSD". You will usually get the best results with short words or letters, because the duplication then stays clear and easy to follow.

Converting the Text into a Shape
Right-click the text layer and, under "Create", choose the command "Create Shapes from Text". This turns the text into a shape layer that you can edit like any other shape. Only then can the concentric shape amplifier be applied to the letters.
Preparing the Stroke for the Text
Now give the text a red stroke and increase its width, for example to a value of three. The value doesn't have to be exact, but it should be chosen so that the letters remain clearly legible. In the "Contents" section you will find a fill for each of the letters. Disable these so that only the strokes remain visible. This already looks like a standalone design effect.
Disabling the Fills and Working Out the Outlines
In the Contents section, click the respective fills and disable them using the eye icon, or delete them if needed. Inner edges don't matter here. In the end, only the outlines of the letters should be visible. This preparation is important because otherwise the duplication will collide with the fills.

Applying Offset Paths to the Text
Open the text's shape layer again and add the Offset Path via "Add". Include the paths of the Wiggle Paths and set the amount to a value between 15 and 17. Then increase the copies. The letters are thereby copied outward multiple times, and the text takes on a strong, filled-in look.

Reversing the Direction of the Text Pattern
If needed, reset the copies and set the copy offset so that the duplication runs in the opposite direction. This creates a completely different image, even though the text and the effect stay the same. Compare both variants and decide on the one that suits your project better.

Using the Text as a Shape Layer in the Composition
In the end, it is important that you merge all texts, shapes, and effects into one shape layer. Only then can the new effect be applied. You can also place the text over other layers or combine it with masks to refine the effect even further.
Summary – Concentric Shape Amplifier in After Effects: Creating Effects Easily
The concentric shape amplifier in After Effects CC 2020 is a powerful tool for patterns, transitions, and title design. The combination of offset paths, copies, and copy offset is enough to build impressive animations from simple shapes. With keyframes and Easy Ease, you can bring the result to life. Feel free to try out different shapes and directions, because the most exciting ideas often arise precisely through experimentation.
FAQ
Do I need a third-party plugin for this effect?No, the concentric shape amplifier has been natively included in the program since After Effects CC 2020 and runs without any additional extension.
How does the copy offset differ from the amount of the offset path?The amount determines the extent of the individual copy, while the copy offset defines where the copies are distributed from and in which direction.
Can I also use the effect with text?Yes, you first have to convert the text into a shape via "Create Shapes from Text". Afterwards, you can apply offset paths and copies just like with any other shape.
How do I achieve smooth movement in the animation?Select your keyframes and apply Easy Ease using the F9 key. Alternatively, you can find the interpolation in the context menu by right-clicking.


