
A good food photo rarely comes about by chance. It starts with a well-thought-out stage: Which surface supports the subject, how does the background run, and from which angle do you photograph? In this chapter, I will show you how to implement these basics step by step and how to use your camera's live view for composition.
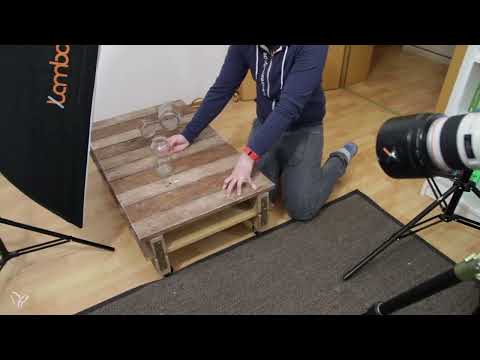
The video is only loaded from YouTube when you play it – data (including your IP address) is then transmitted to YouTube/Google. More in the privacy policy
Key Takeaways
- The surface determines the mood and character of the image. Wood looks rustic and cozy, a tray with a used look looks authentic.
- If you shoot steeply from above, the surface can also serve as the background. This saves effort and creates a harmonious gradient of sharpness.
- Arrange the objects in a staggered fashion and follow the rule of thirds so that the viewer's gaze is guided through the image.
- Set up the light before decorating. Fresh ingredients such as yogurt, fruit, or herbs change quickly.
- A large light source placed as close as possible to the subject creates soft and even reflections on glass.
- With ISO 100, an exposure time of about 1/125 second, and manual focus, you get a reliable basis for studio flash.
- Focal lengths between 85 and 100 mm compress the scene and make the distance between foreground and background appear visually larger.
Step-by-Step Guide
Determining the Location
Find an area where you can work undisturbed and still have enough space for your flashes. In the video, I use a cleared area in the living room. Make sure you can move around the lighting setup without constantly moving objects.

Choosing the Surface
The surface is the basis of your image's impact. In the example, a self-built wooden table serves as the surface. The surface was waxed and partially sanded down, which makes it look lively and warm. You can achieve similar results with simple wooden slats from the hardware store, which you cut to size, screw together, and then stain.

Alternatively, objects with character are suitable, such as a wooden tray with a used look. Such surfaces immediately look rustic, cozy, and authentic. Choose the surface so that it suits your subject and the desired mood.

Planning the Perspective and Background
If you shoot the surface from a relatively steep angle above, it simultaneously becomes the background. You then don't need to bother with an additional background. In addition, a pleasant gradient of sharpness from front to back is created, which emphasizes the depth of the image.

Roughly Placing the Main Players
First, set up your main objects without decoration. In this step, the point is only to give the camera a fixed point to focus on and to get a feel for the rough composition of the image. In the example, these are a glass that will later be filled with muesli and a mason jar from which the muesli spills over.

Using the Staggered Arrangement and the Rule of Thirds
Arrange the glasses in a staggered fashion: The front glass stands at the front intersection of the rule of thirds, the rear one at the rear intersection. In addition, a diagonal is created that leads the viewer's eye through the image. If the muesli spilling out of the glass is placed at the intersection, the composition looks particularly balanced. Also make sure that the rear glass is slightly cropped. This suggests that the scene extends beyond the edge of the frame.

Positioning the Main Light
Place the main light as close as possible to your subject. The larger the light surface appears in relation to the object, the softer and prettier the reflections on the glass will be. If you don't have a larger light modifier available, the simplest solution is to move the softbox closer. When setting the perspective later, make sure that the softbox does not appear in the frame.

Plan for Additional Reflectors
To specifically light glass and fill areas, you can use reflectors. With them, you bring light to the back or from the side into the scene. Keep in mind that different reflections appear on glass, depending on which direction the light comes from. Stray light can never be completely prevented, so you should accept it as a given and control it specifically with reflectors.

Set the Light Before Decorating
Before you arrange muesli, yogurt, fruit or herbs, set the light to its final position. That way, you can fill the glasses and photograph in a single pass later. This is important because yogurt runs, herbs let their leaves droop, and fruit quickly turns mushy. The preparation saves you stress and ensures a fresher result.

Switch the Camera View for Checking
So that you can follow the settings, it helps to position the camera so that you see the perspective from the main camera's point of view. That way, you can recognize at any time what the image will look like later.

Choose the Basic Settings
For studio flash, you have a proven starting point that you can adopt for every shoot:
- ISO 100 as the lowest value of your camera
- Exposure time of about 1/125 to 1/160 second, depending on the flash sync speed of your flashes
- Manual focus, so that you can set the sharpness exactly where you want it
- You control the aperture specifically later on to manage the depth of field
With flashes that have high-speed sync, times of 1/2000 or 1/4000 are also possible. For most shots, however, this doesn't matter.

Determine the Focal Length
In the example, you shoot with a telephoto zoom between 70 and 100 mm. A longer focal length produces stronger compression. As a result, the distance between foreground and background appears visually greater. A classic 85 mm lens or a 100 mm macro lens is also excellently suited for this. A zoom also gives you the freedom to change the perspective without constantly having to rearrange the tripod.

Use Live View for Composition
Switch on Live View. In a flash studio, the image initially appears black because the settings for continuous light are not bright enough. The flash only delivers the actual brightness when the shutter is released. Therefore, switch to aperture priority mode (AV) for the composition. The camera then chooses a suitable exposure, and you see the subject on the display.


Define the Image Frame with the Zoom
Zoom in on the focal length far enough that the table fills the entire image and the edges disappear. In the example, this is the case at about 95 mm. Make sure that no distracting table edge is visible. This step determines how much of the background surface will be visible later.

Align the Objects in the Image
Now align the objects according to the rule of thirds. Repeatedly check up close that everything is right, and then go back to the camera. Move the front glass and the rear glass step by step until they are at the desired intersection points.

Check the Lid and the Details
A lid can take up too much space in the image. In this case, you can fold it back or rotate the glass so that the lid is not visible. The final decision depends on how the reflection of the softbox looks on the glass. Try out both variants.

Setting the Focus Precisely
Use the zoom function in Live View to set the sharpness exactly. Enlarge the image and set the focus manually on the rim of the glass. After that, you can experiment with the aperture to set the desired depth of field.

Positioning the Softbox to the Side
The softbox should be placed to the side of the glass so that the reflection looks even. You can pull it a little further forward so that the light comes more strongly from the side. An alternative is to place the light further back. Then there is no reflection, but a bright edge of light on the glass. Try out these variations and decide based on the result.

Taking the First Test Shot
Now switch on the flash and take a test shot. This way you can see how the aperture affects the image and can adjust the exposure precisely.

Summary ??? Food Photography: Setting Up Location, Surface and Perspective Correctly
You have learned how to choose the right location and surface, plan the background and perspective, and arrange your objects according to the rule of thirds. With the main light close to the subject, suitable basic settings, and Live View as a composition aid, you lay a solid foundation for every food photo. The most important principle is: first establish the light and composition, then decorate and photograph.
FAQ
Which surface is suitable for food photos?Wood, trays with a used look, or other materials with character are well suited, as they convey mood and authenticity. Choose the surface to match your subject.
Why is Live View black when using flash?The basic settings are intended for flash and are therefore too dark for continuous light. Switch to AV mode for the composition, and then you will see the subject on the display.
Why should the softbox be as large and as close as possible?A large, close light source produces soft and even reflections on glass, which look especially high-quality.
Why use a longer focal length for food photos?A focal length between 85 and 100 mm compresses the scene and increases the visual distance between foreground and background.
Why should you set up the light before decorating?Fresh ingredients such as yogurt or herbs change quickly. If the light is already set, you can work quickly and take the picture fast.


