
A photo is rarely finished straight out of the camera. It is only during post-processing that it is decided whether a food image looks alive or stays flat. In this tutorial, you will follow the editing of a nutshell scene that was shot with available light. You will work first in Adobe Lightroom and then in Photoshop, where you will use layers, masks, and dodge-and-burn to direct attention in a targeted way.
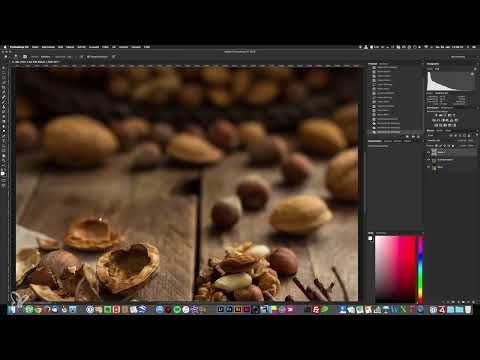
The video is only loaded from YouTube when you play it – data (including your IP address) is then transmitted to YouTube/Google. More in the privacy policy
The goal is not to artificially inflate the image. You should emphasize the mood that is already present in the photo and make it easier for the viewer to focus on what is essential.
Key Takeaways
- The basic editing in Lightroom lays the foundation: lens correction, color temperature, highlights, shadows, contrast, and sharpness.
- Photoshop is well suited for local adjustments such as removing distracting parts of the image, darkening and lightening, and precise vignettes.
- A dodge-and-burn layer in Soft Light mode allows you to finely control brightness without altering the original image.
- The Alt key quickly switches the brush between lightening and darkening.
- High-pass sharpening on a smart object layer remains adjustable at any time.
- Masking during sharpening prevents unsharp areas from unnecessarily receiving noise.
Step-by-Step Guide
Step 1: Assess the Original Image and Review the Exposure Series
Open the exposure series in Lightroom and check which shot should serve as the basis. In the tutorial, the choice fell on the main exposure with aperture 4, 1/25 second, and ISO 100. Look at the histogram: if the shadows or highlights are clipped, you have enough leeway with this exposure. What matters is that you decide on one exposure and don't constantly jump between variants.

Step 2: Adjust Lens Corrections
Switch to the Develop module and open the Lens Correction section. Lightroom usually applies the appropriate profile automatically on import. Reset the lens vignetting to zero if you want to build your own, stronger vignette later. Also make sure that the Constrain Crop option does not unintentionally trigger a perspective correction.

Step 3: Balance Color Temperature, Highlights, and Shadows
Work through the basic sliders from top to bottom. With the color temperature, you check whether the image looks warm enough without tipping into distracting blue tones. You lower the highlights slightly so that shiny spots become softer. With the shadows, you raise the brightness only so far that dark areas still retain detail. Check the reduced-size view from time to time, because this helps you better recognize differences in brightness.

Step 4: Build Contrast with Clarity and the Tone Curve
Clarity enhances micro-contrast and gives the image punch. Use it carefully, because with values that are too high the image quickly looks artificial. For overall contrast, the midtones work best. If you lower the dark midtones, the image becomes more atmospheric. If you raise the light midtones again, it gains contrast overall. Regularly compare your result with the before view.

Step 5: Sharpen Selectively with Masking
Set a base value for sharpening, such as Amount 75, Radius 1, and Detail 25. Then hold down the Alt key and drag the Masking slider. The white areas in the view are sharpened, the black ones are not. Drag the slider so far that only the important contours are captured. This way you avoid sharpening unsharp areas and generating unnecessary noise in the process.

Step 6: Check Noise Reduction and Prepare the Vignette
At ISO 100, noise reduction is usually not necessary. Still, zoom in briefly to be sure. You can create a vignette in Lightroom, but for this edit it makes more sense to add it later in Photoshop. There you control shape and brightness much more precisely, because the vignette does not necessarily have to be round.
Step 7: Hand the Image Over to Photoshop
Right-click the image, choose Edit In, and then Open as Smart Object in Photoshop. This only works if Photoshop is installed. In the color profile dialog, confirm the first option, that is, use the embedded profile. A conversion at this point would cost image information.

Step 8: Duplicate, rasterize, and give the layer a meaningful name
Duplicate the background layer with Command plus J, or Ctrl plus J on Windows. Rasterize the copy via the context menu, because you can only apply cleanup tools to rasterized layers. Name the bottom layer Base Image and the copy Retouching Layer. With clear naming, you keep track even when you have many layers.

Step 9: Remove bright corners with Content-Aware Fill
You remove distracting areas of the image, such as the bright corner caused by the diffuser, with the Lasso tool. Roughly select the spot, make sure the topmost rasterized layer is active, and press Shift plus F5. In the dialog, choose Content-Aware, Color Adaptation 100 percent, and Mode Normal. Then compare before and after. With color differences, small errors can occur, which you will correct later with Dodge and Burn.

Step 10: Create a Dodge-and-Burn layer
Create a new layer and fill it with 50 percent gray by calling up the dialog with Shift plus F5. Set the layer mode to Soft Light. Then activate the Dodge and Burn tool with the O key. Set the Range to Midtones and the Exposure to a maximum of 10 percent. If you apply it thinly several times, you get finer control than if you work with 100 percent right away.

Step 11: Darken and lighten with the Alt key
You don't have to switch tools to darken. Hold down the Alt key while painting, and the brush acts darker. Without the Alt key, it lightens. First darken the areas that distract from the main subject, such as the cloth or the edge of the nutshell. Work with a larger brush for soft transitions and with a smaller one for details. Look at your result before and after again and again.

Step 12: Paint shadows and light deliberately
Set deliberate accents by lightening the shadows between the nuts slightly and reducing the hard cast shadows. The lighting then looks softer and more even. Small bright highlights applied with a fine brush to areas that are already bright increase the perceived contrast. Darken the edges and unimportant areas such as the corners somewhat more, so that the eye moves to the subject in the foreground.

Step 13: Precise vignette via Curves and mask
This step is especially effective. Create a Curves adjustment layer and pull it down in the middle until the edges reach the desired degree of darkness. Choose a soft brush with 0 percent hardness and take black as the foreground color, in case you have other colors active. Then paint on the layer mask the areas that should stay bright. With Ctrl plus click on the mask, you can see which area is excluded.

Step 14: Duplicate the vignette and brighten the center
Duplicate the Curves layer with Command plus J and make sure the mask of the copy is active. Invert it with Command plus I. Now you can lighten the center slightly without changing the edge. Group both curves with Command plus G. This way you control brightness inside and outside separately, which is hardly possible with a classic vignette.

Step 15: Fine-tune background and foreground
Go back to the Dodge-and-Burn layer and darken the rear nut area so that it serves as a calm background. You lighten the front area a little. The nuts in the background remain recognizable but appear understated. In the before-and-after comparison, the difference is subtle but clear.
Step 16: Adjust the color mood via the blue channel
A subtle color mood is created when you switch to the blue channel in a Curves adjustment and pull the lower left point slightly upward. The shadows thereby receive a hint of blue. The image looks more neutral and at the same time more atmospheric. Use this effect only sparingly, though, because strong blue tones look unrealistic and are not suitable for every use, such as magazine publications.

Step 17: High Pass Sharpening on a Smart Object Layer
Use Command plus Alt plus Shift plus E to create a layer that contains all the information beneath it, and convert it into a Smart Object. Then choose Filter, Other, High Pass. A radius of 2 pixels is a good starting point. Set the layer mode to Hard Light. The effect is subtle, but it emphasizes the fine structures in the wood and on the surface of the nut. Since it is a Smart Object, you can readjust the filter at any time.

Step 18: Remove Distracting Flaws with the Clone Stamp in Darken Mode
A distracting element and remnants of the cloth are still visible in the image. To fix this, create a new layer at the top that contains all the information. Select the Clone Stamp with the S key and set the mode to Darken. A hardness of about 50 percent delivers good results. Alt-click to set the reference point and then paint over the area. In Darken mode, only areas lighter than your reference point are changed. Darker areas remain untouched, which allows you to remove halos quickly and without painting over anything.

Step 19: Remove Fine Hairs with the Healing Brush
The Healing Brush is well suited for small blemishes such as a tiny hair. It works similarly to the Clone Stamp, but it incorporates the surrounding color information, which leads to more harmonious transitions. Sometimes the correction works right away, sometimes you have to try several variations. For this, briefly zoom to 400 percent, check the result, and switch the method if necessary.

Step 20: Save and Return to Lightroom
Save the Smart Object in Photoshop. The file is then automatically written back to Lightroom. Since you have created many copies of the same layer, the saving process may take a little longer. By comparing it with your Lightroom edit, you can see whether you still need to readjust contrast or brightness.

Step 21: Radial Filter for Targeted Emphasis in Lightroom
Back in Lightroom, you can use the Radial Filter to emphasize the main area. Drag the circle around the subject, click Invert Mask, and adjust exposure and clarity. With a right-click on the circle, you duplicate the filter and adjust the outer area. With a soft edge, the transition looks more natural. With the Sharpness slider, you can also make the outer area appear slightly blurred.

Step 22: Final Check and Comparison
Compare your finished image with the original image, also in the reduced view. Make sure that attention is on the nuts in the front and that the leading lines guide the eye cleanly. A well-edited food photo tells a story, and that is exactly how you measure your success.

Summary ??? Editing Food Photography: Lightroom and Photoshop Step by Step
You have gone through the editing of a food photo from the original image to the finished result. In Lightroom, you lay the foundations such as lens correction, color, light, contrast, and sharpness. In Photoshop, you refine the image with layers, masks, dodge and burn, precise vignettes, and high pass sharpening. What matters is that every measure draws attention to the subject and supports the mood.
FAQ
Do I have to work with Photoshop?No, many adjustments can be done in Lightroom, but local corrections and layer work are significantly more precise in Photoshop.
Why should I create the dodge and burn layer in Soft Light mode?Because with a 50 percent gray layer you can lighten and darken without permanently altering the base image.
Can I still change the high pass sharpening later?Yes, if you apply it to a Smart Object, you can open the filter at any time via the icon in the Layers panel and adjust the radius.
How do I avoid vignettes that are too strong?Work with a soft edge, reduce the opacity, or use a mask to exclude the center of the image from darkening.


