
Imagine you have fully set up a text animator, and suddenly the transition area needs to become narrower. Normally that means resetting all offset keyframes by hand. With a few targeted expressions, you no longer have to change anything on the keyframes. That is exactly what this tutorial is about: You will learn how to control the offset of text animators with linear(), create overshoots, and shift animations in time via valueAtTime(). The examples refer to After Effects.
The video is only loaded from YouTube when you play it – data (including your IP address) is then transmitted to YouTube/Google. More in the privacy policy
Key Takeaways
The linear() function converts one range of values into another. This lets you always animate the offset of a text animator from 0 to 100, regardless of how wide the transition area currently is.
With a pick whip link to the end of the range selector, the expression adjusts automatically as soon as you change the range.
Multiple text animators with a slight time offset create an overshoot that settles back down after rising.
With valueAtTime(time - 4 * thisComp.frameDuration) you shift the animation by an exact number of frames, regardless of the frame rate.
Step 1: Recognizing the problem with offset keyframes
Before you get started, you should understand why offset keyframes quickly become annoying. If you set the offset of a text animator via keyframes, the animation depends on fixed percentage values. If the transition area changes, for example from -27 to another value, you have to reset every keyframe. The solution is to control the offset value itself via an expression. Then you simply animate the value consistently from 0 to 100, and the range is adjusted later via the expression.

Step 2: Entering the linear expression on the offset
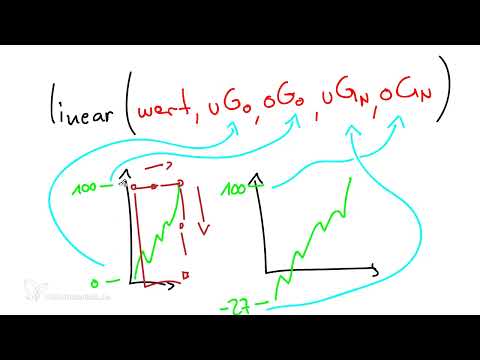
Hold down the Alt key and click the stopwatch of the offset. This opens the input field for the expression. Enter the linear() function there with five values:
linear(value, 0, 100, -27, 100)
The values mean, in order: the current value (value), the lower and upper limits of the original range (0 and 100), and the lower and upper limits of the new range (-27 and 100). Your animator thus still runs from 0 to 100, but is converted to the range from -27 to 100.
Step 3: Understanding how linear() works
The linear() function is a linear conversion of values. You give it an input value and two ranges. The first range is the original range in which your value moves, the second is the new target range. Imagine the curve of your offset as an axis running from 0 to 100. The function takes this curve and stretches or compresses it to the new range without changing the timing. As a result, the animation stays within the same time frame, and only the value span changes.

Step 4: Compressing the range like a transform box
A helpful image for this process is a transform box around your curve. You pull the lower limit downward, stretch the box, or compress it. The upper limit stays at 100. The lower limit corresponds to the start of the text animator, that is, the value you set in the range selector. In the result, the curve still ends at 100, but it starts lower, at -27. With this logic, you understand why the expression distributes the values correctly.
Step 5: Changing the transition area afterwards
The big advantage of this method shows when you want to adjust the range later. You no longer have to edit any keyframes. Simply change the lower new limit in the expression, for example to -82. The text animator then moves over a wider range, and the keyframes remain untouched. This expression is thus a range converter that leads you from one curve to another without changing the actual animation.
Step 6: Linking the expression to the range selector
So that you don't have to adjust the expression manually for every text animator, you link the lower limit to the range selector. Hold down the Alt key, click the stopwatch of the offset, and enter the function like this:
linear(value, 0, 100, -[Pick-Whip auf Ende der Bereichsauswahl], 100)
To do this, drag the pick whip spiral onto the "End" property of the range selector. The minus sign in front ensures that the value becomes negative. You can by now quickly add this small expression to every text animator, and the offset automatically adapts to the text range.
Step 7: Creating an Overshoot with Multiple Text Animators
A lively look emerges when the letters slightly overshoot their target as they come up and then settle back into place. For this, you need a second text animator, which you shift slightly upward compared to the first one and rotate in the opposite direction. You can remove the opacity if it is not needed. Then shift the two keyframes of the second animator by a few frames. The first animator reaches the letters earlier, the second later. This creates a slight time offset that produces the overshoot. You can add more animators, each running in the opposite direction. The result is a double overshoot that shoots upward, falls back, and settles.

Step 8: Saving Keyframes with valueAtTime()
The downside of multiple animators is that you have to manage every timing with three or more keyframes. This is where the function valueAtTime() helps. It gives you the value of a property at a specific time in seconds. If you write valueAtTime(time), you initially get the same result as without the function. The trick is to build in a time shift. Delete the keyframes of the animators, open the offset expression, and replace the pick-whip link with the time-shifted access.
Step 9: Specifying the Shift in Frames via frameDuration
The time in valueAtTime() is specified in seconds. If you want a shift in frames, independent of the frame rate, you use the variable thisComp.frameDuration. It gives the duration of one frame in seconds. At a frame rate of 25 fps, that would be 0.04 seconds. Therefore, write:
valueAtTime(time - 4 * thisComp.frameDuration)
The expression shifts the animation back by four frames. With a minus sign you delay the offset, with a plus sign you speed it up. In this way, you can copy the offset of multiple text animators and shift each by a different number of frames.
Step 10: Reversing the Direction via a Checkbox
Sometimes an animation should not just be delayed but run ahead, for example for an anticipation in which the letters first move downward. For this, you replace the minus sign with a plus sign. So that this doesn't have to be done by hand every time, you can build in a slider or a checkbox. Using a condition, the expression then switches between delay and lead without you having to rewrite the code. In special cases, you can additionally use keyframes. However, the expression with valueAtTime() and a time shift remains the more flexible way of working with text animators, and it helps you implement the Disney principles such as anticipation, overshoot, and timing.

Summary – Controlling Text Animators with Expressions: Offset, Overshoot, and Time Shift
With a few expressions, you save yourself a lot of rework. The function linear() keeps the offset flexible, so you can change the transition range at any time. With the pick-whip link to the range selector, the expression adapts to every text animator. Multiple animators with a slight time offset create a lively overshoot. And with valueAtTime(time - 4 * thisComp.frameDuration) you shift animations precisely by frames without constantly managing keyframes. Try out the steps on your own text field, and you will quickly notice how much time you save.
FAQ
Why should I control the offset via an expression instead of keyframes?Because you can change the transition range later without having to reset all the keyframes.
What do the five values in linear() mean?The first value is the current value, followed by the lower and upper limits of the original range and the lower and upper limits of the new range.
How do I achieve an overshoot with text animators?You use multiple animators with a slight time offset that run in opposite directions.
Why does valueAtTime(time) without a shift calculate the same as without the function?Because no time is shifted, so the value remains identical.
Why do you multiply the frames by thisComp.frameDuration?So that the shift always covers exactly the desired number of frames, regardless of the frame rate.
How do I reverse the direction of the shift?You replace the minus sign with a plus sign or control the direction via a checkbox.


