
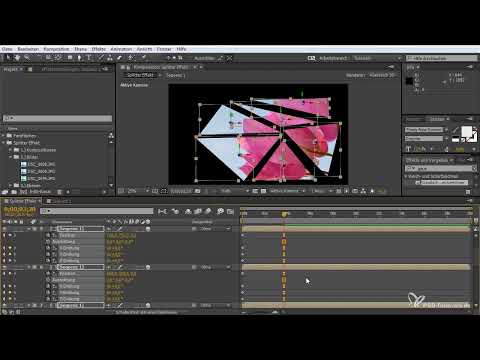
An image shatters into countless shards that spin through space, drift apart, and finally come back together: you'll recreate exactly this look in this After Effects tutorial. You'll learn how to break an image into individual splinters, organize them as precompositions, and move them through space with a 3D camera, a controller, and a dolly. The tutorial is the first part of a two-part series. The transition to the next image follows in the second part.
The video is only loaded from YouTube when you play it – data (including your IP address) is then transmitted to YouTube/Google. More in the privacy policy
Key Takeaways
Key Takeaways
- A clean folder structure with separate folders for compositions, layers, and images saves you a lot of searching later.
- Precompositions are the heart of the effect. Changes to the base composition automatically affect all shards.
- Each shard gets its anchor point in the center so that rotations around its own axis work.
- Camera, controller, and dolly form a camera rig that you animate with keyframes.
- With keyframes, Easy Ease (F9), and a preview (RAM preview), you can check movements quickly and precisely.
Step-by-Step Guide
Step 1: Create the Project and Folder Structure
Start with a new project via "File" and "New". Then create folders for the shard effect, the compositions, the layers, and the images. A tip from my own practice: put numbers in front of the folder names, for example 1 to 3. That way the folders appear in the right order, and you can find your way around the Project panel without detours.


Step 2: Create the Main Composition and Import Material
Use the icon for new compositions to create a composition named "Splittereffekt" and confirm with OK. Then drag your images or video files into the Project panel. The originals form the basis for all later shards. So load them completely first before you continue with the setup.

Step 3: Build the 3D Camera and Camera Rig
Create a new camera via "New" and "Camera". Then duplicate a null object with Ctrl+D and convert it into a 3D layer. Rename one null object to "Controller" and the other to "Dolly". The controller later serves as the target for the camera, the dolly as the starting point for zoom and movement.


Step 4: Create a White Solid and Link the Rig
Via "New" and "Solid", create a white solid at the composition size. You only need this layer later for the white flash transition, so you disable it for now. Then link the camera to the controller and the controller to the dolly. This creates a stable camera rig that can be controlled via the controller at any time.

Step 5: Place Images and Mark the Camera Layers
Drag the prepared images into the composition and scale them with the S key until they fit well in the frame. Then select the camera, controller, and dolly together by holding the Shift key and color them orange for a better overview. That way you keep the control elements in view while animating.


Step 6: Create Shard Precompositions
Select the layers in the upper area that you want to break into shards, and create a precomposition with Ctrl+Shift+C. Name it "Sequenz 1". Then duplicate this precomposition six times with Ctrl+D. You now have six copies that all point to the same reference. This is the key to the effect, because each copy later gets its own cutout.


Step 7: Draw masks for the individual shards
Activate all sequences except the first one. Then select the Pen tool or press G and set three points on the first sequence that together form a triangle or quadrilateral. Close the mask so that a shard is created. Repeat the procedure for each sequence with a different shape. Make sure the shards fill the area without gaps, because otherwise visible gaps will appear during animation.

Step 8: Why the sequences are independent of each other
Changes in the base composition, such as a new color layer or a different video, are carried over to all shards. If, on the other hand, you animate each sequence individually, the image in the background still remains visible and moves along. It is precisely this interplay that makes the effect convincing. Therefore, check the preview again and again so that you keep the effect in view.

Step 9: Set anchor points in the center
Select the first sequence and activate the Anchor Point tool, which you can reach with the Y key. Place the anchor point in the center of the shard. Repeat this for all sequences. Without this step, a shard would rotate around its corner instead of its own axis during a rotation, and the animation would look unnatural.

Step 10: Animate the color flash
Activate the white color layer and press T to set a keyframe for the opacity. Jump a few frames ahead with Shift and Page Down, set another keyframe, and set the opacity to zero. Then add a smooth interpolation with F9. Turn on the RAM preview. You will see a short flash of light at the beginning, which you will later use in combination with the shards.

Step 11: Animate shards individually
Prepare the animation by selecting the sequences together and revealing Position and Rotation with P and Shift+R. For each shard individually, activate the stopwatch of the parameters, jump a few frames ahead with Shift and Page Down, and change the position and rotation. Then smooth the keyframes with F9. You can also move and rotate the shards directly in the composition window using the handles.


So that the movement does not feel too symmetrical, rotate neighboring shards in opposite directions. The animation will then be more lively. Check the result with the RAM preview and adjust individual values until the effect looks coherent. With the A key you can see all animation parameters at a glance.

Step 12: Precomposition for the overall effect and blur
Select all sequences, copy them with Ctrl+C, and create a new precomposition from them with Ctrl+Shift+C. Move it down, activate the switch icon for the layer, and apply the Gaussian Blur to it. Increase the value just far enough that you can recognize movement in the background, but the image remains legible. Rename the composition again and color it purple so that you can find it quickly later.


Step 13: Camera animation, white flash, and dolly
Activate the controller and set keyframes for the position on it using the P key. Move the timeline forward and backward until the movement fits, and move the controller accordingly. Then you activate the white flash again and observe how it introduces the transition. The dolly then takes over the zoom: Set the first keyframe at the beginning, the last at the end, and let the camera move in. Finally, the main precomposition receives a small scale animation that reinforces the zoom within the effect.


Summary ??? After Effects Shard Effect: Mastering the 3D Camera and Sub-Compositions
In this tutorial, you built a shard effect from scratch. You set up the project structure cleanly, created a camera rig consisting of a camera, controller, and dolly, and used masks to break an image into seven shards. The anchor points in the center allow rotations around their own axis, and the color fade as well as the camera animation add dynamism to the effect. In the second part of the series, you will design the transition to the next image.
FAQ
Do I really have to place the images in the main composition before creating the shards?Yes, because all shards access this source material. If you change it later, the change automatically affects all sequences.
Why should I convert the layers to 3D?Only then do the camera, the controller, and the dolly work in space. In addition, the shards can then be rotated around all axes.
What happens if I don't set the anchor point to the center?The rotation occurs around the corner of the shard instead of its center. This looks unnatural and makes animating more difficult.
How can I tell whether the animation works?Turn on the RAM preview and watch the entire sequence. Noticeable issues such as overly symmetrical movements quickly stand out.


