
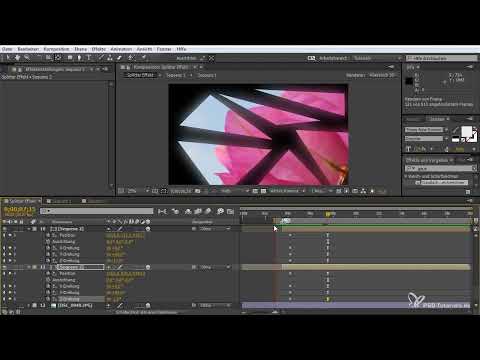
Imagine a single image shattering into countless shards that rotate, shift and finally let you fly right through the middle. This is exactly the look you will finish building in this second part. The foundation with the white flash from the first part remains in place. On top of it, you add further shard sequences, camera moves with position, rotation and zoom, as well as an exit with motion blur.
The video is only loaded from YouTube when you play it – data (including your IP address) is then transmitted to YouTube/Google. More in the privacy policy
Key Takeaways
- Each shard sequence is its own precomposition, which you can edit separately and insert again later.
- Position, rotation and scale are controlled via keyframes. With F9 you make the movements smooth.
- The anchor points must be aligned before the animation so that the shards rotate cleanly around the center.
- Trim layers as soon as they are no longer visible. This saves computing time when rendering.
- A fly-through is only convincing if the tips of the shards point toward the center of the image on approach.
Step-by-Step Guide
Preparing the first flight
Start with the composition from part 1 and make sure the layer you are working with is active. The white flash stays in the composition so that you keep the transition in view.

Select the layer and press the P key to reveal the position. Then hold the Shift key and pull the layer back a bit until there is a clear distance between it and the next layer.

Bring up the rotation with Shift and R and set the Y rotation to 90°. The layer then stands perpendicular to the viewing direction and is ready to fly into the frame.
Now move the layer slightly to the side until it roughly snaps into place and comes from outside the frame. Keep in mind that the transition to the next position should look fluid.
Use the marker key to set markers at important points of the animation. With the keys 1 to 0 you can then jump directly back and forth between these markers. This is especially helpful if you want to edit individual chapters in a targeted way.

Setting keyframes for position and rotation
Bring up the controller layer and activate the orientation with Shift and R. Then set a new position as a keyframe so that the movement continues. Also create a keyframe for the Y rotation.

Advance ten to fifteen frames and pull the layer in the direction of the Z axis while holding the Shift key. Make sure you readjust the Y rotation as you do so. This takes some patience until the movement looks coherent.

Set the rotation to 90° and check whether the movement looks clean. Do not pull the controller too close to the camera, because a dolly move that leads further forward will follow later.
Select the keyframes and press F9 to smooth the animation with Easy Ease. Then play back the sequence. A short pre-render helps you judge the overall impression.
With the B key, set the start of the work area at the point where the new composition begins. That way After Effects only renders the section you currently need.

Saving render time and creating the next sequence
From a certain point on, you no longer need the animation before it. Drag the layer's left or right edge up to this point while holding the Shift key. Thanks to snapping, the layer is deactivated from this point on, and you save a lot of time when rendering.

Set up the next layer so that it starts at roughly the same point. Select all layers of the current sequence and press Ctrl + Shift + C to create a precomposition. Confirm with OK and give it a clear name, for example Sequence 2.

Cutting Up Splinters and Aligning Keyframes
Bring up the Pen tool with the G key and draw the triangles as splinters. Each splinter becomes its own layer. Disable the splinters one by one so that the image gradually comes into view.

This work is laborious and requires patience, but it is worth it. You only change the source image, and all preset movements are retained. This is exactly where the strength of this technique lies.

Realign the anchor points of all splinters so that they later rotate around the right point. Select the layers, press the A key for the anchor point, and move it to the center of each splinter.

Then activate all layers and bring up the position and rotation with P and Shift and R. Advance eleven steps and set the keyframes. Then select all keyframes and press F9 so that the movement becomes smooth.

Designing the Fly-Through
Begin the animation with the first splinter. First rotate it slightly and then move it upward. With an additional rotation, the movement looks more lively. Keep in mind that the tips of the splinters should point toward the center at the end.

Repeat the procedure for the other splinters. Watch the animation in between until all splinters are closed. The result should show a clear fly-through in which you fly right through the middle of the image.

Place the finished splinters into a sub-composition again. Then add a blur and activate it so that the splinters look slightly out of focus and emphasize the depth.

Name the sub-composition Sequenz 2 and check in the preview whether the alignment is correct. If everything fits, the second flight is mastered.

Implementing the Dolly Move and Zoom
Bring up the position of the controller and set a keyframe for a forward movement. The dolly move brings you closer to the image without changing the perspective.

Return to the opening sequence and build in the zoom there. Set the keyframe for the scale at the beginning, move to the end, and enlarge the image slightly. Then select the keyframes and press F9.

Integrating the Next Layer
Place the next layer at the starting position. Since it should be at the very beginning at the start, you first have to move it there. Press P and Shift and R to display the rotation, and move the Z axis back a little.

Adjust the rotation until the layer fits into the desired position. Then bring it to 90° and a little further back until it looks good.

It is helpful to mark the sequence with its own color. This way you keep an overview when many layers are stacked on top of each other. In the example, the color brown is chosen.
Hiding the Distracting Background
The layer in the background gets in the way during the next camera move. Hide it by setting keyframes at the appropriate point. Press P, Shift and R and set the keyframes of the shards you want to deactivate.

Move forward fifteen steps and set the zoom. Make sure you select the correct parameter. A Z rotation creates an impressive zoom through the shards.

Use the T key to adjust the opacity. The layer should only become visible when the zoom begins. Select the keyframes and press F9 to apply a smooth transition.

Building the final flight
When the shards are no longer needed, you trim the layer. Then you duplicate the appropriate shards and align them again before starting the next flight. This is painstaking work, but it delivers the desired effect.

Select all keyframes with a selection rectangle and press F9. After that, you can build the animation with simple rotations and movements. Don't overdo it, because overly strong movements quickly look restless.

Next, add the precomposition with the blur and press A until all layers are collapsed. Put everything into another precomposition and name it Sequence 3.

Designing the exit
Trim Sequence 3 at the appropriate point and set a marker for the dolly move. Then move forward and build the exit. To do this, activate the controller and set the keyframes for a fly-out over about fifteen steps.

Set a rotation to 0° so that the ending feels calm, and add a suitable zoom. Make sure you set the interpolation back to smooth.

Activate the white fade that was previously in the background and set the value to 100. Only then will the transition become visible once the flight is complete.

At the end, activate Motion Blur in all precompositions. This ensures that fast movements look smooth and natural. Afterwards, check whether the switch is actually active.

In the last precomposition, add another zoom and set the scale so that it fits the closing animation. Press F9 and play the sequence. You will then see how the entire flight works together.

Summary – Mastering 3D flights: Shatter effect in After Effects step by step
You have completed the shatter effect by building additional sequences, setting keyframes for position and rotation, and implementing camera moves with dolly and zoom. In doing so, you worked with precompositions, reduced the rendering load, and designed the ending with motion blur and an exit. Since you can swap images and video clips at any time, the animation is easy to adapt to your own projects.
FAQ
Why should I align the anchor points before the animation?Because otherwise the shards won't rotate cleanly around the center and the fly-through will look restless.
What are precompositions used for?They group several layers together so that you can edit sequences separately and easily reuse them later.
Why should I trim layers that are no longer visible?Because After Effects then has to calculate fewer layers, which significantly shortens the render time.
How do I make a movement smoother?Select the keyframes and press F9 to apply Easy Ease.


