
Heat shimmers above a road, and the image behind it seems to tremble. You can recreate exactly this effect in After Effects with the Displacement Map. The effect is called "Versetzen" there (in the German version) and is located under "Verzerren" (Distort). It shifts pixels of an image based on the brightness or color values of another layer. The result looks like a heat haze, a distortion, or a wave pattern.
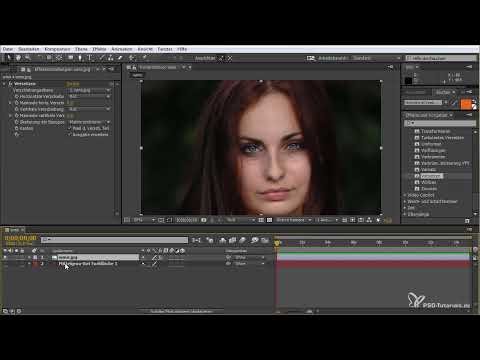
The video is only loaded from YouTube when you play it – data (including your IP address) is then transmitted to YouTube/Google. More in the privacy policy
In this tutorial, I will guide you through the entire setup: from the composition and the parameters of the Displacement effect to control via particles and nesting in a precomposition. I will also show you why footage at the edges often causes problems and how to sensibly dose the strength of the effect.
Key Takeaways
- The Displacement Map shifts pixels. It does not create new content and therefore always needs a source image.
- Your footage should be larger than the composition size so that no visible gaps appear at the edges when shifting.
- Via the color channels, you determine which color information controls the displacement. Red is particularly well suited for many heat effects.
- Particles can be used as a control layer. A particle system with just a few settings is often enough to create organic movements.
- The effect works reliably if you build it in a standalone precomposition (Ctrl or Cmd + Shift + C).
- A strength of about 20 to 35 usually looks more natural than extreme values.
Step-by-Step Guide
Step 1: Prepare the Composition and Source Image
First, create a new composition and drag your image into it. In the example, it is a portrait that should later look as if it were being distorted by rising heat. Make sure the subject is clearly recognizable in the composition so that you can easily judge the effect.

Step 2: Apply the Displacement Effect
Drag the "Versetzen" effect onto your layer or right-click it and select the effect via the menu. You will immediately see the image change. In the "Effekteinstellungen" (Effect Controls) panel, you will find three central areas: the horizontal displacement, the vertical displacement, and the displacement layer. In addition, under "Kacheln für Verschiebungszuordnung" (Displacement Map Behavior), you determine how the edges behave. There you can choose between Center, Stretch, and Tile (Repeat). The "Tile" option leads to a repetition of the material, which often looks interesting for heat effects.

Step 3: Enlarge the Material for the Displacement
As soon as you displace strongly, parts of the layer are pulled out of the visible area. This creates gaps at the edges. To prevent this, your material should be slightly larger than the composition. For a composition of 1280 × 720 pixels or 1080p, it is therefore advisable to use material with a few pixels of overhang, for example 1300 × 850 pixels. The material then overlaps at the edges, and you will not see any empty areas.

Step 4: Define the Color Channel for the Displacement
In the effect, you can specify which color channel controls the displacement. Set both the horizontal and the vertical displacement layer to Red. First set the displacement value to zero so that the image is unchanged again. Then increase the value gradually. Red works particularly well in this example because it controls the distortion evenly and in a controllable way. If you work with Green or Blue, the direction and strength of the displacement change significantly, and you should readjust the values accordingly.

Step 5: Use a Particle Layer as a Control Layer
The displacement layer does not necessarily have to be an image. You can also create a new solid, for example in white or black, and place a particle system on top of it. The particle filter, referred to in the video as particle simulation, then generates moving structures that control the image underneath. For testing, turn off the visibility of the control layer to see how the result changes, and then enable it again afterwards.

Step 6: Adjust the Particles
For the particles to achieve the desired effect, you should set the color to Red. Increase the particle radius until the structures are clearly visible. You can also raise the run radius so that the movement looks more lively. Don't start the preview too early: let the animation run for a few seconds until the particles have settled. Only then can you judge the look realistically.
The standard particle simulation sometimes produces popping squares. There are two solutions for this: you can work with special third-party particle systems or adjust the settings so that the particles appear smoother. Which route you choose is up to you.

Step 7: Move the effect into a precomposition
This step is crucial. If you apply the Displacement Map effect directly to your layers, it often does not displace the material you want. Therefore, select the layers you want to displace and choose "Pre-compose" ("Move layers into new composition") (Ctrl or Cmd + Shift + C). Activate the option to keep the attributes so that the transformation and settings are preserved. The new composition then behaves like a normal clip and can be moved independently.

Step 8: Assign the displacement layer and use the blur
Now set the displacement layer in the precomposition or in the main composition. You select the layer with the Displacement Map effect as the control source. First set the maximum horizontal and the maximum vertical displacement to 50. The image then looks heavily distorted, which you need for fine-tuning. Then you add a Gaussian Blur. It smooths the hard transitions and ensures a more homogeneous look. Change the blur value until the distortion looks softer and more organic.

Step 9: Fine-tune the strength
A value of 50 is too strong for many subjects. Set the displacement to around 20 and observe the result. You can also reduce the particle radius so that the structure looks finer and less flat. Then try values around 35. In many cases they already produce a decent heat effect that doesn't look exaggerated. You can also set the horizontal and vertical displacement differently to change the direction of movement.

Step 10: Use your own video as a displacement layer
You don't always have to drive the effect with particles. A fully rendered video, such as a logo, a text, or an animation, can also be used as a control layer. Import the video and let it shine through the effect. In this case you don't need an additional precomposition as long as the video is already fully rendered. The only important thing is that the source is set up cleanly, as otherwise the effect won't take hold. If you see no effect despite all the settings, first check whether the maximum displacement values are set and the precomposition has been created correctly.

Summary – Displacement Map in After Effects: Heat Effect Step by Step
With the Displacement Map you create convincing distortions reminiscent of heat shimmer, water, or waves. Three points are crucial: larger source material, the right color channel setting, and moving the effect into a precomposition. With particles, blur, and fine values you get an effect that you can later refine with glow effects or additional layers. Try out the steps, change the values, and develop your own style from them.
FAQ
What is a Displacement Map in After Effects?It is an effect that displaces the pixels of an image based on the color values of another layer, creating distortions such as heat shimmer.
Why do gaps appear at the edges?When the material is displaced, part of it moves out of the visible area. If the material is only as large as the composition, gaps remain.
What size should my material be?The material should be larger than the composition, for example 1300 × 850 pixels for a composition of 1280 × 720 pixels.
Why should I put the effect in a precomposition?The precomposition ensures that the displacement is reliably applied to the desired material and that the result can be controlled like an independent clip.
Which color channel is best?Red is often used in the example because it keeps the displacement even and controllable. Green or blue change the direction and strength of the effect.
Why does nothing happen after applying the effect?Check whether the maximum horizontal and vertical displacement is set, whether the displacement layer has been assigned correctly, and whether the effect is in an independent precomposition.
How do I avoid popping squares with particles?Alternatively, use third-party particle systems or adjust the radius and movement so that the particles look smoother.
How does the Gaussian Blur work in the effect?It smooths the hard transitions of the distortion and ensures a more homogeneous, more organic look.
What strength makes sense for heat effects?Values around 20 to 35 usually look natural. At 50 the image quickly looks exaggerated.
Can I also use a finished video as a control layer?Yes, a rendered video with a logo, text, or animation can be used as a displacement layer and be let shine through underneath.


