
Maybe you only need to obscure a face in a shot, put a virtual pair of glasses on a person, or change an actor's eyebrows. With the face tracking that was newly added in After Effects CC 2015, such tasks can be solved much more easily. The function works with masks and analyzes a face piece by piece, so that the mask moves along with it throughout the entire footage. In this tutorial, you will learn how to prepare the function, how to choose between the two tracking modes, and how to use the resulting tracking data for your own effects.
The video is only loaded from YouTube when you play it – data (including your IP address) is then transmitted to YouTube/Google. More in the privacy policy
Key Takeaways
- Face tracking only works with a mask. Without one, After Effects does not recognize an area it can follow.
- The closer a face is to the camera, the longer the calculation takes, because more details have to be analyzed.
- A face that is as still as possible and well lit delivers the best results.
- With the "Face Tracking Outline Only" mode you get the outline, while with "Face Tracking Detailed Features" you get numerous track points for eyes, nose, mouth, and cheeks.
- A defined rest pose serves as a reference and improves the accuracy of the tracking.
- The track points can be linked to other layers via expressions, for example to place a pair of glasses exactly on the eyes.
Step-by-Step Guide
Step 1: Choose the right source material
For face tracking, you first need a shot in which the face is clearly visible. The video uses a 1080p shot in which the person sits relatively still. That is exactly ideal, because calm movements deliver the most stable results. Load the footage into After Effects and drag it into a composition.

Step 2: Open the Tracker
To use the tracking functions, open the "Tracker" panel via the "Window" menu. In the video, it is dragged to the left side of the workspace so that you keep it in view while you work. This way the panel is always within reach.

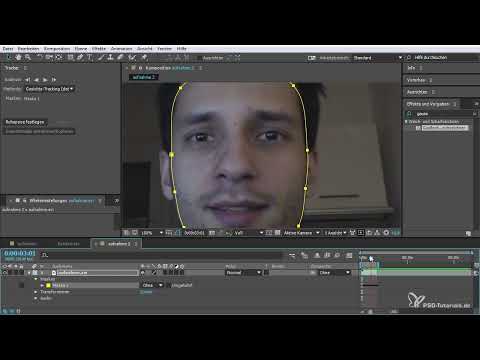
Step 3: Trace the outline of the face
Select the Pen tool and use it to trace the outline of the face in the layer. Zoom into the image so you can see the details better. It is normal to be a little off on your first attempt. With a bit of practice, however, you will get more and more precise. Make sure that the mask encloses the outline of the face as completely as possible, because the later tracking is oriented precisely along this line.

Step 4: Select the tracking mode
Once the mask is in place, two options are available to you in the "Tracker" panel. The "Face Tracking Outline Only" option follows the outline of the face. The "Face Tracking Detailed Features" option, on the other hand, detects numerous points within the face. To get started, the "Outline Only" mode is recommended, because it leads to a usable result more quickly.

Step 5: Narrow down the work area
By default, tracking affects the entire clip, and depending on its length, that can take a very long time. In the example, the shot lasts about 35 seconds, but the calculation takes significantly longer. You can therefore process only the section you need. To do this, set the work area to the desired spot with the N key, for example to the first five seconds. You can see the selection in the timeline and in the frame preview.

Step 6: Consider the influence of face size
The size of the face in the frame plays a big role in tracking. The closer the face is to the camera, the more details After Effects detects, and the longer the calculation takes. A small face in the frame, on the other hand, can be processed more quickly. So if you only want to obscure a face that is small in the frame, this generally goes faster.

Step 7: Start the Tracking
Now, in the "Tracker" panel, click the "Track selected mask forward" button. After Effects then calculates the movement of the mask over the selected range. Rendering can take a few minutes depending on length and resolution. Let the process finish completely before you continue. A look at the preview shows you whether the mask follows the face.
Step 8: Apply the Effect to the Mask
Once the tracking is complete, you can add an effect. In the example, the blur "Gaussian Blur" is used, which you simply drag onto the footage. At first nothing happens, because the effect applies to the entire layer. To apply it only to the face, set the mode to "Add" in the mask settings. Then you apply the blur to the desired area.

Step 9: Check and Refine the Mask
To make sure the mask fits correctly, temporarily hide the mask edges. To do this, use the keyboard shortcut Ctrl + Shift + H, or Command + Shift + H on the Mac. If the outline doesn't quite fit yet, you can add a soft mask edge in the mask settings. This makes the transition between the edited and unedited area look more natural.

Step 10: Use the Detailed Features
For more complex tasks, the "Face Tracking Detailed Features" mode is suitable. Beforehand, you should remove the previous effect and prepare the mask again without it. Pay attention to a so-called rest pose. This is a frame in which the face is shown as relaxed as possible, without strong movement or speech. Set this position via the starting position, because it helps After Effects align the tracking correctly. In the video, the rest pose is set at one second in the range of around 309, and then you start the tracking again.

Step 11: Look at the Track Points
After the tracking is complete, a new section named "Face Track Points" appears in the panel under the mask. Here you will find numerous points for the mouth, nose, chin, cheekbones, eyebrows, and eyes. Each point has its own keyframe for every frame. You can move these points, but they jump back to their original position the next time you play back, unless you change the keyframes. The points form the basis for all further applications.

Step 12: Link a Pair of Glasses to the Track Points
A practical example is a pair of glasses that follows the face. To do this, create a shape layer with an elliptical shape in the composition and scale it appropriately. Then go to the "Position" property of the layer and find the section with the left pupil. Hold down the Alt key and activate the stopwatch so that the numbers turn red. Then drag the pick whip tool onto the left pupil and release it there. This creates an expression that takes over the position of the pupil.

Step 13: Fine-Tune the Glasses
If the glasses are still slightly offset, the anchor point helps. Select the shape layer and press the A key to make the anchor point visible. Move it so that it matches the center of the glasses. Then you can press the P key to view the position and fine-tune it. Be careful not to change the position with the mouse, as this would break the link to the eye. With a little patience, the glasses will end up sitting perfectly on the face.

Step 14: A Preview of Character Animator
The tracking data can also be reused outside of After Effects. With the "Extract Face Measurements" function, you can copy the data, place it on the clipboard, and later paste it into the Character Animator program. There, characters or puppets can be created from the data. This topic will be explored in more depth in the next tutorial.

Summary ??? Face Tracking in After Effects: Tracking and Editing Faces Selectively
Face tracking in After Effects CC 2015 is a powerful tool that lets you reliably follow faces in footage. The process begins with suitable footage and a precise mask. Then you choose the appropriate tracking mode, limit the work area, and start the calculation. With the "outline only" mode, you edit larger areas of the face, for example to make it unrecognizable. With the detailed features, you get numerous points that you can use for glasses, eyebrows, or other elements. Always pay attention to a calm starting pose and allow enough time for the calculation, and the results will turn out reliably.
FAQ
Do I always need a mask for face tracking?Yes, without a mask After Effects doesn't detect an area it can follow. You can also use an ellipse tool for this, but the results are then often somewhat worse.
Why does the tracking take so long?The closer a face is to the camera, the more details After Effects has to calculate. Limiting the work area significantly shortens the waiting time.
What is the difference between outline and detailed features?The "outline only" mode tracks the outline of the face. The "detailed features" mode additionally detects points for the eyes, nose, mouth, and cheeks.
What is the rest pose for?The rest pose is a face position that is as relaxed as possible, which After Effects uses as a reference. It improves the accuracy of the tracking.


