
Before you place logos, graphics, or particles into live-action footage in After Effects, you need to know how the camera moves in that footage. That is exactly what this tutorial is about. Using a camera move across a breakfast table as an example, I will show you how to set up your project cleanly and how to use the built-in 3D Camera Tracker. You will also learn why the order of tracking and stabilization is so crucial. You can find the project files and the original footage in the folder "Hello World Projektdateien", so you can follow along with every step directly.
The video is only loaded from YouTube when you play it – data (including your IP address) is then transmitted to YouTube/Google. More in the privacy policy
Key Takeaways
- Always perform tracking before stabilization, otherwise the tracker will get thrown off.
- The 3D Camera Tracker only works reliably with static scenes. The camera should be the only moving element.
- Parallax, meaning foreground and background moving at different speeds, helps the tracker recognize the depth of the scene.
- Content that you add later should be placed unstabilized and stabilized together with the footage.
Step 1: Set Up the Project Properly
Start by importing your clip into After Effects. Simply drag and drop the file into the Project panel. A few minutes of organization will pay off many times over later: create a folder for the footage, one for the compositions, and one for sound and other assets. That way you keep an overview even with larger projects.

Step 2: Import Sound and Logo
In addition to the clip, you also need the soundtrack and the show's logo in this project. The logo has already been provided, so you do not have to create it yourself. Import it just like the clip and place it in the appropriate folder as well. The sound in the example is a shortened edit of "Bushwig Tarantella" by Kevin MacLeod. The original, including the license, is included in the project files. When using third-party music, always make sure to comply with the license terms.

Step 3: Create a Composition and Insert the Footage
Now create a composition and place the clip in it. In the example, the shot is a bit shaky and too long. You will adjust the length later with time remapping, and stabilization comes only after tracking. So leave the footage unchanged for now. You will see in a moment why this is so important.

Step 4: Determine the Right Order
Before you start the tracker, you should understand the order of operations. Any subsequent stabilization shifts, rotates, or distorts the image. These very changes confuse the tracker, because it expects the natural behavior of a real camera. If you stabilize first, it calculates a false movement. The rule of thumb is therefore: track first, then stabilize.
This also has implications for your content. Everything you add to the scene later, such as bouncing dots or the logo reveal, you initially insert unstabilized. Only afterward is it stabilized together with the rest of the footage.

Step 5: Open the 3D Camera Tracker
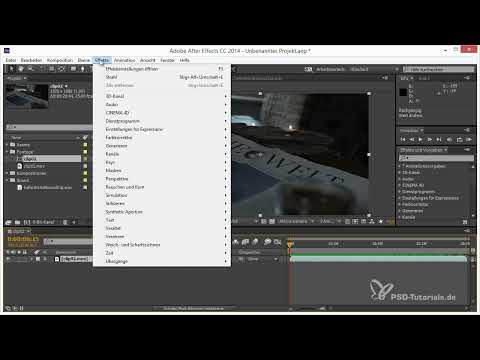
You can find the tracker via the Effect menu, then Perspective, and there the entry 3D Camera Tracker. Alternatively, you can switch to the "Tracking" workspace. There you will find the "Track Camera" button, which has been available since After Effects CS6. Both paths lead to the same result, so choose whichever feels quicker to you.

Step 6: Start the Analysis
With the tracker, you hardly have to adjust anything. It first tracks the tracking points in the shot, then analyzes the movement and calculates the camera move from it. So you only have to wait until the process is complete. Make sure that you have the footage open in the correct composition before you start.
Step 7: Understand the Basic Rules of 3D Tracking
The tracker sets a large number of tracking points and follows them over the entire duration of the clip. In doing so, it assumes that these points remain constant relative to one another, because only the camera is moving. A rolling ball on the table or a crowd of people in the frame disrupts this model. Such objects change their position relative to each other, and the tracker cannot find a reliable solution.
That is why 3D tracking basically only works with static scenes. The breakfast table example meets this condition, since everything stands still and only the camera moves.

Step 8: Checking the Found Tracking Points
After the analysis, you can display the found 2D sources. There you can see the individual tracks that the tracker has followed in the image. As the analysis progresses, it finds more and more points it can use for orientation. Take a look at how these points are distributed and whether they are located at sensible places in the image.
Not every point is ideal. In the example, some points are located on a glass surface where light is refracted. This refraction moves unnaturally. However, the tracker's tolerance is high enough, since it finds enough other reliable points. So you don't necessarily have to remove such outliers.

Step 9: Using Parallax and Checking the Camera
Parallax is crucial for a good result. Foreground and background objects move at different speeds during a camera move. In the example, there is the table in the foreground and the cabinet in the background. The tracker compares these movements and derives the depth of the scene from them. The more such depth differences appear in the image, the more precise the reconstruction becomes.
To check, you create a new camera in your scene and look through it into the view. In the example, it turns out that the tracker has reproduced the movement and rotation of the original camera. The points in 3D space are therefore positioned relative to each other just as they were in the original. The result is thus suitable for further work.

Step 10: Outlook on Stabilization
With the tracking, you have created the framework on which everything else builds. In the next step, you will build your stabilization toolset. There you will also add the logo reveal and the jumping dots, which you deliberately left unstabilized earlier. Keep the tracked composition unchanged so that you can fall back on it at any time.

Summary – 3D Camera Tracking in After Effects: Setting Up the Project and Tracking the Camera
In this guide, you have learned how to organize an After Effects project with footage, sound, and logo, and how to use the 3D camera tracker correctly. The most important principle is: track first, then stabilize. The tracker needs a static scene and parallax in order to reliably reconstruct the camera move. Checking with a new camera in 3D space shows you whether the result is correct. With this foundation, you can cleanly combine stabilization and content in the next step.
FAQ
Why do I have to track before stabilizing?Because any stabilization alters the image, giving the tracker an unnatural motion pattern that it cannot evaluate correctly.
Why doesn't the 3D tracker work with moving objects in the image?The tracker assumes that the tracking points remain constant relative to each other. If objects move independently of the camera, this model no longer holds.
What does parallax mean in 3D tracking?Parallax occurs because foreground and background objects move at different speeds during a camera move. The tracker uses these differences to calculate the depth of the scene.
How do I check whether the tracking is correct?Create a new camera in your scene, look through it into the view, and compare the reconstructed movement with the original footage.


