
Imagine a point that doesn't hop across a flat surface, but across the surface of a sphere, and every jump arcs exactly outward, away from the globe. That's exactly what you'll build step by step in this tutorial using expressions in After Effects. You'll learn how to determine the center of a sphere made of many layers and use it to calculate a jump vector that is always perpendicular to the surface.
The video is only loaded from YouTube when you play it – data (including your IP address) is then transmitted to YouTube/Google. More in the privacy policy
Key Takeaways
The jump vector is created by subtraction: you subtract the center's vector from the jumping point's vector. As a result, every jump automatically points outward from the center of the sphere.
You determine the center as the average position of all relevant layers, which you narrow down with a controller between First Layer and Last Layer. Afterwards, you bake the value into a null object so that the calculation doesn't have to be re-run on every frame.
The multiplier of the jump vector determines the jump height. If you apply it to all three axes (X, Y and Z), the jump works correctly. If only the Y values are on the multiplier, the point only jumps up and down.
Step-by-Step Guide
Starting Point: Apply the Preset and Remove Keyframes
You start with the preset for the jumping point that you built earlier. First, remove the keyframes for the jump vector and the drawing point so that you're working from a clean base. Then apply the Jumping Point preset jp01. The jumps in this composition are still much too big, so you reduce the values via the Effect Controls.

Adjust the Jump Height and Identify the Problem
Set the jump height from 200 to about 100. This makes the jump clearer, and you can see that although the point jumps back and forth, the arcs curve inward. That's exactly what you want to avoid. The jumps should always run outside the globe.

Idea: Calculate the Jump Vector from the Center
The key idea is this: you calculate the jump vector so that it points from the center of the sphere through the current position of the point. As long as the point lies on the surface, the vector is therefore always perpendicular to the sphere. For this you first need the center, and you determine it with a custom expression.

Determine the Center with Expressions
Duplicate the null object Jumping Point 01 and remove its position keyframes. Then create an expression on the position that refers to two layer controllers: one for the First Layer and one for the Last Layer. In the example, the First Layer is layer number 6 and the Last Layer is layer 697. The expression calculates the average position of all layers between these two values.
Be patient when selecting the layers. With around 600 layers, scrolling in the dropdown takes a while, and After Effects isn't optimized for so many layers. The average position doesn't correspond exactly to the center of the sphere, but it comes close enough.

Convert the Expression into Keyframes
The expression has to go through 600 layers on every frame, which slows down the preview. That's why you bake it into fixed values. First trim the work area to a short section, because only that section will be calculated later. Then Shift-click and right-click on the position, open the Keyframe Assistant and choose "Convert Expression to Keyframes". Afterwards, delete all keyframes so that only the fixed value remains.

Check the Center in the Views
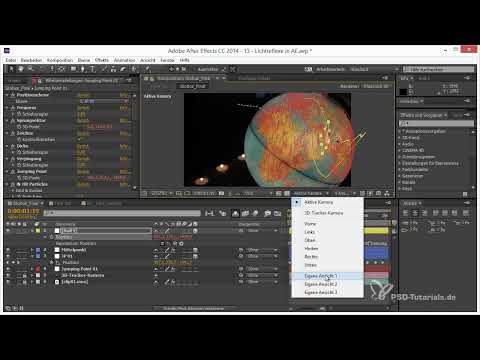
Check the center in the four views. A null object in the center of the sphere helps you verify the position. The average position is initially a bit off, so you move the value manually until the null object really sits in the middle of the sphere. Zoom the layer out a little so that you keep the entire globe in view.

Calculating the Jump Vector via Expression
Now the actual jump vector comes into play. The expression simply subtracts the center point's vector from the jumping point's vector. Apply it to the jump vector by Alt-clicking the stopwatch and pasting in the prepared expression. In the "Point" field, enter Jumping Point 01, and in the "World" field, the null object of the center point.

Controlling Jump Height with a Multiplier
The jump vector is multiplied by the value you enter. With a value of 1, you get the original vector, and the jump is usually far too high. Set the value to about 0.5, and the point will only jump half as high. To keep an eye on the jump height, you can create a yellow control null object with a fader and link its value to the Jumping Point via expression.

Adjusting Keyframes for the Route
With this route, the animation only samples the globe at certain time intervals. Therefore, move the second and third position keyframes further back so that the point reaches more intermediate stops. Also increase the frequency of the jumps so that the point jumps about once per second. Since the animation is not altered via Time Remapping, you can only achieve the desired rhythm through the keyframes.

Adjusting Preview and Speed
Set the preview to Quarter and create a RAM preview to assess the current state. If the speed is too slow for you, increase the value in the Effect Controls, for example to two. Then the point jumps twice as often. You can also adjust the Longevity to give the jump a different timing.

Readjusting Handles and Interpolation
Not every arc looks good right away. Select the relevant keyframe and adjust the handles. If the handles lose their connection when you move them, right-click the keyframe and set the interpolation back to a smooth Bezier curve. Afterwards, you can flatten the tangents slightly so that the arcs look softer.

Reducing the Distance to the Globe
Sometimes the point in the preview is still a bit too far from the surface. In this case, select only a single keyframe, not the entire position, and pull it a little closer to the globe. This way, the rest of the motion path remains unchanged.

Applying the Jump Vector to All Three Axes
During testing, you notice that the point only jumps on the Y axis. This is because the values for X and Z in the multiplier were set to zero. Therefore, enter the same value in all three fields, for example 0.3. After that, you get the true jump vectors, the point jumps across the entire sphere, and the height stays pleasantly low.

Final Check in the RAM Preview
Finally, create another RAM preview of the entire sequence. Pay attention to the arcs on the back of the globe and make sure the point never disappears on a path outside the sphere. If everything fits, you have a jumping point that follows the globe and strikes every arc perpendicular to the surface. The next step in the video is dedicated to the light that the point casts onto the globe.

Summary ??? Jumping Point on the Globe: Jump Arcs in After Effects
With a calculated center point and a jump vector derived from subtraction, you create jumps that always run perpendicular to the sphere. The center point is derived from the average position of many layers, which you then convert into keyframes. The multiplier controls the height, and if you apply it to all three axes, the point jumps correctly over the globe in every direction. You round off the motion with fine-tuning of the keyframes and handles.
FAQ
Why does the point jump inward without a jump vector?Without a jump vector, the movement does not align with the spherical shape. The point always jumps in the same direction and can therefore travel into the globe or past it.
Why is the expression for the center point so slow?The expression runs through all layers between First Layer and Last Layer on every frame. With around 600 layers, this takes significantly longer. That is why you convert the expression into keyframes as soon as the value is settled.
Does the center point have to be calculated exactly?No. The average position comes close to the center of the sphere. With the null object in the four views, you can refine the position by hand until it sits in the middle.
Why does the point only jump up and down?The values for X and Z in the multiplier are probably set to zero. Enter the same value in all three fields, and the correct jump vectors will be created.
How do I change the jump height without changing the expression?Adjust the multiplier of the jump vector. A value of 0.5 halves the height, and with a control null object you can conveniently control the value via the Effect Controls.
How do I increase the frequency of the jumps?Move the position keyframes closer together. Since the animation is not altered via Time Remapping, the spacing of the keyframes determines the rhythm.


