
Imagine you're sitting on the train, you've spontaneously recorded a few clips, and you want to turn them into a cohesive video today. That's exactly what iMovie on the iPad is made for. The app offers many features you know from the Mac, and thanks to touch controls it can be used conveniently on the go.
The video is only loaded from YouTube when you play it – data (including your IP address) is then transmitted to YouTube/Google. More in the privacy policy
In this guide, you'll get to know the start view, automatically create a movie with Magic Movie, work with storyboard templates, and edit your own clips in the Movie section. I'll also show you how to use titles, filters, and audio, and how to share or save your project at the end. The basics also apply to the iPhone, as the interface is very similar.
Key Takeaways
- iMovie on the iPad offers three sections on the start page: Magic Movie, Storyboard, and Movie.
- Magic Movie automatically creates a movie from selected photos.
- Storyboard templates such as Trailer can be filled with your own videos.
- In the Movie section, you cut clips, adjust speed and volume, apply filters, and add titles.
- Projects are saved and, unless disabled, stored in iCloud.
- You can share finished videos directly or save them to the gallery.
Step-by-Step Guide
Step 1: Understanding the Start View
Open iMovie. Without existing projects, the start view initially looks rather empty. At the bottom edge, you'll find a slider that you pull upward to reveal the sections. There are three options to choose from: Magic Movie on the left, Storyboard in the middle, and Movie on the right. Magic Movie and Storyboard are intended for quick results, while the Movie section is for the classic editing of your own footage.

Step 2: Using Magic Movie for Automatic Movies
Magic Movie is a feature you don't know in this form from the Mac. You select several photos, and iMovie automatically creates a movie from them. So you hardly have to do any design yourself. When selecting, pay attention to suitable subjects and a sensible order, because the better your photos fit together, the more appealing the result will look.
Step 3: Downloading Storyboard Templates
The middle option, Storyboard, offers various templates, for example for a trailer. At the bottom, you'll find the button "Download All". With it, you download all the templates. This is useful if you want to try out several styles before deciding on one.

Step 4: Selecting and Customizing a Template
Tap a template, for example "Movie" or "Basics", to view it in the preview. Before you create, you can adjust color, font, and music. You should be careful with music: check beforehand whether you're even allowed to use the track commercially or on social media. In the tutorial, I skipped it because this question wasn't clearly resolved. Once you're happy with the settings, tap "Create" and wait a brief moment until iMovie has set up the project.

Step 5: Filling the Placeholders in the Trailer
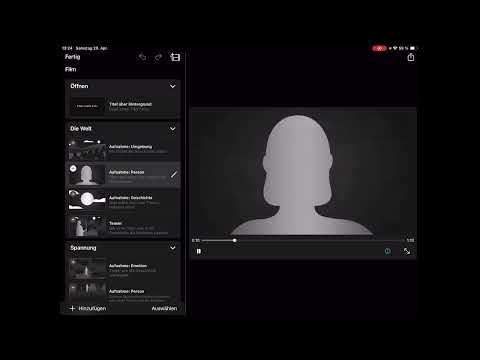
After creating, an overview appears that adopts the title, font, and color from the template. The gray placeholders show you where you can insert content. Tap on them and select the desired video or photo. iMovie then inserts the clips into the scene sequence and often adds suitable transitions. Using the icon with the two stars, you open the settings for the respective scene and can adjust it afterwards. Using "Add" at the bottom left, you add further videos, titles, or clips from the library.

Step 6: Finishing, Sharing, and Saving the Project
Once your movie is finished, tap "Done" at the top left to save the project. At the top right, you'll find the "Share" option. There you can send the video to family and friends, publish it on social media, or save it to your gallery. In the project overview, you can find all saved projects again at any time. Unless you've disabled iCloud storage, they're also stored there, so nothing gets lost.

Step 7: Starting a New Film Project
In the Film section, you start a new project. Choose a video from your media library, mark it with the checkmark, and then confirm with "Create Movie". Your footage will then appear in the timeline. Pay attention to the aspect ratio: A portrait video, as is common on YouTube Shorts, will not fill the entire frame in a landscape project. iMovie will then display borders. This is not a malfunction, but a matter of display.

Step 8: Using Additional Functions via the Gear, Microphone, and Photo Icons
At the top right you will find the gear icon, which lets you apply filters to your video. With the microphone icon, you can record a voiceover commentary at any time. The photo icon allows you to add more photos and media. The audio track is displayed separately so that you can edit it specifically. In addition, individual clips can be faded in at the beginning and faded out at the end. For certain topics, such as a news style, there are suitable templates that can automatically appear in a matching design for titles.

Step 9: Editing a Clip Precisely
Tap the video track so that the context menu opens. There you can delete the clip, shorten or lengthen it with a finger gesture, and trim it from the end. You can also adjust the speed, insert a freeze frame, or control the volume. Without an audio track, however, the volume control has no effect. The speed adjustment in particular is well suited for using slow motion or highlighting a special moment.

Step 10: Adding and Designing Titles
Via the "Titles" option, you insert text into your video. In addition to classic titles, there are also variants with effects, such as "Reveal". After inserting, tap the "Aa" icon to change the font, and the color icon to adjust the text color. Via the three dots you reach further options. After placing it, check whether the text covers important areas of the image, and adjust the position if necessary.

Step 11: Using Picture-in-Picture, Split Screen, and Green Screen
For more sophisticated design, iMovie on the iPad offers cutaways, picture-in-picture, split screen, and green screen. You place a second video over the main clip by inserting it via the Add function, and then adjust its size and position. This technique is excellent when you want to show two subjects at the same time, such as a reaction next to a main scene. After inserting, you usually still have to fine-tune the result a bit until everything looks coherent.

Step 12: Adding Audio and Finishing the Project
You add audio recordings, sound effects, your own music, and soundtracks in a similar way to iMovie on the Mac. Here, too, the following applies: Pay attention to the license terms, especially if you want to use the video commercially. When everything is right, tap "Done" at the top left. After that, you can play, share, or edit your video directly, or delete the project. This is how finished videos are created entirely on the go, without you necessarily having to sit at a Mac.

Summary ??? iMovie on the iPad: Editing and Designing Videos on the Go
With iMovie on the iPad, you can create videos from the first idea to the finished clip directly on the go. You start in the start view, use Magic Movie for automatic results or storyboard templates for structured trailers. In the Film section, you cut clips, adjust speed, volume, and filters, add titles, and use techniques such as picture-in-picture. Finally, you share your work or save it to the gallery. Always pay attention to the usage rights of your music and media, and then nothing stands in the way of your next project.
FAQ
Do I need to take out a subscription for iMovie on the iPad?No, iMovie is free to use and does not require a subscription.
Where can I find my saved projects again?You can find saved projects in the iMovie project overview. Unless you have disabled iCloud storage, they are also stored in your iCloud.
Why is my portrait video displayed with borders in the project?The project has a landscape aspect ratio. If your clip does not match it, iMovie displays borders. The video itself is not damaged in the process.
May I insert music from the internet into my movie?That depends on the license. Check beforehand whether you may use the music commercially or on social media before you use it.
How do I save a finished video to the gallery?After finishing, tap "Share" and choose the option to save to the gallery.


