

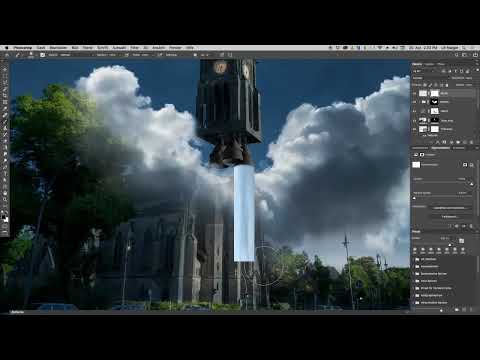
Your rocket is already in the picture, but the engines still lack fire. This is exactly where this tutorial comes in. You build the exhaust jets from a tiny rectangular section of a cloud, stretch it in one direction, and then brighten it selectively. The effort is manageable, yet the result still looks believable and dynamic.
The video is only loaded from YouTube when you play it – data (including your IP address) is then transmitted to YouTube/Google. More in the privacy policy
Key Takeaways
Key Takeaways
- A small section with varying brightness values is suitable as base material for exhaust jets.
- When scaling, you change only one dimension if you hold down the Shift key before dragging the handle.
- You adjust the brightness with the Levels adjustment, without using an additional adjustment layer.
- Layer masks ensure that the jet disappears behind the brickwork and does not extend beyond the engines.
- A white core at the engines enhances the lighting effect.
- A layer group keeps the finished jets neatly together.
Step 1: Find the right cloud and choose the section
Open the group with the cloud layers, which contains clouds 1 and 2. There, look for a spot where light and dark tones are close together. A purely dark or purely light area will not produce a lively flame later. With the Rectangular Marquee tool, select a narrow strip that is roughly as wide as one of your engines. Make sure you make the selection in the correct cloud layer, because otherwise you will copy the wrong material.

Step 2: Duplicate the section as its own layer
Copy the selection with the keyboard shortcut Command plus J (on Windows Ctrl plus J). Photoshop then creates a new layer that contains only the selected area. Give it a meaningful name right away, for example "Jet". This makes it easier for you to find your way around later when you work with several jets.
Step 3: Remove the jet from the group and place it above the clouds
Drag the new layer out of the cloud group and place it above the clouds. This way it remains independent of the group and you can edit it freely. Afterwards, close the cloud group again so that your workspace stays tidy.
Step 4: Move the jet to the engines
Activate the Move tool and drag the jet to the position of the engine. Zoom in closer to the engines so that you can judge the position precisely. It is worth enlarging the view from time to time to see where the jet should actually start.
Step 5: Scale the jet in width
In the Edit menu, choose the command Transform and then Scale. First, adjust the jet so that you can control the width well. Then click on the side handle without moving the mouse yet. Hold down the Shift key and only then drag. In this way you change only the width and the subject is not distorted in height.

Step 6: Stretch the jet in height
For the length, you proceed in the same way. Click on the handle at the bottom or top edge, hold Shift, and drag the jet downward. This creates a long, slender flame that streams away toward the back. You can then pull the shape a bit further upward if the jet looks too short at the base.

In this step, be sure to pay attention to the Shift key. The instructor in the video forgot it several times himself. If you drag without Shift, the image is distorted uncontrollably and you have to start the transformation over. Finally, confirm the transformation with the Enter key.

Step 7: Brighten the jet with the Levels adjustment
The jet is still too dark. Instead of creating an adjustment layer, you open the Levels adjustment directly with the keyboard shortcut Command plus L (on Windows Ctrl plus L). This is a deliberately pragmatic choice. If you misjudge it, you can recreate the jet at any time and repeat the process. Drag the sliders so that the area becomes noticeably brighter, and at the same time reduce the color saturation a little so that the jet does not appear too colorful. A subtle, almost whitish glow is the most convincing.

Step 8: Position the jet exactly above the engine
Move the brightened jet again with the Move tool. You can fine-tune it with the arrow keys, as this moves the layer pixel by pixel. Make sure the base sits exactly beneath the engine.

Step 9: Tame the jet with a layer mask
In the next step, you make sure the jet is visible only where it belongs. Create a white layer mask. Choose a soft brush with black color and reduce the opacity, to about 50 percent. Then paint carefully over the areas where the jet should not appear. At the top, where the flame comes directly out of the engine, you can work with full opacity. At the bottom, farther from the source, a lower opacity of around 20 percent is worthwhile so that the transition stays soft.

An important note: the jet must disappear behind the masonry at the end. Check that no hard line remains visible, on either side.

Step 10: Transfer the technique to the remaining engines
For the other two engines, you repeat the steps. Duplicate the jet layer with Command plus J, move it to the next engine, and adjust width and length if necessary. You will have to edit the mask slightly differently for each jet, because the engines differ in shape and position. This may mean that you unlink the layer and the mask in order to move the image and the mask separately. Afterwards, you paint with black what is still showing too much, or with white where the jet is still missing.
With the third engine, you can feel free to work a bit more generously with white paint and an opacity of about 20 percent. The jet at the front engine, on the other hand, should lie beneath the others so that the depth effect is right.

Step 11: Emphasize the white core of the engines
The engines themselves glow very brightly. Therefore, create another layer and name it, for example, "White". With a soft white brush at about 20 percent opacity, paint the brightest area directly at the nozzle. You don't need to create works of art here. It is enough to gently brighten the center of the flame. If the effect looks too strong, simply take a little back with black.

Step 12: Combine the layers into a group
Finally, you organize everything. Select the jet layers, their copies, and the white layer. Via the menu, create a new group from the selected layers and name it, for example, "Exhaust jet". This keeps the Layers panel clear, and you can move, hide, or adjust the entire effect group later with a few clicks.

Summary – Exhaust jet in Photoshop: Creating engine flames from a small selection
You have seen that a small section of a cloud is enough to create convincing exhaust jets. You copy the selection to its own layer, stretch it in width and height while holding the Shift key, and brighten it with the Levels adjustment. Layer masks ensure that the flame disappears where it should not be visible. A white core at the engines rounds off the effect. With a layer group, the project stays organized in the end.
FAQ
Why should I hold down the Shift key when scaling?With Shift, you change only the desired dimension, so the jet isn't distorted uncontrollably.
Do I have to use an adjustment layer for the brightness?No, in the tutorial the Levels adjustment is applied directly, which is quick and can be replaced at any time with a new jet if needed.
What opacity is suitable for the mask?At the top by the engine you can work with 100 percent, further down 20 percent is often enough for a soft transition.
What do I do if the jet shows a visible line at the masonry?Paint over the transition with a black brush until the jet disappears behind the masonry.
Why do I use a separate copy for each engine?Each engine has a different position and shape, so an individual mask is usually necessary.

