
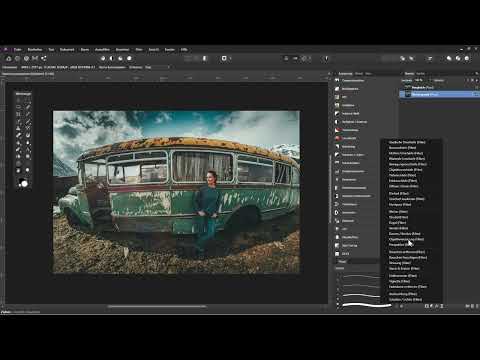
A wide-angle image thrives on its depth and its many details, but as soon as building lines bulge outward, the subject quickly looks crooked. This is exactly where this tutorial comes in. You will learn how to straighten curved lines in Affinity Photo using a horizontal guide, keep a comparison image, and adjust the correction step by step via live filters. The basis is the video "Improving Photos in Affinity Photo: 14 | Compensating for Distortion", which lasts a good six minutes. The method does not work perfectly on every image, but it noticeably reduces lens distortion.
The video is only loaded from YouTube when you play it – data (including your IP address) is then transmitted to YouTube/Google. More in the privacy policy
Key Takeaways
- Wide-angle and fisheye lenses produce typical distortions that cannot be removed completely, but can be significantly reduced.
- A comparison copy of the original and a guide along an element of the subject that is actually straight form the basis of the correction.
- The lens distortion in the live filter is non-destructive and can be readjusted at any time, whereas developing in the Develop Persona is not.
- Edge areas are lost during distortion correction, so you should plan the crop from the start.
- Several small correction steps usually lead to a more natural result than a single strong intervention.
Step-by-Step Guide
Step 1: Secure the original image and create a comparison copy
Open your photo in Affinity Photo. It is present as a background layer in the Layers panel. You should not modify this layer directly. Instead, duplicate it with the keyboard shortcut Ctrl+J. Then rename the copy "Vergleich" (comparison) so that you can easily show a before-and-after comparison later. Hide this layer, then select the background layer again and zoom out of the image a bit so that you keep the curved lines fully in view.


Step 2: Show the rulers and set a guide
To have precise orientation, you need the rulers. If they are not visible for you, open the "View" menu and activate "Show Rulers" there. Then click on the top ruler, hold down the left mouse button and drag a horizontal guide into the image. In the video, this line is shown in blue. Place it so that it lies as exactly as possible on the roof of the bus, because you align the correction to this edge. A part of the subject that is straight in reality is the most important benchmark for all following steps.

Step 3: Choose between live filter and Develop Persona
Before you get started, decide on a way of working. You can use a live filter on the background layer, which can be adjusted at any time later. Alternatively, you create a copy of the background layer and work in the Develop Persona. There, under "Lens", you will find the menu item "Lens Correction" with sliders for the distortion. The Develop Persona is actually intended for developing RAW files. If you drag the distortion slider to the left, the image is corrected. You can additionally tilt, scale or rotate. The catch: if you click "Develop", you cannot easily return to these settings. That is why the live filter is the better choice in most cases.


Step 4: First correction via the live filter
Select the background layer, open the Live Filters menu and click on "Lens Distortion". There you will find a single slider that fulfills the same function as in the Develop Persona. Move the slider to the left while keeping an eye on the guide. In the example, you stop at a value of about 98 percent, because from there the curvature of the roof is not straightened any further. Too much correction would make the subject look unnatural. Better two smaller steps than an exaggerated cut.

Step 5: Crop the image and continue the correction
Every distortion correction pulls edge areas of the image along with it, which is the price for straight architecture. So select the Crop Tool, drag the top handles down and the left handle to the edge of the curvature. This way you lose as little of the original image as possible. Confirm the crop with a double-click. Afterwards, compare the result with the hidden comparison layer to see what has changed.

Next, you add another Lens Distortion live filter. Drag the slider to the left again, to a value of about 27 percent in the example. Take advantage of the fact that you can adjust each filter afterwards.

Step 6: Move the guide line and make further corrections
With the Move tool, you can reposition the guide line once more. Place it directly in the area of the roof and align the correction with this new line. In the video, a value of about 21 percent is enough for the roof to run roughly as straight as the guide line. Make sure you don't overdo it, otherwise new distortions will appear in other areas of the image.


Step 7: Final crop and checking the result
Since parts of the image are lost at the top with the second correction as well, you pick up the Crop tool again. Drag the top edge downward and adjust the sides until the subject looks coherent. Confirm with a double-click. The result still looks slightly distorted, because a wide-angle lens inevitably shapes the composition of the image, but the distracting curvature is significantly reduced. Finally, turn on the comparison layer to check the before-and-after result.

Summary – Correcting Lens Distortion in Affinity Photo: Tutorial
With a comparison copy, a guide line along a straight element of the subject, and the Lens Distortion live filter, you have a tool that visibly reduces curved lines in wide-angle and fisheye images. Work in small steps, check each intermediate state against the comparison image, and plan for the crop. This way the subject stays natural and you keep control over the final result.
FAQ
Why shouldn't I edit the background layer directly?The background layer is your original, and with a copy or a live filter you always keep the option of returning to the original image.
How does the live filter differ from the Develop Persona?The live filter is non-destructive and can be readjusted at any time, whereas after clicking "Develop" in the Develop Persona you can't easily get back to the settings.
Why do I lose parts of the image when correcting distortion?When correcting distortion, the edges are shifted so that areas outside the new frame disappear. That is why cropping is an integral part of the method.
How far should I correct the distortion?Correct step by step and stop as soon as the curvature no longer decreases or the subject looks unnatural.
What do I do if the rulers are not visible?Open the "View" menu and enable the "Show Rulers" option.


