
Hard edges, clean curves, and clearly outlined shapes are the domain of the Pen tool. Whether headphones, speakers, or a car window: with a path that you set point by point, you outline an object precisely, without pixel edges appearing. In this tutorial, I will guide you step by step through the process, from the first anchor point through fine-tuning the curves to the finished mask with a new background.
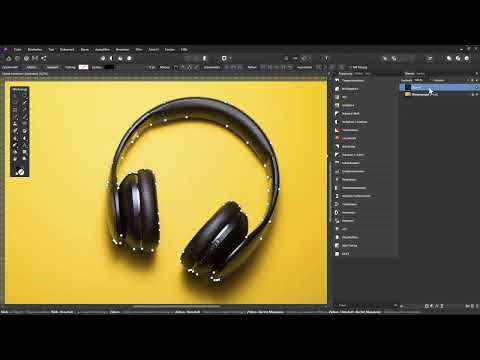
The video is only loaded from YouTube when you play it – data (including your IP address) is then transmitted to YouTube/Google. More in the privacy policy
Key Takeaways
- The Pen tool (keyboard shortcut P) creates paths from anchor points, lines, and curves. You are not working with pixels, but with vectors.
- Clicking and dragging creates curves. With the Alt key held down, you remove individual handles; with Ctrl and Alt, you move them independently of each other.
- From a closed path, you create a selection or a path mask that you can edit at any time.
- Duplicate the path as a backup before continuing to work.
- Slightly blur the mask edge if your original image is not completely sharp.
- For cutouts such as window panes, you use the "Subtract geometry" function.
Step-by-Step Guide
Step 1: Activate the tool and distinguish it from the brush
You can find the Pen tool in the toolbar, or get to it faster with the keyboard shortcut P. Don't confuse it with the brush. With the brush, you paint directly on the image or on a mask. The Pen, on the other hand, sets individual anchor points, and between them run lines or curves that can be adjusted at any time.

Step 2: Set the first anchor point
With the tool activated, click on the edge of your object where you want to begin. If you hold down the left mouse button and drag a bit, two small handles slide out of the anchor point. These handles determine the direction and strength of the curve up to the next point. A simple click without dragging, on the other hand, creates a sharp corner.

Step 3: Shape curves with the handles
Set the second anchor point at the next spot and click again while dragging. A curve is created between the two points. To reshape it, hold down the Ctrl key (the Command key on a Mac) and drag the handle. The curve follows the movement until it matches the curve of your speaker. A contour that you create this way stays completely smooth even when enlarged.
Step 4: Correct anchor points afterwards
If a point is a few pixels off, you don't have to start over. Hold down Ctrl, click the anchor, and drag it to the right place. The associated handle moves along with it. Make sure the background doesn't show through beneath the curve, as that is usually a sign of an incorrectly placed point.
Step 5: Create straight lines
On a headphone band, you often need a straight line instead of a curve. Simply dragging a handle downward doesn't help much here, because the opposite handle moves in sync and bends the curve in the opposite direction. Instead, hold down the Alt key (the Option key on a Mac) and click on the handle. It disappears, and a straight segment is created between the points.

Step 6: Move handles independently of each other
If you want to refine the curve later, don't remove the handle, but detach it from its counterpart. To do this, hold down Ctrl and Alt at the same time, click on the handle, and move it. The other one remains untouched. This way the curve stays flexible, and you can readjust at any time. For an absolutely straight line, it is enough to click on both points one after the other with the Alt key held down.
Step 7: Solve curve changes and S-curves cleanly
At the transition from one curve to the next, an S-curve often forms. Here too, detach the handle from its counterpart with Ctrl and Alt and drag it in the appropriate direction. With this approach, you reproduce the transition precisely. Don't be put off if the curve looks uneven on the first attempt. Often a small correction to the handle is enough.

Step 8: Navigation and Fine Correction
If you can see background again beneath a curve, the anchor is usually sitting slightly off. Hold down the Ctrl key and drag the point into place. If you need to navigate within the image, hold down the spacebar. The cursor turns into a hand, which you can use to move the view. Double-clicking the hand icon takes you back to the overall view.

Step 9: Working by Eye and with Planning
Not every section needs many anchor points. Where the course is gentle, one point is enough, and you smooth out the curve over longer stretches using the handles. The typical beginner mistake is clicking all the way around the entire image. This takes a lot of time and produces uneven contours. Decide beforehand whether the course should be one continuous curve or several consecutive arcs. With practice, you will quickly recognize where a point is actually needed.

Step 10: Converting Corners and Curves into Each Other
Sometimes a corner appears even though you need a rounded curve. Hold down Shift, click on the anchor and drag to pull out handles again. Conversely, select the relevant anchor point while holding down the Ctrl key and click "Smooth" in the context toolbar at the top to get a curve, or "Sharp" to create a corner again.

Step 11: Closing the Path and Saving a Backup
Return to the starting point and click on the first anchor to close the path. A path layer then appears in the Layers panel above the background layer. Next, duplicate it with Ctrl and J, name the copy something like "Path (Backup)" and hide it. This way you can fall back on it at any time if further work goes wrong.

Step 12: Converting the Path into a Vector Mask
Activate the path layer and, with the path selected, click the mask icon. The background layer underneath is immediately masked along the path. Since it is a vector mask, it remains editable. With Ctrl and a click on a handle, you can also change the contour afterwards.

Step 13: Using a Selection Instead of a Mask
If the edges of your path are very sharp but the original image is not, you need an intermediate step. Show the path layer again and choose the option for selection from path in the menu. Then you hide the path layer, activate the background layer and click the mask icon. With Ctrl and D you deselect the selection when you no longer need it.

Step 14: Softening the Mask Edge
Hold down the Alt key and click on the mask to view it in isolation. You will then see the hard edges. Select the mask, open Filter, Blur and Gaussian Blur and set the value to about 1.5 pixels. Confirm with Apply and compare the result. The edge now looks much more realistic and matches the original image.

Step 15: Adding a Background with a Fill Layer
Since the background is still transparent, you create a color area via Layer, New Fill Layer. Drag it all the way down until it lies beneath the object, and choose a suitable shade of blue. For the time being, the headphones still glow yellow, which you will correct in the next step.

Step 16: Changing the Object Color with a Clipping Mask and Blend Mode
First rename the fill layer, for example to "Background Color". Duplicate it with Ctrl and J and name the copy "Color". Place the copy over the headphones by dragging it onto the background layer. It now acts exclusively on the isolated object. Change the blend mode of the copy from "Normal" to "Hue". The yellow is thereby converted into the chosen shade of blue. A click on the layer and a new hue via the color swatch is enough if you want it different later.

Step 17: Protect the indicator light with a brush mask
The red indicator on the headphones should be preserved. To do this, create a mask for the color layer and select the Brush Tool with black. Paint over the area of the indicator so that the color change is reverted there. By double-clicking the hand icon, you can then see the complete image again.

Step 18: Punch out cutouts with "Subtract Geometry"
For holes such as a window pane, you need a second, closed path. Draw it above the large path, select both path layers while holding down the Shift key, and in the Layer menu use Subtract Geometry. The upper path is subtracted from the lower one, and the background shows through at that spot.

Summary ??? Cutting out with the Pen Tool in Affinity Photo
The Pen Tool thrives on practice and patience. You set anchor points, shape curves using the handles, and detach them from each other with Ctrl and Alt when you need independent movements. A backup of the path protects your work, and converting it into a mask or selection places your object cleanly onto the background. With a slight blur of the edges and a suitable fill layer, you achieve a coherent result.
FAQ
How does the Pen Tool differ from the brush?The brush paints directly on the image or mask, while the Pen Tool creates paths from anchor points and curves that you can still modify later.
What is the Alt key used for with the Pen Tool?While holding down the Alt key, you remove a handle, creating a straight line between two points.
How do I move a handle without changing the opposite one?Hold down Ctrl and Alt, click on the handle, and drag it. The counterpart remains unchanged.
Why should I duplicate the path?The backup secures your work in case you want to discard or rebuild the mask or selection later.
Why does the mask look too hard at the edge?Vector paths are absolutely sharp. A Gaussian blur of about 1.5 pixels on the mask adapts the edge to a blurry original image.
How do I create a hole in an object?Draw a second closed path above the first one, select both layers, and use Layer, Subtract Geometry.


