
Anyone who has ever wanted to cut out a pile of stones, rocks or leaves knows the problem: irregular contours are hard to trace with the Pen Tool, and the result quickly looks artificial. In this tutorial, I'll show you how to cleanly separate a pile of stones from the background in Affinity Photo using the Quick Mask, the Paint Brush and the Flood Select Tool. The method is somewhat more time-consuming, but very precise and controllable.
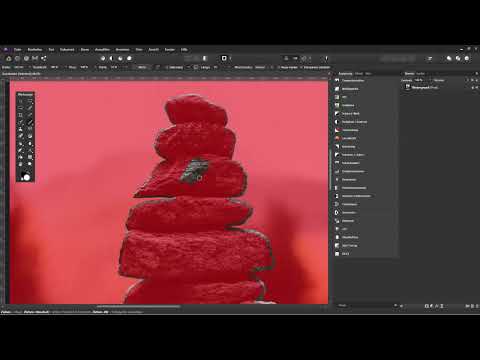
The video is only loaded from YouTube when you play it – data (including your IP address) is then transmitted to YouTube/Google. More in the privacy policy
Key Takeaways
- The Quick Mask shows you all areas that are not yet selected as a red overlay. White marks the selection, black removes it again.
- For irregular contours, the Paint Brush is usually the better choice, while the Pen Tool is suited for clear lines and curves.
- You should adjust the brush hardness to the sharpness of the original image. Blurry areas require a softer brush.
- First you only paint along the edge, then you fill the interior with the Flood Select Tool.
- The tolerance of the Flood Select Tool determines whether small pixels at the edge are also selected. A gap in the edge, on the other hand, causes the fill to leak into the entire image.
- With a spare channel, you save the selection so that you don't have to recreate it later.
Step-by-Step Guide
Preparing the Source Image and Switching to the Quick Mask
Open your image in Affinity Photo. It is available as a background layer. Zoom in on the pile of stones so that you can see the edges clearly. Then select the Paint Brush Tool. After that, you activate the Quick Mask either with the Q key or via the corresponding icon in the top toolbar.

Now a red overlay covers the entire image. This means that nothing is selected yet. You only see the original colors within the brush tip. When you paint with the brush, the selection areas are created there. If you exit the Quick Mask again with Q, exactly the selection you painted earlier appears.

Using White and Black Purposefully
In the Quick Mask, a simple rule applies: white adds to the selection, black removes it again. With the X key, you switch between the two colors without searching in the color palette. With Ctrl+D, you deselect an existing selection completely in case you want to start over.

Setting Brush Hardness and Brush Size
The hardness of the brush determines how sharp the transition between the selection and the background becomes. For subjects with clear, hard edges, you can work with a hardness of 90 percent. If, on the other hand, the image shows a gradient of sharpness in which the background becomes blurry toward the back, a softer brush is more suitable.
The size and hardness can also be adjusted directly on the image. To do this, hold down the Alt key and the mouse button. If you drag left or right, you change the brush size. If you drag up or down, you change the hardness. This is unfamiliar at first, but with a little practice it goes very quickly.

If you work with a graphics tablet, you can additionally activate the pressure function. Then the pressure of your pen determines the size of the brush tip, and you don't have to constantly switch between sizes.

Painting Along the Edge Piece by Piece
Now comes the actual work. First, concentrate only on the contour of the pile of stones and not on the areas inside. If you accidentally go past the edge, simply undo the step or switch to black with X and correct the spot.
For hard edges, it's worth reducing the hardness slightly, to about 85 percent. Even with sharply depicted stones, the edges in reality are not completely straight. Slight anti-aliasing looks more natural and prevents jagged edge effects.

If it helps, you can rotate the document in 15-degree steps via View and Rotation. This makes it easier for you to guide the brushstroke in a comfortable direction. When you reset the view, the image looks normal again.

Not every single stone has to be captured exactly. If a small area lies outside the contour, it usually will hardly be noticeable later. So you don't have to hit every detail perfectly.

Consider the sharpness gradient
Pay attention to areas that are out of focus. In the example, the edge looks slightly blurry on one side. A hard brush edge doesn't match the original image here. You reduce the hardness and paint the transition more softly. This makes the cutout look much more convincing.

If you want to adjust the transition later, that is also possible. You open the mask again in the QuickMask and apply a Gaussian blur filter to the edge area.

Fill the inside of the selection with the Fill Area tool
Painting the entire edge with the brush would be very time-consuming. That's why you choose the Fill Area tool. You'll find it behind the paint bucket icon or via the G key. Make sure that white is the active color, and click in the middle of the pile of stones. The area fills with white and is thereby selected.
It is important that the contour is completely closed. If there is a gap, the fill will run through it, and the entire image will turn white. So check the edge carefully before clicking.

Adjust the tolerance and check the result
After the first click, it may be that small pixels are still missing at the edge. You can recognize the result by the fact that red lines remain visible when you leave the QuickMask. In this case, undo the step and increase the tolerance. In the example, 20 percent initially didn't quite work, at 46 percent lines still remained, and only at 60 percent was the edge captured cleanly.
The right tolerance depends on your image and the brush hardness. With a softer brush, you usually need a higher value.

As soon as you leave the QuickMask, you should check the edge in magnification. Pay particular attention to the places where the background should show through.

Save the selection as a spare channel
Before you create a mask, it's worth making a backup of the selection. To do this, open the Channels palette via View, Studio, Channels. At the very bottom, the pixel selection appears, i.e. the currently active selection. Right-click it and choose Create Spare Channel. With a double-click, you can name the channel, for example Pile of Stones.
This way the selection is preserved even if you create a different selection later. A mistake can thus be corrected easily.

If you want to use the selection again later, switch to the Channels palette, right-click the saved channel, and choose Load as Pixel Selection.

Create a mask and cut out the object
Finally, you activate the background layer and click the mask icon. The selection is thereby converted into a layer mask. You now see the background as transparent. Afterwards, you deselect the selection with Ctrl+D.

The object is now cut out. What you do with it afterwards is up to you. You could, for example, insert it into a composition and anchor it to the ground with a soft shadow.

Summary ??? Cutting Out with QuickMask: Precisely Selecting Rough Edges
With the QuickMask and the Paint Brush, you can cut out objects with irregular contours step by step. First you paint the edge, adjust the brush hardness and size to the image, and then fill the interior with the Flood Fill tool. Make sure you have a closed contour, a suitable tolerance, and a spare channel so that your work stays safe. With a little patience, you will get very clean cutouts that are convincing even with difficult subjects.
FAQ
How do I activate the QuickMask in Affinity Photo?Press the Q key or click the corresponding icon in the top toolbar.
What do I use to add areas to the selection and how do I remove them?With white you paint areas into the selection, with black you remove them. With the X key you switch between the two colors.
When do I use the brush instead of the Pen tool?The brush is suitable for rough, natural contours such as stones, rocks, or clouds. The Pen tool is better for technical objects with clear lines and curves.
How do I quickly adjust brush size and hardness?Hold down the Alt key and the mouse button. If you drag left or right, you change the size; up or down changes the hardness.
Why do red lines remain visible at the edge after filling?The tolerance of the Flood Fill tool is too low. Undo the step and increase the tolerance until the edge is completely captured.
What happens if the contour has a gap?The fill runs through the gap into the entire image, and the selection becomes unusable. Close the gap beforehand with the brush.
How do I save a selection for later?Switch to the Channels panel, right-click the pixel selection, and choose Create Spare Channel. You can then rename the channel.
How do I load a saved selection again?Right-click the spare channel in the Channels panel and choose Load to Pixel Selection.
Can I make the cutout softer afterwards?Yes. Open the mask in the QuickMask and apply a Gaussian Blur filter to the edge area.


