
Imagine a visitor finds your offer exciting but leaves your page again without leaving anything behind. Without a clear sign-up path, that happens quite often. A landing page gives this visitor exactly one reason and one way to contact you: their email address.
The video is only loaded from YouTube when you play it – data (including your IP address) is then transmitted to YouTube/Google. More in the privacy policy
Mailchimp offers a simple solution for this. You don't need your own website, because the landing page is created directly in the Mailchimp editor and is available online immediately. In this guide, I will walk you step by step through creating a newsletter sign-up page, from choosing the template to publishing.
Key Takeaways
- With Mailchimp, you can create landing pages without owning a website.
- Each sign-up is automatically added to an audience of your choice.
- Templates can be freely customized in terms of text, images, font sizes, and colors.
- Additional fields such as the first name help you personalize your newsletters later on.
- The Marketing Permissions document how prospects have decided regarding your emails, and support GDPR compliance.
- A landing page is only online once you save and publish it.
Step-by-Step Guide
Step 1: Create the Landing Page
Open your Mailchimp account and click "Create" at the top. Scroll down a bit until you find the entry "Landing Page" and select it. This starts the wizard for your new sign-up page.

Step 2: Set the Name and Target Audience
First, assign an internal name, for example "Newsletter Landing Page". This name is only visible to you, so it can be descriptive. Then you select the audience into which the new contacts should be added. In this example, we use the audience "Unternehmen XYZ Newsletter". If someone signs up via this page, their email address automatically ends up exactly there. Then you click "Begin".

Step 3: Choose a Suitable Template
Mailchimp shows you several templates. There are also some blank templates that you can use for a completely custom layout. For getting started, a ready-made template is worthwhile, because it gets you a cohesive result faster. Select a template, and the page opens directly in the editor.

Step 4: Customize the Heading and Text
The editor works similarly to the campaign builder for your newsletters. You click on an element and can edit it directly. Delete the existing text and write a call to action, for example "Sign up for my newsletter". A short, clear call to action usually works better on sign-up pages than long explanations.

Step 5: Set the Font Size Correctly
If you highlight the text, you can change the font size using the "Size" option. In the video, a size of 35 is tried first. It quickly becomes apparent that a long paragraph can break the layout. That's why it's worth shortening texts before you enlarge the font further. Test the preview after every change so you can see how the page looks to visitors.

Step 6: Shorten the Text and Strengthen the Impact
A shorter title can have a much stronger effect. In the example, the heading is reduced to "Newsletter" and then enlarged. A possible addition would be "Newsletter Opt-in". The term "Opt-in" describes that someone signs up for a newsletter consciously and voluntarily. It is commonly used in German, so many prospects can relate to it. Make sure the wording remains understandable for your target audience.

Step 7: Choose Colors for Better Readability
Blue is not always the best choice for headings. You can change the text color at any time, for example to black. This often makes the page look clearer and easier to read. Make sure there is enough contrast between the text and the background, otherwise the message gets lost in the design. In the example, the font is also set to size 55 until the result fits.

Step 8: Remove unnecessary elements and set up the email field
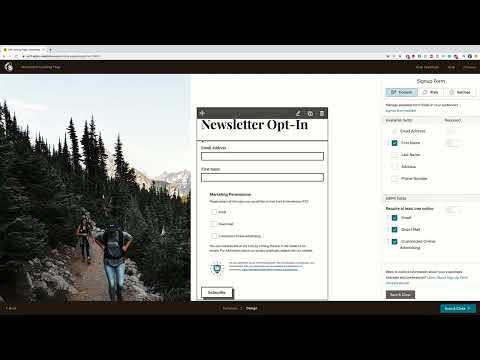
Not every element of the template fits your plan. Select unnecessary blocks and remove them using the delete icon. Afterwards, you will find the signup form with the email field. This is where visitors enter their address. If you want to learn more about your contacts, an additional field for the first name is recommended. You add it via the right sidebar. Other fields such as last name, address, or phone number are also possible, but you should only ask for data that you really need. With a first name, you can make your newsletters more personal later on.


Step 9: Set up Marketing Permissions
Below the form, you will find the so-called Marketing Permissions. They are particularly important if you want to comply with the GDPR. Here you specify what the prospect is signing up for, such as your emails in general, direct communication, or advertising. The selection is made via checkboxes, and the settings are then saved in Mailchimp. This way, you can later trace which contact gave which consent. However, this does not replace legal advice, so you should check the current requirements for your case yourself.

Step 10: Design the button and confirmation message
The button at the end of the form should clearly show what will happen. The phrase "Sign up now" is short and understandable. Below it, you define the confirmation message that is displayed after signup or sent by email. Alternatively, you can redirect visitors to a custom web address after signup, for example to a thank-you page. Which option you choose is up to you.


Step 11: Edit other areas of the page
Scroll further down, where you will find additional text and images. Each area can be clicked and changed. You can edit texts, replace images, add share buttons, or insert completely new content. Take your time with this part, because a coherent overall impression in particular builds trust before someone signs up.

Step 12: Save and publish
When you are satisfied with the result, click "Save and close". You will then return to the overview. Check once more that all the information is correct, because after publishing, nothing important should be missing. Then click "Publish". The landing page will go online immediately and receive a link that you can share.

Step 13: Test the landing page
Open the generated link and look at the page as your visitors will see it later. Sign up as a test with your own address. Afterwards, check in Mailchimp whether the contact has arrived in the audience "Unternehmen XYZ Newsletter". Only this test shows you whether the entire process works smoothly.

Summary ??? Creating a landing page in Mailchimp: How to collect email addresses
You have learned how to create a landing page in Mailchimp, start with a template, and adjust texts, font sizes, and colors. You also know how to set up the email field and optional fields such as the first name, take the Marketing Permissions into account, and save and publish the page. With this knowledge, you can now build your first signup page and transfer your prospects' addresses directly into your audience.
FAQ
Do I need my own website to create a landing page in Mailchimp?No, the landing page is created and published directly in Mailchimp, so you don't need your own website.
Where are the email addresses saved that sign up via the landing page?The addresses are automatically added to the audience you selected when creating the landing page.
Can I ask for additional information such as the first name?Yes, you can add additional fields such as first name, last name, or phone number via the right sidebar.
What are Marketing Permissions?Marketing Permissions are checkboxes that allow prospects to specify which emails they consent to, and they help you better meet GDPR requirements.
What happens if I don't publish the landing page?Then it is not publicly accessible, and visitors cannot sign up via the link.
Can I change the colors and texts later?Yes, you can edit texts, colors, images, and font sizes at any time and save and publish the page again.


