
Anyone who runs ads often guesses which image or text will resonate better. A split test puts an end to this guesswork. You show two variants of the same ad and then compare which one performs better. In this guide, you will learn how to set up the content test. The example is a free 50 g bar of chocolate that you give away. You will find out which settings you need to define before the start, how to create two ads with different images, and what to look out for during the evaluation.
The video is only loaded from YouTube when you play it – data (including your IP address) is then transmitted to YouTube/Google. More in the privacy policy
Key Takeaways
- In a content split test, you change only one variable, for example the image. All other elements stay the same.
- You define the target audience, language, placement, and optimization before the start and apply them to both ads.
- The daily budget must match the number of ad groups. The test power should be at least 80%, otherwise the test will not deliver representative data.
- A cost limit per landing page view caps how much you pay for a result.
- Title, description, URL, and button are also part of the content and can be tested.
Step-by-Step Guide
The following steps build on each other. Stick to the order, because the settings for the target audience and the budget will later apply to both variants.
Step 1: Switch between the tests and open the content
You do not have to create every test from scratch. If you want to switch from one split test to another, simply click on the content of the ad. At the top, the view immediately adjusts to the selected test, so you can see exactly which test you are currently working with.

Step 2: Define the target audience
Scroll down and define the target audience. For the example, you choose Germany as the country and an age range of 20 to 40 years. Keep in mind that these settings should apply to both ads. Only this way can the difference in the result be attributed solely to the content.

Step 3: Set gender and language
In the next step, you choose the gender. For this example, you leave the option on "All". Then you set the language, in this case German. Here too: what you define now stays constant throughout the test.

Step 4: Add detailed targeting
Further down, you will find detailed targeting. Here you can specify interests or behaviors that fit your offer. In the video, the interest "chocolate" is entered as an example. In your own project, choose terms that really fit your product, because overly general entries dilute the target audience.
Step 5: Define placements
Now you decide where your ad should appear. With automatic placement, the system distributes the ad across available placements on its own. With manual placement, you determine the locations yourself. For getting started, the automatic option is usually the easier choice, because it takes the selection off your hands.

Step 6: Set optimization to landing page views
In the optimization section, you define which result the system should achieve as often as possible. Options include link clicks or landing page views. In the video, the instructor chooses landing page views, because the ad should actually bring people to your page and not just encourage them to click.

Step 7: Set a cost limit per result
Directly below, you set a cost limit. This caps the maximum you want to pay for a result. In the example, the upper limit is 30 cents per landing page view. Choose a value that fits your calculation so that the test does not become expensive unnoticed.

Step 8: Check daily budget and test power
Now you set the daily budget for the entire split test. In the video, an amount of €47 is mentioned. This value works if only two ad groups are running. More important than the exact amount is the test power. It should always be at least 80%. If it is below that, the test does not deliver reliable data, and you cannot make a dependable decision. If necessary, adjust the budget so that the test power is reached.

Step 9: Create Ad A
Click "Continue" at the bottom. The ad creation screen opens. You now see Ad A and Ad B. First create the content for Ad A. This variant is your baseline, which you will build on later.

Step 10: Select an image for Ad B
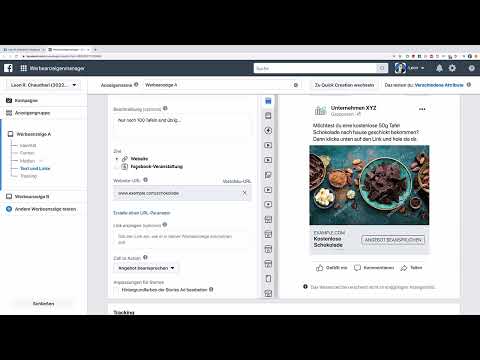
In the example, a single image from the stock photos is selected for one variant. You click "Add media" at the bottom, choose Add image, and open the stock photos. Search for a suitable term, for example "chocolate", select a photo you like, and click "Continue". The image is applied directly to the ad.

Step 11: Write the main text
Now you write the ad text. In the video, it reads: "Would you like to have a free 50 g bar of chocolate sent to your home? Then click the link below and get yours." Make sure the text clearly states what the user gets and what they should do. You can later use this text unchanged for variant B.

Step 12: Add title, description, and URL
Below the text, the title and description of the ad appear. In the example, the title is "Free Chocolate". The description is "Only 100 bars left!". Finally, you enter the target URL, in the example example.com/schokolade. Check whether the URL matches the landing page to which you want to send visitors.

Step 13: Choose the right button
Next, you choose the button that appears below the ad. Options include "Claim offer", "Shop now", "Sign up", or "Subscribe". The video makes clear that longer terms are quickly displayed too small in the designated area. The instructor therefore opts for a shorter, suitable wording. So when making your choice, pay attention to length and relevance to the offer.

Step 14: Customize Ad B with the second image
When you are finished with Ad A, you go to Ad B. There, the content is initially identical because you copied it over. Now you change only the image. Click "Edit image", then "Change image", and again select a stock photo on the topic of chocolate. In the video, a photo is chosen that shows only a single bar, while variant A shows several pieces of chocolate. Confirm with "Continue".
During the upload, a temporary error may occur. In the video, it does not disappear immediately. If this also happens to you, do not reload the page hastily, but first check whether the preview is displayed correctly in other places.
Step 15: Confirm and start the test
When both variants are complete and you have checked the budget and the test power, click "Confirm" at the bottom. The split test starts. From now on, the system distributes the ads across your target audience. Do not constantly interfere with the settings during the run time, otherwise you will distort the result.

Step 16: Compare results and make decisions
After a sufficient run time, you compare the results. The point of the test is that you changed only one variable. If Ad A is more profitable, you know that the photo with several pieces of chocolate works better. If Ad B is better, the clear single bar appeals more. If both are equally profitable, the image content is apparently secondary for your target audience. On this basis, you decide whether to invest more budget in one variant, put no further resources into the weaker one, or let both continue running.

Summary – Split Test Content: Testing Ads Step by Step
A split test of the content compares two variants of an ad that differ in only one element. You define the target audience, placement, optimization, cost limit, budget, and test power in advance and apply these values to both variants. Then you create the ads, change the image, for example, and start the test. The evaluation shows you which variant is more profitable and forms the basis for your budget decision.
FAQ
How much budget do I need for a split test?In the video, a daily budget of €47 is given as an example. The appropriate amount depends on the project; the most important thing is that the test power reaches at least 80%.
Why should the test power be at least 80%?If it is lower, the test does not provide representative data, and you cannot make a reliable decision based on the results.
May I change several things at the same time?No, you should only change one variable, for example the image. Only then can the difference in the result be clearly attributed to that element.
Which result should I choose for optimization?In the video, optimization for landing page views is chosen because the ad is meant to lead visitors to the page.
Can I switch between split tests?Yes, you simply click on the content of the ad, and the view adjusts to the selected test.


