
Imagine the sky in your photo is overexposed, but the person's face should remain unchanged. This is exactly where masks come into play. With them, you don't apply tools and filters to the entire image, but only to the areas you deliberately select. In this tutorial, you will learn about the most important mask types in Capture One Pro and find out how to use them step by step.
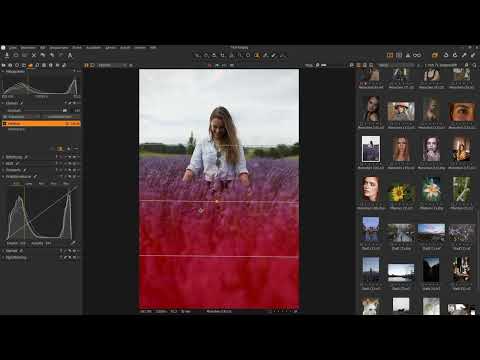
The video is only loaded from YouTube when you play it – data (including your IP address) is then transmitted to YouTube/Google. More in the privacy policy
Introduction
Masks are the tool for local adjustments. You place a layer over your image, use a brush or a gradient to define which areas it affects, and then adjust those areas with filters, color tools, or curves. The tutorial takes you from creating a layer, through painting a mask, to gradient masks and luminosity range masks.
You should be familiar with the basics of the layer function from the previous tutorial. If you haven't checked it out yet, it's worth doing so, because without layers, masks don't work in Capture One Pro.

Key Takeaways
Key Takeaways
- Masks always apply to one layer. Changes on this layer only take effect in the areas that the mask reveals.
- An empty layer shows no overlay when you press the M key, whereas a filled layer affects the entire image.
- The brush paints the affected areas, and the eraser removes them again. With the synchronization option, you share the size and hardness of both tools.
- Gradient masks, linear or radial, are suitable for soft transitions. With the "Invert mask" option, you quickly reverse the selection.
- The luminosity range mask selects areas based on their brightness and enables very precise results.
Step-by-Step Guide
Step 1: Create the Right Layer
Open the image in the layers palette on the left side. At first, you only see the background layer, and changes there would affect the entire image. Therefore, click the plus icon to create a new layer. Alternatively, open the context menu with a right-click on the plus icon and select "New Empty Layer" there.
The difference from a filled layer is important: If you choose "New Filled Layer," a red overlay appears over the entire image when you press the M key. This means that adjustments on this layer would be visible everywhere. An empty layer, on the other hand, shows no overlay, and that is exactly what you need if you only want to edit part of the image. Then give the layer a meaningful name, such as "Sky," so you keep track of things later.
Step 2: Set Up the Brush Tool
Select the brush icon at the bottom of the toolbar. As soon as the tool is active, the mouse pointer changes. A right-click on the image opens the settings for the brush. There you can adjust size, hardness, opacity, and flow.
The size determines how wide the brush paints. The hardness controls the transition at the edge of the brush. You can recognize a soft brush by the two circles that move far apart. The further you slide the hardness to the right, the closer the circles move together and the more contrasty the edge becomes. For sky or other large areas, softer edges are usually the better choice so that no visible transitions appear. In this example, you leave the opacity at 100 percent.
Step 3: Paint the Desired Area
Place the brush on the image, hold down the left mouse button, and paint over all areas you want to edit. In the overlay, you can see which spots are already marked. Areas that do not appear red are not affected by the layer. In this example, you therefore limit yourself to the sky. You don't have to work perfectly, because mistakes can be corrected.
Step 4: Remove Overpainting with the Eraser
If you have marked too much, you switch to the eraser. It is located behind the same icon as the brush. A right-click on the icon opens the menu, where you select "Erase Mask." It's faster with keyboard shortcuts: The brush has the shortcut B, the eraser the shortcut E. So with E you switch directly to the eraser, and with B back to the brush.
You will find a practical tip at the very bottom of the menu: Activate the option to link and synchronize the brush and eraser settings. Then size and hardness apply equally to both tools. This way, you don't have to readjust every time after switching.


Step 5: Apply the Edit to the Mask
Once the mask fits, hide the overlay with the M key so you can see the result. Then you can, for example, use the HDR filter. Drag the "Highlights" slider to the right to bring back structure in very bright areas. Since the mask is active, this change affects only the sky. The rest of the image remains unchanged.
A tone curve can also be applied to the mask. You can fix the midtones, raise the highlights, and lower the shadows to create more contrast. In RGB mode, this additionally affects the saturation.

If you want to compare the result, hold down the Alt key and click the arrow icon at the top. As long as you hold the mouse button, you will see the before state. If the effect is too strong, simply reduce the opacity of the layer and work your way step by step toward the desired result.

Step 6: Create a Linear Gradient Mask
A gradient mask is suitable for transitions that extend across the image. To do this, create a new empty layer and name it, for example, "Color Look". Then right-click the brush icon and select the linear gradient mask. Drag a line in the image to create the gradient. If you don't see the overlay, press the M key again.
The gradient ranges from areas with 100 percent effect to areas with 0 percent effect. The two lines mark the transition in between. With the small circle in the middle, you activate a directional cross that you can use to move the gradient. If you move the mouse over the center line, the cursor changes, and you can rotate the gradient. With the outer lines, you narrow or widen the middle area.
If you want to move the two handles independently of each other, hold down the Alt key while dragging a handle. This creates an asymmetric gradient.


Step 7: Invert the Mask and Adjust Colors
Often it is not the upper but the lower part of the image that should be edited. For this, there is the "Invert Mask" function. Right-click the layer and select this option. The selection is then reversed.
Now switch to the "Color" tab and open the Color Balance. Briefly press the M key to hide the overlay. In the shadows, you can now change the colors, for example by adding a little blue to the dark areas. With the Alt key held down and a click on the arrow icon, you again compare the before and after. The upper, darker areas remain untouched.


Step 8: Use a Radial Gradient Mask
The radial gradient mask is suitable for round or oval areas. Select it, like the linear variant, via the context menu of the brush icon and drag a circle over the subject. In the center, you move the mask; with the rings, you adjust the gradient and, if needed, make the shape more elliptical.
By default, you edit the areas outside the circle here. If the center should be affected instead, right-click the layer again and select "Invert Mask". After that, you can adjust the exposure or contrast in this area. Here you are free to be creative and shape the effect according to your own ideas.


Step 9: Manually Adding to Interactive Masks
You can readjust an interactive gradient mask at any time. However, if you want to add additional areas with the brush, an error message appears. The mask must first be rasterized. This means that you lose the interactive control options, but you can add individual areas manually. For example, if you want to add more of the head, you simply paint over that area with the brush.
With a right-click on the layer and the option "Delete Mask", you remove the mask completely again.

Step 10: Using the Luminosity Range Mask
A particularly powerful method is the luminosity range mask. It selects areas based on their brightness. To do this, create a filled layer, for example via a right-click on the plus icon, and name it, for example, "Recolor shadows". Then select the luminosity range mask.
In the dialog window you will see a histogram display. Black is on the left, white on the right. With the sliders you determine which tonal values are affected. In the example, the values between 20 and 235 were initially selected. If you drag the left slider to the right, dark areas are excluded. The white slider works the same way for bright areas. The sliders below determine how soft the transition is. A soft transition prevents color breaks at the edges when you edit the selection.
In the example, the dark areas in particular should be affected. To do this, you click on "Invert range". Then you move the slider a bit further until the dark parts are fully captured. With the radius, the selection can be fine-tuned further. Confirm with "Assign", and the mask is kept and you can show and hide it with the M key.


If you now switch to the Color area and move the Blue slider to the right, the color changes affect only the dark areas. The skin in the bright area remains unaffected. The mask can be readjusted at any time until the result looks exactly the way you imagine it.

Summary ??? Local Adjustments with Masks in Capture One Pro
Masks are the central tool in Capture One Pro for targeted image editing. You start with an empty layer and paint the affected areas with the brush. With the eraser you correct mistakes, and synchronizing the settings saves you time. Gradient masks, linear or radial, create soft transitions, and the invert option helps you quickly select the other half of the image. Finally, the luminosity range mask selects areas according to their brightness and delivers particularly precise results. Practice all the variants on different photos, and you will quickly find out which method suits which subject best.
FAQ
How do I tell which areas are covered by a mask?The red areas in the overlay are affected, and you show or hide it with the M key.
Why does a filled layer affect the entire image?A filled layer is already fully selected, so adjustments take effect everywhere. For local changes, you need an empty layer.
Can I set the size and hardness of the brush and eraser together?Yes, if you activate the option for synchronizing brush and eraser in the settings.
What does "Rasterize mask" mean?The interactive mask is converted into a fixed mask, so that you can add to it manually with the brush, but you lose the interactive sliders.
What is the "Invert mask" option for?It reverses the selection, so that you edit the remaining areas instead of the marked areas.


