
A suitable frame can turn a plain snapshot into a picture with its own character. Nik Color Efex Pro 4 offers the Image Borders filter for this. There you will find a large selection of borders that you can adjust in size, edge structure, and coloring. In this tutorial, I will guide you step by step through the most important settings. In addition, I will show you a trick that lets you lose hardly any image information despite the frame.
The video is only loaded from YouTube when you play it – data (including your IP address) is then transmitted to YouTube/Google. More in the privacy policy
Key Takeaways
- The Image Borders filter offers numerous frame variants that you can freely customize.
- With the sliders for size and scatter, you determine how much of the image is retained and what the transition to the frame looks like.
- The edge types "clean" and "rough" change the look significantly: clear edges versus textured borders.
- The random generator quickly delivers ideas that you can then fine-tune.
- If you want to lose as little image material as possible, enlarge the canvas in Photoshop and fill it with white before applying the frame.
Step-by-Step Guide
Step 1: Open the Image Borders Filter
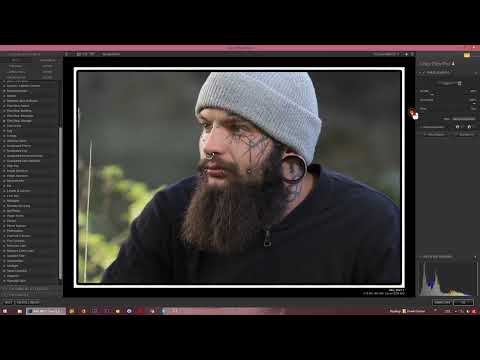
Open your photo in Color Efex Pro 4 and look for Image Borders in the filter selection. The filter is available to you right away and, like the other effects, can be controlled via the preview. With this entry point, you have all the tools for frame design in one place.

Step 2: Look at the Default Frame
After activating it, a white frame initially appears around your image. This default frame serves as your starting point. Take a close look in the preview at how it affects your subject, because this is where you make all further adjustments.

Step 3: Start with the Random Generator
If you don't yet have a specific idea in mind, use the random generator, which can be reached via the "Random" button. At the push of a button, it generates new combinations of frame size, scatter, and edge type. This way you discover looks you might not have come up with on your own. Once you find a result you like, you can then refine it further in a targeted way.

Step 4: Adjust the Size of the Frame
With the size slider, you determine how much of the original image the frame covers. A small value leaves your subject almost completely visible, while a large value noticeably takes away area. While moving the slider, make sure that important image areas do not disappear into the border.

Step 5: Correct the Scatter
The scatter affects the black area that becomes visible inside the frame. With this slider, you correct how soft or hard this transition looks. Try out several values until the transition looks harmonious with your subject.

Step 6: Choose Between "Clean" and "Rough"
The edge type is one of the most important design switches. With the "clean" option, you get relatively clear, clean edges. If you switch to "rough," visible structures appear at the edge, giving a photo an older, grainier character. Enlarge the preview to see these structures better. With "clean," the frame looks more neutral overall.

Step 7: Click Through the Different Styles
The filter includes numerous presets that can be browsed with a simple click. Go through all the styles one after another and pay attention to how color, width, and texture change. This overview quickly shows you which direction suits your image. This run-through is especially helpful for choosing a consistent look across several photos.

Step 8: Protect Image Information with a Larger Canvas
The border is integrated directly into your image and therefore covers part of the subject. If you don't want to lose anything from the photo, prepare the file in Photoshop beforehand. To do this, enlarge the canvas so that additional space is created around your image. Fill this new area with a white background. Then apply the border to this extended area. Your original photo remains completely intact, and you can determine the settings at your leisure.

Step 9: Experiment with Different Variants
In the end, testing is worthwhile. The borders numbered 14 and 13 are particularly straightforward: number 14 is a pure white border, number 13 a pure black one. The remaining variants are mixtures of both approaches. Test them one after another on your subject, because a border that looks excellent on a portrait may not suit a landscape. Have fun trying them out!

Summary – Borders for Your Photos: How to Design Image Edges with Image Borders in Color Efex Pro 4
The Image Borders filter in Color Efex Pro 4 offers you many possibilities for giving photos a border. Using size, spread, and the edge types "clean" and "rough," you adapt the look to your style. The random generator and the presets help you discover new ideas. If you don't want to lose any image information, enlarge the canvas in Photoshop beforehand and fill it with white. That way your subject remains fully intact while the border is being designed.
FAQ
Do I need a specific version of Color Efex Pro for Image Borders?The guide refers to Color Efex Pro 4, which includes the Image Borders filter. In other versions, the interface and names may differ.
Can I change the border color?Yes, in addition to the white default border, pure black variants and mixed forms are available, which you can select directly.
Why do I lose image information with a border?The border is integrated into your image and therefore covers part of the subject at the edge.
How do I avoid losing image information?Before applying the filter, enlarge the canvas in Photoshop and fill the new area with white, so that the border sits on this additional area.
What is the difference between "clean" and "rough"?With "clean," relatively sharp edges are created; with "rough," visible textures are generated at the edge, resulting in an older look.
How do I quickly find a suitable border?Click through the various presets one after another and use the random generator as a source of inspiration.


