

Imagine you have modeled a cup that still looks like a raw blank. With the right shaders, it transforms into an object made of hard and soft plastic. In this tutorial, I will guide you through the entire process: from preparing the scene, through lighting and materials, to subsurface scattering, which gives the plastic its typical translucency.
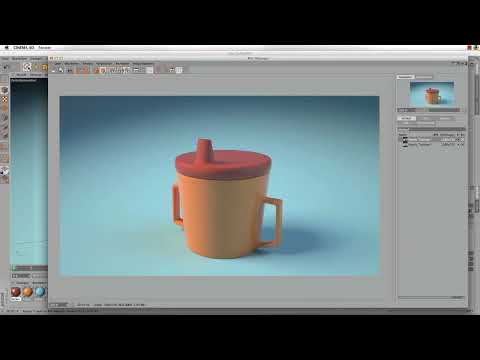
The video is only loaded from YouTube when you play it – data (including your IP address) is then transmitted to YouTube/Google. More in the privacy policy
Introduction
Plastic looks simple at first glance, but it is tricky to implement. A smooth color shader is rarely enough, because real plastic reflects, scatters light, and shows very different highlights depending on the surface. In this tutorial, you will learn how to create a hard plastic using color, reflection, Fresnel, and matting, and how to use a softer material at the edge of the cup to create the impression of a rough, pleasant-to-touch surface. At the end comes the subsurface scattering, which gives the materials depth.
Key Takeaways
- Good lighting is the foundation for every convincing material. Without suitable light, even the best shader setup looks flat.
- Plastic usually consists of several material layers: color, highlight, reflection via Fresnel, and a matting for a softer look.
- Subsurface scattering in the luminance channel simulates light shining through thin plastic layers and looks especially coherent with ketchup or apple skin presets.
- A custom reflector polygon with an adjusted render configuration creates targeted highlight edges without distorting the global illumination.
Step 1: Prepare the Scene and Import the Cup
Before you assign materials, clean up the scene. Remove all unneeded objects such as the statue, the gold material, and the lights from the template, because you will create all shaders from scratch. Then load your plastic cup into the scene and check the position of the teeth or spout elements. Adjust them if necessary until the shape matches your vision. Make sure the cup stands cleanly on the future floor.

Step 2: Define Renderer Settings
For realistic results, you need the right render options. Turn off depth of field so that all details stay sharp. Enable global illumination and choose indirect illumination as the method in the Physical renderer. Set the quality to Medium for now, as that is sufficient for test renders. You can increase the settings later for the final image.

Step 3: Set Up the Lighting
A scene with only one light quickly looks too dark. In the video, the main light from the left is set brighter and supplemented with a second light material that covers the sky area. For this, you take a blue tone from the sky's HDRI and reduce the brightness to about half so that the light does not look too strong. The color cast later provides the cool mood on the surfaces. Check a test image after every change, because the effect of the lighting only shows in the render.


Step 4: Adjust the Light Position
If the side of the cup is still too dark, move the light source on the X axis to the other side. This creates a distinct blue streak that emphasizes the shape of the object. You do not have to get every detail perfect, because you will add highlight edges specifically later. What matters is that the light distribution looks balanced overall.

Step 5: Create the Floor Material
The floor serves as a cove and the surface on which the object stands. First turn off the highlight, since the floor should stay matte. In the color channel, you assign a slightly bluish tone. For a subtle reflection, you activate the reflection channel and add a Fresnel effect. Set the value to about 2 so that only a very slight reflection remains visible.

Step 6: Create Hard Plastic for the Cup
For the lower part of the cup, you choose an orange tone in the color channel. Remove the highlight, since you want to control it specifically via the reflection. In the reflection channel, you use the Fresnel effect so that the reflection becomes stronger at the edges and decreases toward the center. This is a typical characteristic of plastic. In the presets area, you will find a prepared plastic variant. Activate it as a basis and then adjust it so that the tone fits your scene.

Step 7: Create a Softer Lid with Matting
The lid should feel different from the cup. To achieve this, it gets a slightly red tint, which is set via the color values. Again, you remove the specular highlight and activate the Fresnel effect. To create a softer, slightly rough surface, you switch on the matting effect in the reflection channel and set it to about 25 percent. This makes the reflections appear scattered and gives the lid a velvety character.

Step 8: Activate Subsurface Scattering for Light Transmission
Thin layers of plastic let light shine through. You simulate this effect with Subsurface Scattering. Open the luminance channel of the lid material, activate it, and select Subsurface Scattering under Texture Effects. In the presets you will find various options, such as apple skin, cream, potato skin, or ketchup. In the video, the ketchup preset serves as a starting point. To make the color tone match the material, you copy the color from the color channel and paste it into the Subsurface section. You proceed the same way for the cup: you take over the color, activate the luminance channel, and likewise paste the value into the Subsurface section. The material immediately looks brighter and more lively, especially in thin areas such as the handle.


Step 9: Reflector for a Targeted Highlight Edge
An additional highlight edge makes the plastic look more three-dimensional. For this, you create a separate material for a reflector polygon. The polygon is rectangular, sits in the same position and orientation as the light, and has the same shape. In the render settings, you deactivate all options except global illumination, so that the reflector is not mixed with the rest of the GI. This way you create targeted light reflections without changing the overall lighting.

Step 10: Compare Results and Readjust
Compare your intermediate results by placing different render images side by side. You will notice that Subsurface Scattering brightens the cup significantly, especially at the handle and underside. A final fine-tuning includes the render quality, which you raise from Low to Medium, as well as the angles of the spotlights, which you enlarge slightly so that the upper area becomes brighter. You can also give the shadows higher values if needed to improve the contrast.


Step 11: Check the Final Result
To finish, render the image completely. Check the dark areas, which should become brighter through the light from the left and the reflectors. Pay attention to smooth color gradients and clean highlight edges. If the plastic looks coherent, you have correctly applied all the essential building blocks of a convincing plastic material.

Summary ??? Plastic Materials in Cinema 4D: Sippy Cup with Subsurface Scattering
In this tutorial, you have learned how to build plastic materials in Cinema 4D. You prepared the scene, set up the renderer and lighting, and created the floor, hard plastic, and a softer lid. With Fresnel reflections, matting, and Subsurface Scattering, you achieve the typical look of plastic. The reflector specifically adds the highlight edges. If you apply these steps consistently and adjust the values to your own scene, you will get realistic results.
FAQ
Why does my plastic material look so flat without a specular highlight?Without targeted reflections, the material lacks surface appeal. Use Fresnel and adjust the light sources so that edges become visible.
What is the matting effect used for?The matting effect scatters reflections and makes the material appear softer and rougher, for example for a lid with a velvety surface.
Which preset is suitable for Subsurface Scattering?In the video, the ketchup preset is used. However, you can also try other presets such as apple skin or cream and adjust them depending on the material.
Why should the reflector polygon not be included in the global illumination?If the reflector participates in the GI, it changes the entire lighting. By deactivating it, it remains a targeted light source for highlight edges.
How can I tell whether my render quality is sufficient?Compare test images at Low and Medium. If shadows and gradients look clean, the quality is sufficient. For the final image, you can go higher.


