
A single photo is rarely enough for cars with reflective paint and dark interiors. If you photograph the car with several flashes and an ambient shot, you end up with many individual images that only become a coherent picture in Photoshop. In this tutorial, I'll show you how to build a convincing image from these shots layer by layer. You'll learn the Lighten method, which lets you place light accents precisely, and you'll see how masks, Camera Raw and retouching work together.
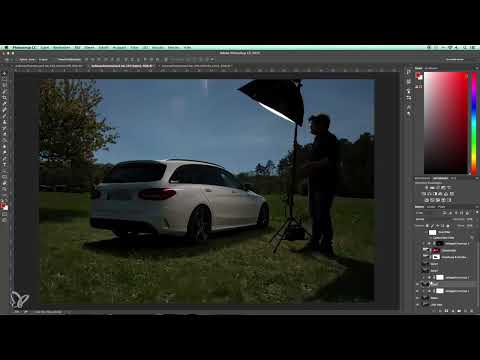
The video is only loaded from YouTube when you play it – data (including your IP address) is then transmitted to YouTube/Google. More in the privacy policy
Key Takeaways
Key Takeaways
- The basic framework comes from a flash shot as the base, over which you place an ambient light shot and mask the areas of the car.
- With the "Lighten" layer mode, only what is brighter in the upper layer is applied. This creates an automatic mask for each light accent.
- Each individual flash is photographed as its own shot and layered on top step by step. This is laborious, but gives you full control over the light.
- Reflections, displays and backgrounds need their own masks so that the overall impression stays coherent.
- The look is created at the end using colors, contrasts and gradients, which you apply uniformly across the image.
Step-by-Step Guide
Step 1: Open the flash shot as the foundation
Start with the photo in which you lit the car with three flashes, two strip lights from the side and one from the front. This file serves as the starting image on which you will build everything later. At this stage, focus only on the paintwork, because it determines the basic impression of the car.

Step 2: Place the ambient light shot on top
Now drag the shot without flash as a new layer over the starting image. The car will initially be covered by the surroundings. Then mask out, in the area of the car, everything you want to take from the flash shot. Conversely, the surroundings must no longer be visible where the car is in the image.

Step 3: Correct distracting reflections and color casts
The sun had moved quickly that day and left a reflection in the lower area. Remove it roughly using a mask and refine it later. Then correct the brightness and tonal values of individual areas, such as the windshield or the radiator grille, and balance color casts, for example a slight yellow cast on the side panel.

Step 4: Basic development in Camera Raw
Before you define the look, you develop the image in Camera Raw. There you work with graduated filters to darken the sky and direct the viewer's eye to the car. Slightly desaturate the remaining colors so that the focus is on the vehicle. Afterwards, you can enhance the contrasts with Color Efex Pro.

Step 5: Define the image crop
Only now do you decide on the crop. Move the car to the center and crop the image tighter so that the subject dominates. A tighter crop also hides small irregularities at the edge of the image.

Step 6: The Lighten method with a single flash
In the next section, I'll show you the technique with which you can also work with just one flash. First open the image with the flash at the rear. Place the shot with the side lighting on top and change the layer mode from "Normal" to "Lighten". This makes only the areas visible that are brighter in the upper image than in the lower one. It works like an automatic mask.

Step 7: Build up the light accents piece by piece
For each additional flash position, you take a separate shot, for example one meter further forward on the car. Place each shot on top as a layer and also set it to "Lighten". This way you build up the light piece by piece until the side of the car is evenly lit. If necessary, you adjust the brightness of each layer with a curves adjustment.

Step 8: Understanding What the Camera Does Internally
In principle, the method corresponds to your camera's multiple exposure function. There, too, the brighter areas of the individual shots are layered on top of each other. The difference is that in Photoshop you can adjust the layers individually at any time. When shooting on location, make sure that position and exposure remain as constant as possible, because large deviations are difficult to compensate for.

Step 9: Isolating the Car from the Ambient Light
Insert the ambient shot again and mask out the car. This way, you only take the surroundings from this file, while the vehicle comes from the flash layers. You keep the windows from the ambient light, because the strip lights would otherwise be too noticeable in them.

Step 10: Post-Processing the Car and Selectively Brightening It
After assembling the image, place it on a new layer and develop it again in Camera Raw. Increase exposure, highlights, and whites so that the car stands out more. Work with masks, for example on the rims and the taillights, so that these details stand out additionally.

Step 11: Photographing the Interior with Multiple Flashes
For the interior, you proceed exactly as with the exterior image. You begin with a shot in which the strip light is positioned directly above the windshield. This is followed by shots with light from the left and right, each set to the "Lighten" mode. Make sure that the driver's seat, steering wheel, and center console receive light.

Step 12: Balancing the Light Distribution in the Interior
Place the shots with the light from the right over the image and adjust the brightness. Check on the driver's seat and the center console whether the light is evenly distributed. The shot of the sunroof with the flash from above finally completes the scene.

Step 13: Masking Excessive Reflections
High-gloss surfaces such as the center console quickly reflect too strongly. Selectively mask out this layer where the reflection becomes too much. Areas that face upward, on the other hand, get a touch more light, such as the steering wheel.

Step 14: Treating Digital Displays Separately
In vehicles with many LCD screens, a black monitor can disrupt the overall image. Apply a mask only to the area with the on-board computer and selectively brighten it. With such subjects, it is essential to make sure that the displays are switched on.

Step 15: Integrating the Background
For the background, meaning the view out of the window, you create a separate layer and mask out just the background. Set its mode to "Normal," since nothing should be brightened here. This way, the landscape stays the way you saw it on location.

Step 16: Retouching Distracting Details
Remove leaves, distracting wooden beams, and small shadows, for example from the gear shifter. To do this, copy suitable areas into place and retouch the transitions cleanly. Small spots on high-gloss parts can be removed with the Clone Stamp tool, even though they can never be completely prevented.

Step 17: Creating Depth with Dodge & Burn
With Dodge & Burn, you bring out the shape of the interior. Brighten light areas such as the steering wheel and seats a little, and deepen dark areas such as the footwell. This looks more natural if you work by feel and don't overdo it.

Step 18: Defining the Final Look
Finally, you adjust the contrast and the look using Color Efex Pro, for example with Pro Contrast and Tonal Contrast. You slightly mute the grass toward yellowish and reduce the saturation. The crop on the right is made tighter so that the B-pillar doesn't interfere. Whether the grass stays lush green or more subtle is up to your own taste.

Summary ??? Mastering Automotive Photography with Artificial Light: Image Composite Step by Step
Image compositing requires patience, but the structure follows a clear logic: You start with a flash shot, lay the ambient light over it, and add each further light accent using the "Lighten" layer mode. Masks control where reflections, displays, and backgrounds end up. In the end, the look determines the mood. With every additional shot you take, you gain more room to maneuver in post-processing.
FAQ
Do I have to use multiple flashes for this technique?No, a single flash is enough if you photograph the car from several positions and stack the shots using the Lighten mode.
Why should I take the shots with constant exposure?Consistent exposure and camera position make stacking easier, because the images can later be combined without any shifts.
What role does the mask play when lightening?The Lighten layer acts like an automatic mask, but you still have to mask manually if the surroundings or windows are supposed to come from a different image.
What should I do if the display in the car is black?Mask the area specifically and make sure when shooting that the digital instruments are switched on so that they remain cleanly visible.


