
Photographing a car outdoors sounds easy until you notice how differently paint, chrome and glass react to light. The sun casts harsh reflections on the hood, while the headlights and wheel arches disappear into shadow. With three flashes, you can deliberately balance out these differences. This guide shows you step by step which flash to place where, why it has to stand there, and how to check every change directly in the image.
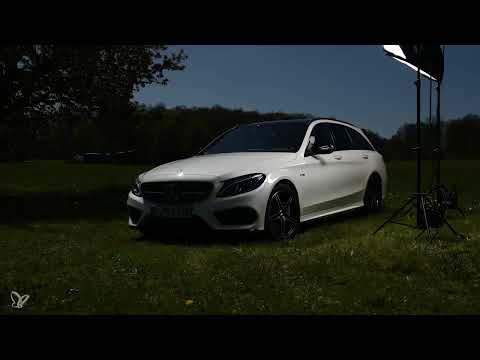
The video is only loaded from YouTube when you play it – data (including your IP address) is then transmitted to YouTube/Google. More in the privacy policy
Key Takeaways
Each flash has a fixed job. Flash 1 highlights the rear section, Flash 2 shapes the side line, Flash 3 brings light to the radiator grille and front sills.
One test shot per flash is mandatory. Set the flashes individually to different channels and photograph them one after the other. This way you can immediately see which flash lights which area.
Stability comes before convenience. A heavy weight on the tripod prevents it from tipping over in the wind, and that protects your equipment.
The flash must not be in the frame. A flash that stands within the image frame gives itself away through reflections or hotspots. That is why you should always compare the position against the camera image.
Headlights need their own exposure. Dark front headlights often cannot be made visible with flash light alone. A longer exposure time without flash brings them out, or you add them later in image editing.
Step-by-Step Guide
Step 1: Secure the Tripod
Before you set up the first flash, set up the tripod securely. Hang or place a heavy weight at the bottom of the center column so that the tripod doesn't wobble in the wind. Especially outdoors, even a light gust can push the softbox out of position, and then your lighting no longer matches. In addition, the microphone, if you are using one, should be protected from wind noise.

Step 2: Set Up and Test Flash 1 at the Rear
Flash 1 stands at the rear of the vehicle and forms the foundation of the light. Set it to full power, because in sunlight you need enough strength to compete with the ambient light. Switch it to channel 1 and take a test shot. Pay attention to how the light runs across the rear and whether the area is evenly lit.

Step 3: Position Flash 2 on Channel 2 at the Side
Flash 2 gets its own channel, in this case channel 2. This way you can control it separately from Flash 1 on your transmitter. Deliberately switch on channel 2 on your transmitter so that you only see the light of this flash. First place it in a basic position and set up the box so that it creates a strip of light along the side wall. The car immediately looks more three-dimensional as a result.

Step 4: Adjust the Height and Distance of the Second Flash
The light already looks good, but the height is not right yet. Lower the box by a few centimeters until the light runs cleanly along the side line. Pay attention to the hood while doing so. The flatter the vehicle gets toward the front, the stronger the reflections from above can become. Check the light first and the position afterwards, because a beautiful light rendering is more important than the exact tripod height.

Step 5: Move Flash 2 Out of the Frame
If you look at the image more closely now, you may see the front flash in the frame. This happens easily because the tripod's position is often right at the edge of the image. So go back about half a meter and then raise the box a bit more. The flash disappears from the image, and the lighting stays nearly the same.

Step 6: Readjust Flash 1
With Flash 2 in its position, you now have the side wall. Add Flash 1 and photograph the entire side. You will often notice that the rear stays too dark. Move Flash 1 about half a meter farther back. This evens out the brightness and prevents the rear section from sinking into shadow.

Step 7: Check the side line and shadow
Now it's worth taking a close look at the side panel. Above the door handles, a clear line of light should run, and below it a slight shadow is created. This transition traces the shape of the car. Down between the wheels, the lower sill should also stand out cleanly. If these edges are right, the side is done and you can turn to the front.

Step 8: Position flash 3 low and frontal
Flash 3 illuminates the front, but it gets a completely different height from the other flashes. Set up this tripod securely again as well by hanging the weight at the bottom. Place the softbox significantly lower than the other lights. The hood is already bright from the sun anyway and does not need additional lighting. What matters are the radiator grille and the front sill, which have received hardly any light so far. Aim the box almost frontally at this area.

Step 9: Check flash 3 individually and center it
Switch flash 3 to channel 3 and shoot again with only this flash. This way you can immediately see whether the right front half of the vehicle is well lit. The test image often still shows some room for adjustment. Therefore, move the flash a bit further toward the center of the vehicle until the light falls evenly across the radiator grille and bumper.

Step 10: Test all three flashes together
Now add all three flashes and shoot the final result. Zoom into the image when viewing it, because small reflections, gradients, and hotspots only become apparent at high magnification. Your image should now show the sides, the rear, and the front clearly and harmoniously. If something doesn't fit, you specifically correct the flash that is responsible for it.

Step 11: Make the headlights visible
One problem often remains: The headlights look very dark in the flash light, even if you have turned the car on. To fix this, switch on the vehicle's headlights and shoot with flash. You will notice that the glow of the headlights is barely visible. A different approach helps here: Turn off the flash, release the shutter without flash, and lengthen the exposure time until the headlights stand out clearly. Concentrate only on the headlights here until they shine brightly enough.

Step 12: Set the exposure time for the headlights
You find the right exposure time by trying step by step. Increase the time until the headlights look properly bright and the details are recognizable. With this image and the flash image, you get two shots that you can merge later in image editing. Place the headlight shot as an additional layer over the flash image, and you have a clean final result with glowing front lights.

Step 13: Compare the result with the available-light image
Finally, it's worth comparing the flash image with the available-light image you took at the very beginning. You can see how strongly the light of the three flashes changes the shape of the vehicle and gives the image depth. Take your time with this comparison, because it clearly shows you what contribution each flash has made.

Summary ??? Large lighting setup for automotive photography with three flashes
With three flashes, you shape the light in car shots deliberately. Flash 1 at the back highlights the rear, flash 2 models the side line via a light tube, and flash 3, low and frontal, brings the radiator grille and front sill into the light. Secure the tripod, test each flash individually, adjust the position to the camera image, and add the headlights with their own exposure. This creates a harmonious and precise result.
FAQ
Why should I secure the tripod with a weight?In wind, a light tripod can move or tip over. A weight at the bottom of the column provides stability and protects the flash and camera.
How do I tell whether a flash is in the frame?Take a test shot with flash and look at the image closely. You can recognize flashes in the frame by reflections or bright areas. In that case, it helps to step back half a meter and place the box a bit higher.
Why do I choose a separate channel for each flash?With separate channels, you can trigger each flash individually. This way you can immediately see which area it illuminates and can correct it specifically.
Why are the headlights so dark in the flash image?Compared to the body, the headlights are only small light sources and barely reflect the flash. That is why a longer exposure time without flash helps.
Can I insert the headlights later in image editing?Yes. Photograph the headlights separately with a longer exposure time and place the image as a layer over the flash image. Then you adjust opacity and alignment.
Why don't I additionally light the hood with flash 3?The hood is already bright enough in sunlight. Flash 3 should therefore primarily illuminate the radiator grille and front sill, which otherwise receive too little light.


