
An ad stands or falls with its headline, its description, and the right image. Even so, many campaigns fail not because of the content, but because of details in the Ads Manager: truncated text on the smartphone, wrong URLs, or an account that has not yet been activated. In this guide, I will walk you through the process step by step, from the first entry to submission. I will also explain the statuses Serving and Not Serving and show you how to deal with notices from the Ads Manager when an ad is not being delivered.
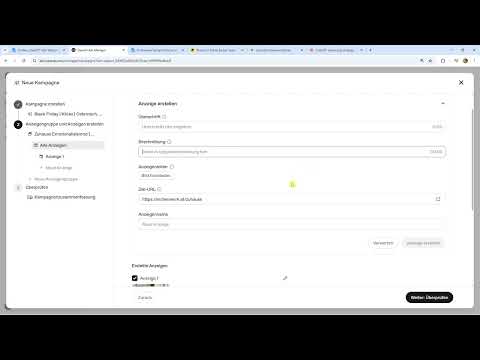
The video is only loaded from YouTube when you play it – data (including your IP address) is then transmitted to YouTube/Google. More in the privacy policy
Key Takeaways
The character limit is only the upper bound. The field allows 50 characters for the headline and 100 characters for the description. 16 and 32 characters respectively are recommended so that the text remains fully visible on the smartphone.
The URL usually belongs at the ad group level. This keeps tracking comparable across all ads. Only if you deliberately test different landing pages should you change the URL at the ad level.
Multiple ads and ad groups make sense, but they require budget. For the start, plan for at least three to five ads and two ad groups, and make sure the daily budget is sufficient so that all variants receive clicks.
An account must be fully set up before ads go live. This includes verification, logo, payment details, and the company name. If any of these items is missing, publication cannot take place.
Tracking should be considered from the very beginning. UTM parameters and conversion tracking at the campaign level later determine which ad really works.
Step-by-Step Guide
Step 1: Enter the headline and description
The first step is to fill the ad with a headline and a description. The input field allows up to 50 characters for the headline and 100 characters for the description. However, stick to the recommendation from ChatGPT Ads: 16 characters for the headline and 32 characters for the description. The reason is the display. If the text is too long, it gets truncated, and especially on the smartphone this quickly looks sloppy.

Two approaches can help you with the content direction. The situation-centered approach addresses a specific life situation, such as "at home" or "moving." The problem-centered approach takes up a problem, for example too little space at the dining table. Have a few variants developed for each category, which you can then enter one after the other. Start with the three strongest suggestions.
Step 2: Upload and crop the image
Each ad can have its own image. Upload the image directly in the form. The Ads Manager then offers a cropping function in case the motif does not fit. Make sure the image is as square as possible, because that is exactly how it will be displayed in the ad. A format that does not fit will either be cropped or displayed distorted, and both reduce the impact.

Step 3: Set the target URL and ad name
You enter the general URL at the ad group level. It is automatically applied to all ads. If you want to use a different landing page for an individual ad, you can override the URL at the ad level. However, an important rule applies here: Different links at the ad level make it harder to compare performance, because later you cannot cleanly attribute which ad brought the clicks.
Also assign an internal name, for example "Ad 1." This name is only visible to you and helps you find the ads again in your reporting list.
Step 4: Create the ad and check it in the preview
After clicking "Create ad," the ad appears in the preview. Here you see the name, logo, headline, image, and description as they will appear later. Now add the company name if a placeholder is still there, and check whether the text is fully legible. Pay particular attention to the description. If it is short enough, it fits on the smartphone in two lines without being truncated.

Step 5: Duplicate and adjust additional ads
You create a second ad directly in the same area. You do not have to copy anything; you can simply create a new ad. If the image and URL are to remain the same, duplicating is faster. You then only change the title and description. The ads appear automatically in the structure view on the left, where you can duplicate, edit, or delete them.

Step 6: Ensure tracking via UTM parameters
UTM tracking also belongs in this step. It is best to enter the UTM parameters at the ad group level. If you change links for each individual ad, you distort the analysis. You then cannot say clearly that ad 2 performed better because it achieved more clicks. Therefore, use the same logic for all ads in a group and vary only the texts and images.
Step 7: Select ads and remove superfluous variants
In the "All ads" section, you select which ads should be active. You can remove ads again at any time or edit them afterwards. Removing them from the selection does not delete the ad permanently, so you can use it again later. To start, two to three ads are usually enough, so that you do not spread the analysis unnecessarily thin.
Step 8: Duplicate the ad group and switch the topic
If you want to test a new topic, you duplicate the ad group including its ads. Then you change the targeting term, for example from "home" to "desk", and adjust the URL or context if necessary. You can adapt the ads of the new group or deliberately leave them unchanged. An adjustment makes sense as soon as the topic changes fundamentally. An example: Instead of targeting the home emotionally, in a second group you address the problem of how much space each person needs at the table.

Step 9: Align budget and number of ads
The more ads and groups you create, the more budget you need. Take an example: With a daily budget of €50 and €5 per click, a single ad in a single group receives around ten clicks per day. If the budget is spread across many ads, none of them gets enough data. Therefore, plan deliberately. Five ads in two groups are often a good benchmark for a test, but only if your budget allows it.
Step 10: Review and submit
With "Review" you see all levels once more: campaign, ad group, and ads. Here you can make changes at any time. If everything is fine, publication follows. In the example in the video, this step was initially not possible because the account had not yet been fully set up.

Step 11: Meet the account requirements
If publication is blocked, the cause is usually the account. Go through the following points: verification of the URL at the account level, uploading the logo, entering the payment details, and providing the company name. Approval by ChatGPT can take one to three days during the beta phase. Once it has been granted, the account becomes active and you can run ads.
Step 12: Interpret the Serving and Not Serving statuses
If the account is active and the ad is published, the Ads Manager displays the status. Serving means that the ad is currently being delivered. Not Serving means that it is currently not being displayed. The most common causes are missing approvals, incomplete account details, or a budget that is not sufficient. In this case, first check the account settings, then the payment details, and finally the campaign budget. The Ads Manager's recommendations on character lengths and wording help you adapt ads so that they can be delivered.

Summary – Creating and submitting ChatGPT Ads
You have now learned a complete workflow: headline and description with the recommended character lengths, image and URL, clean tracking at the group level, a suitable budget, and the account requirements for publication. With this approach, you keep an overview, understand the meaning of the Serving and Not Serving statuses, and know where to start when problems arise. As a next step, you should look into UTM tracking and conversion tracking at the campaign level, because only then can ads truly be evaluated.
FAQ
Question: Why should I follow the recommendation of 16 characters for the headline if 50 are allowed?Answer: Because long texts are cut off on smartphones. With the recommendation, you ensure that the headline and description are fully visible.
Question: Where should I enter the target URL?Answer: As a rule, at the ad group level. There it is automatically applied to all ads, and the tracking remains comparable.
Question: Can I use a separate URL for each ad?Answer: Yes, that is technically possible. However, you should only do so if you are deliberately testing different landing pages, because otherwise the analysis of the ads will be distorted.
Question: Why can't I publish my ad?Answer: Usually the verification, logo, payment details, or company name are missing in the account. Complete this information and wait for approval.
Question: How long does it take for the account to be approved?Answer: According to the video, it can take one to three days during the beta phase. You can see the status in the Ads Manager.
Question: What does the Not Serving status mean?Answer: The ad is currently not being displayed. First check the account requirements, then the payment details and the budget.
Question: How many ads should I create to start?Answer: For an initial test, three to five ads in two ad groups are a sensible benchmark, provided your budget is sufficient for it.
Question: Can I delete ads without losing them permanently?Answer: Yes, you can remove ads from the selection and reactivate or edit them later.


