
Imagine you click Play and can view your building from every angle, without writing a single line of code. That is exactly what this chapter is about. You set up a camera that orbits your architectural model, zooms in on it and limits your viewing angles. For this, you use a ready-made script from the Unity Asset Store that takes care of all the programming work for you.
The video is only loaded from YouTube when you play it – data (including your IP address) is then transmitted to YouTube/Google. More in the privacy policy
Key Takeaways
A ready-made script replaces extensive programming work. The Ultimate Orbit Camera Script handles rotation, zoom and viewing angle limits. You only need to import and assign it.
The camera needs a target. Without a target point, the script does not know what to aim at. An empty object at the center of your building solves this problem.
Viewing angles can be tested in Play mode. You adjust the limits for the vertical view live and then permanently transfer the values to the Inspector.
Values set in Play mode are lost when you exit. Write down the desired values or transfer them deliberately before you stop the game.
Step-by-Step Guide
Starting Point: The Model Is Present but Static
You begin with your architectural model from Cinema 4D, which is already loaded in Unity. In Play mode, nothing happens at first when you click with the left mouse button. The camera is fixed in position and cannot be moved. This behavior is the starting point for the following steps.

Positioning and Aligning the Camera
Select your Main Camera in the Hierarchy. In the camera preview window, you can see what the camera captures. Move it with the translation tool until you have a good starting angle on your building. With the rotation tool, you tilt the camera downward so that the house appears from a pleasant perspective.

When moving, pay attention to the axis system. With a switch at the top, you can toggle between the global and local coordinate system. In the global system, you move along the world axes; in the local system, along the axes of the camera itself. For fine positioning, the local system is often more intuitive because you orient yourself in the camera's viewing direction.

The keyboard shortcuts make work easier: W activates moving, E rotating and R scaling. However, you don't need scaling for the camera.

Obtaining the Script from the Asset Store
The centerpiece of this guide is the Ultimate Orbit Camera Script from the Unity Asset Store. In the video, it costs around 10.63 euros. Prices can change, so check the current price directly in the store. The investment is worthwhile because you can use the script in many other projects and save yourself many hours of programming.
Open the Asset Store, search for the script and click the button to install or buy it. After purchase, the package is imported into your project via the Package Manager. Alternatively, you can also drag and drop the downloaded package into the Project window.

Checking the Contents in the Project
After the import, you will find a new section in the Assets folder with materials, scenes and scripts. Open the Scripts folder. There are two files: a demo script for trying things out and the actual final script for your tool. For your camera, you only need the final script.


Assigning the Script to the Camera
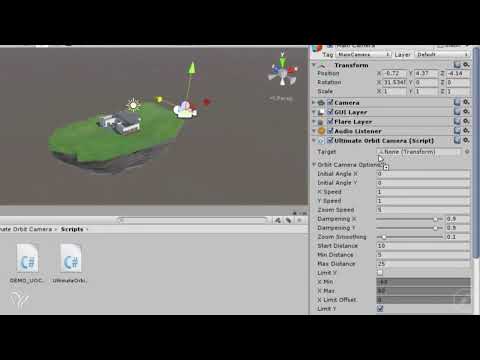
Assigning a script is straightforward. First select the object that should receive the script, that is, your Main Camera. Then drag the script from the Project window into the camera's Inspector. After that, the component appears in the Inspector.

If you press Play now, at first nothing visible happens again. This is because the script needs a Target. This field is still set to "none". So the camera doesn't know which point it should orbit around.
Create a target point for the camera
The center of the building is a suitable target. However, if you click on the house, you will see that its pivot point is not necessarily in the middle. That is why you create your own object. Click on GameObject in the top menu and select Create Empty. In Cinema 4D, this empty object corresponds to a null object.
Name the new object, for example "Mittelpunkt Haus", and move it to the spot the camera should look at. Usually this is roughly the center of the building structure. Since you can select the object and reposition it at any time, you stay flexible.

Next, drag the "Mittelpunkt Haus" object from the Hierarchy into the Target field in the Inspector of the Main Camera. The script finally has its target.

Test the orbit function
Start the scene. The view now changes noticeably. You can move around the building with the left mouse button and zoom in or out with the mouse wheel. Try moving up and down. You will notice that the rotation stops at a certain point. This effect is intentional and will be adjusted in the next step.

Limit vertical viewing angles
In the Inspector of the Main Camera, you will find the script's parameters. Further down there is the "Limit Y" section with a minimum and a maximum. By default, the minimum is set to -60 and the maximum to 60. These values determine how far you can look up and down.

In Play mode, you can change the values live and see directly what happens. For example, set the maximum to 0, and you can no longer look up beyond the horizontal. For architectural views, values between -20 and -30 are often sensible, because the view then stays on the building and doesn't look into empty space. In the video, the value -25 proved to be comfortable. Try different values until you find a setting that suits your project.

Keep values permanently
Attention: When you exit Play mode, the values revert to their original state. So your adjustments are lost if you don't apply them. Note down your value, exit the game, and then enter it manually in the Inspector. Only then is it saved permanently. Afterwards, start the scene again to check whether the limit works as desired.

Outlook: Hide the roof with a button
With the camera control, you have laid the foundation. In the next step, you want to hide the building's roof with a button so that you can look inside. You have already prepared the geometry in Cinema 4D. In Unity, a button is needed for this that shows and hides the roof object. The following chapter covers this part.

Summary ??? Setting up an orbit camera in Unity: How to control your architectural view through 360 degrees
You have learned how to set up a camera in Unity that orbits around your architectural model. You imported the Ultimate Orbit Camera Script from the Asset Store and assigned it to the Main Camera. With an empty object at the center of the building, you created a target for the camera to align to. Finally, you limited the vertical viewing angles and saved the values permanently. This lays the foundation for an interactive 360-degree view.
FAQ
Do I need programming knowledge to set up the orbit camera?No, the script handles all of the control, and you only need to assign it via drag and drop.
Why doesn't the camera move yet after assigning the script?The script needs a Target, i.e. a target point. As long as the field is set to "none", the camera doesn't know what it should be aimed at.
Where should the target point be located?Ideally roughly the center of your building. An empty object created via GameObject and Create Empty is well suited for this, because you can move it at any time.
Why have my limit values disappeared after stopping Play mode?Changes made in Play mode are not saved automatically. You have to enter the desired value manually in the Inspector after exiting.
Which value is suitable for the vertical limit?In the video, the value -25 proved to be suitable. However, try different values, because every project and every camera angle looks different.
Can I also use the script in other projects?Yes, that is one of the big advantages. Once purchased, you can use the script in further Unity projects.


