
Your graphics tablet pen is ready, but your strokes still feel uncertain? That's exactly what the first exercises are for. You don't need a specific Photoshop version, because the basics work the same in all versions. In this guide, you'll learn how to set up a suitable working document, get to know pen pressure, and finally paint a three-dimensional-looking sphere using just a few layers. The sphere isn't an end in itself: it shows you particularly well how much paint you apply with which pressure and how light and shadow come about. You'll need exactly these skills later for larger subjects such as landscapes.
The video is only loaded from YouTube when you play it – data (including your IP address) is then transmitted to YouTube/Google. More in the privacy policy
Key Takeaways
- All Photoshop versions are suitable for digital paintings; the basic functions are identical.
- An A5 document at 300 DPI, rotated by 90 degrees, provides a clear working area.
- Pen pressure determines stroke thickness and amount of paint, so you should train it first with simple lines.
- With a soft brush with reduced opacity, you build up color layer by layer.
- On separate layers, you can correct mistakes at any time without destroying the image.
Step-by-Step Guide
1. Setting Up the Working Document
In Photoshop, open a new document in A5 format with a resolution of 300 DPI. Then rotate the canvas by 90 degrees so that you have it in front of you in landscape format. This feels unfamiliar at first, but on many screens it offers more space for wide subjects. The document is large enough for details and at the same time not so huge that your computer starts to struggle.

2. Getting a Feel for the Tablet with the Standard Brush
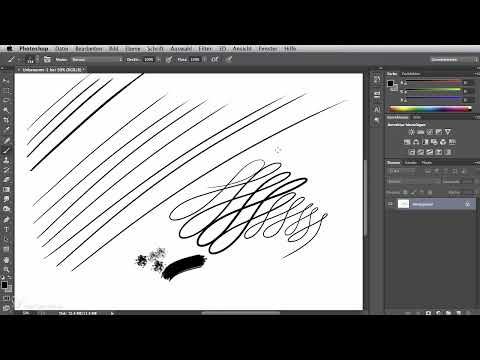
At the beginning, choose a standard brush with a small size. Standard brushes respond simply and predictably, so you can concentrate on your pen. First, draw straight and curved lines across the canvas. Pay attention to how the movement of your hand on the tablet is reflected in the movement on the screen. This exercise sounds trivial, but it lays the foundation for everything else.

3. Controlling Stroke Thickness via Pen Pressure
Now it's about consciously dosing the pressure. Draw thin lines by touching the pen down lightly and thick lines with firmer pressure. Also try small loops in which you change the pressure during the movement. This way you get a feel for how hard you need to press to get a thin or a thick line. Repeat this exercise until the lines look controlled and even.

4. Trying Out Different Brushes
Photoshop comes with a large selection of brushes. Feel free to test several, because each brush behaves differently. Texture brushes are suitable for rough surfaces, special brushes for grass or plants, and chalks for strong, grainy strokes. With a bit of willingness to experiment, you'll quickly find out which brushes suit your style. Feel free to make a note of which settings you particularly like.

5. Creating a New File for the Sphere Exercise
For the next exercise, you create a new file. The default values are entirely sufficient for this, but make sure that the pixel width is 1152 pixels. This size is compact and well suited for exercises because you can see the entire shape on the screen.

6. Drawing Out an Even Circle
Select the Elliptical Marquee Tool and use it to draw out a circle. Hold down the Shift key while doing so. This draws the shape proportionally, and you get a perfect circle instead of an ellipse. This circle serves as the basis for your sphere, because it limits the areas where you apply paint.

7. Creating a New Layer with Medium Blue
Create a new layer using the new layer icon at the bottom right of the Layers panel. Then choose a medium blue tone. A neutral starting color makes it easier for you to cleanly apply both lighter and darker tones later. The layer keeps your painting separate from the selection so that you can edit it flexibly later.

8. Setting up the soft round opacity brush
To paint the sphere, you need a soft round opacity brush with a size of about 150 pixels. Set the brush opacity to roughly 50 percent and the flow to around 50 percent as well. This way you don't apply the paint completely in a single stroke, but in soft, overlapping layers. That is the key to smooth transitions.
9. Building up the sphere at the edges
Start at the edge of the selection and paint inward. Initially use little pressure and work your way forward slowly. Working at the edges helps you define the shape of the sphere. Make sure that light pressure gives you only a little paint and stronger pressure gives you more paint. This sphere motif impressively shows you how much the amount of paint changes with pen pressure.

10. Creating depth with a darker blue
Now switch to a darker blue tone and work along the edges again. These zones are in shadow if you imagine a light source from the top left. The dark edges make the sphere look more three-dimensional and realistic. Approach it slowly and don't apply too much paint at once.
11. Correcting mistakes
It's easy to make a mistake or have a spot become too dark. No problem: you can counteract at any time with a different color. Simply paint over the affected area with a lighter tone until the transition looks harmonious again. Thanks to the layer structure, the rest of your image remains untouched.
12. Adding shadow on an additional layer
Now deselect the selection, for example with the keyboard shortcut Ctrl+D on Windows or Cmd+D on a Mac. Then create a new layer and move it below the existing painting layer. Choose a dark blue tone and use it to add a light shading underneath. The shadow on its own layer can be edited independently of the rest. With this step, your sphere is finished, and you can see how quickly you can achieve a three-dimensional impression with a graphics tablet.

Summary – Digital painting with Photoshop: First steps with the graphics tablet
You have learned how to set up a suitable document, train pen pressure with simple lines, and explore different brushes. With a circular selection, several layers, and a soft round opacity brush, you have painted a sphere that already looks three-dimensional. The most important insight: with patience and lots of short exercises, you quickly develop a feel for color, pressure, and light. Feel free to repeat the sphere several times with other colors before you venture into larger motifs.
FAQ
Which Photoshop version do I need for these exercises?All versions are suitable, since brushes, layers, and selection tools work the same in all versions.
Why should I start with a standard brush?A standard brush responds predictably and helps you get to know the pen pressure, stroke width, and working area of your tablet.
What document size makes sense for getting started?An A5 document at 300 DPI, rotated by 90 degrees, offers a good working area for first paintings.
Why do I set the brush opacity to about 50 percent?This way you apply paint in soft layers, which makes smooth transitions and a three-dimensional effect easier.
How do I get a perfect circle?Drag with the Elliptical Marquee tool while holding the Shift key, then the shape stays proportional.
What do I do if I've applied too much paint?Counteract with a lighter or darker tone until the spot looks harmonious. Thanks to the layers, the rest of the area remains unchanged.


