
A turtle in front of a murky blue tone quickly looks like it has been cut out. That is exactly what you work on in this tutorial: you cleanly isolate an animal subject, place it in a coral landscape, and give the scene believable depth with color, rocks, and sunbeams. You carry out all steps in Photoshop Elements in Expert mode.
The video is only loaded from YouTube when you play it – data (including your IP address) is then transmitted to YouTube/Google. More in the privacy policy
Key Takeaways
- The Quick Selection tool is suited for the rough cut; you handle the fine work with the Lasso and the brush.
- With Shift (plus) you expand a selection, with Alt (minus) you shrink it.
- With "Refine Edge" you check the selection against light and dark backgrounds and soften the edges.
- Isolated subjects sit on their own layers so that you can swap backgrounds without losing the subject.
- Dark rocks in the foreground and a ray of light in the background make the subject look three-dimensional.
- Sunbeams are created from Polygonal Lasso selections, which you fill with a brush and then soften with the Gaussian Blur and a reduced opacity.
Step-by-Step Guide
Start the project and open the subject
Start Photoshop Elements and switch to Expert mode. There, open your source image via "Open File". In the example, it is an underwater turtle from a stock agency. In terms of licensing, with stock material you should make sure that you are allowed to use the subject for your project.

Enlarge the subject and navigate
Before you begin isolating, zoom in on the turtle so closely that you can see all the edges clearly. The Zoom tool is the obvious tool for this. With a graphics tablet, you can additionally assign function keys, for example for zooming in and out. The spacebar helps you navigate in the enlarged image without switching tools.

Rough selection with the Quick Selection tool
Choose the Quick Selection tool and paint within the area of the turtle. Photoshop Elements detects the edges automatically and expands the selection step by step. This takes a moment, but is much faster than outlining manually. Inaccuracies are normal at this point and will be corrected in the next step.

Refine details with a small brush
Set the brush to a small size to reach the details on the head, flippers, and shell. Go along the edges of the animal and mark the areas that are still missing. Keep zooming in as you do this, because often you only notice at higher magnification that a small piece is missing from a flipper.

Expand and reduce the selection
Hold down Shift so that the brush shows a plus sign. This expands the selection. With the Alt key held down, the brush switches to a minus sign and removes excess areas again. You can also find both functions at the bottom in the options bar, but the keyboard shortcuts are much faster. At the end, also check the shell, because small gaps tend to remain there.

Add missing areas with the Lasso
The Lasso tool is suited for larger areas that are still missing. Here too, hold Shift to add areas to the existing selection. Trace the outline of the flipper that Photoshop did not fully detect. In the lower flipper area, you can subtract excess areas with the regular Lasso while holding Alt.

Check the selection with "Refine Edge"
Next, open "Refine Edge". The tool shows you the turtle on different backgrounds, such as white and black. This way you can see immediately whether unnecessary pixels are still clinging to the edge. You can soften or round the edge. Don't be too radical here, because a hard edge will give away any composite later.

Placing the subject on its own layer
Copy the selection with "Edit", then "Copy", and then "Paste". The turtle now sits on its own layer and is completely cut out. You can move it, and if you hide the background layer, you will see the subject on its own.

Preparing the background color
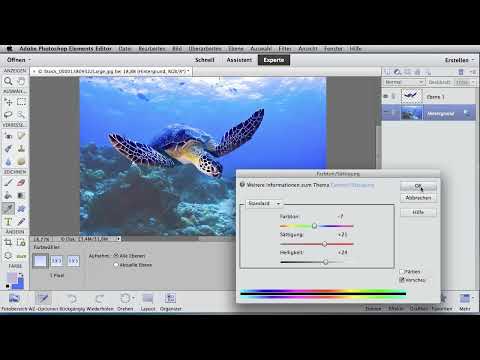
Click on the background layer and, via "Enhance", open the option "Adjust Color", then "Hue/Saturation". First increase the brightness so that the turtle stands out from the background. Then reduce the hue slightly and increase the saturation, so that a warm underwater blue with more depth is created.

Inserting the coral landscape
Now open your stock image with the coral landscape via "Open File". Zoom in on the section appropriately. Choose the Lasso and trace around the lower layer of the landscape, that is, the rocks and corals. Shape the upper edge so that the blue background is separated, and close the area cleanly at the end. With the Move tool or with Copy and Paste, you transfer the landscape into the image with the turtle.

Scaling and fitting the landscape
Photoshop Elements automatically creates a new layer when pasting. With the "Transform" command, you enlarge the landscape until it fills the width of the image. Then confirm the transformation with the green checkmark.

Softening transitions with the Eraser
The edges of the new layer often look too harsh. Choose the Eraser tool with a soft round brush, reduce the opacity, and work with a size of about 300 pixels. This way you slowly fade out the edge, and a little of the underlying image shines through again. The two images blend together much better as a result.

Intensifying the color of the landscape
With Hue/Saturation you can tint the landscape a bit more strongly. The ground then looks colorful and lively without becoming garish.

Adding dark rocks as a frame
Create another layer using the icon for new layers at the top left. It automatically sits above the previous one. Choose a brush with a hard edge and the color black. Start at the upper left edge and pull downward with quick strokes. Feel free to let the color show through slightly at the edges; this looks more realistic later. Work your way along the mountain edges again and again until you like the silhouette, and repeat this on the right side.

Modeling rock structures with a small brush
If you change the brush size, smaller structures can be worked out in the rock walls. If you don't like a contour yet, you correct it with a small brush. A little background may shine through between the rocks. This creates depth.

Adjusting the image section with the Crop tool
If the section still isn't right, choose the Crop tool and cut off the lower area. The turtle thereby moves more into focus. Confirm the crop with the Enter key or with the green checkmark.

Placing light behind the subject
Create a new layer and move it beneath the turtle. Choose the brush and hold down the Alt key, and the eyedropper appears automatically. This way you pick up a color directly from the image without having to switch tools. Choose a large, soft airbrush brush with lower opacity and carefully apply a light blue. This creates the impression that light is falling through the rocks from behind. You correct overly strong brightening with the Eraser. With a white tone on the same layer, you can additionally highlight the turtle.

Selecting sunrays with the Polygonal Lasso
Zoom out of the image and create a new layer that sits behind the turtle. Choose the Polygonal Lasso and set the top point from which the rays fall into the water. Then draw triangular rays by clicking to set points and returning to the starting point at the end. For each additional ray, hold down Shift so that the previous selection is kept. Distribute the rays at the top left, right, and individually on the left side as well, until the group looks round.

Filling the rays with a white brush
Choose a white color and a large, soft round brush with lower opacity. Fill the rays solidly in the upper area and let them fade out toward the bottom. At this point, the rays still look hard and somewhat cartoonish. This is normal, because the fine-tuning comes in the next step.

Blurring and blending the rays
Drag the layer with the rays all the way to the top so you can see how the turtle shimmers slightly through the cone of light. Then apply the "Gaussian Blur" filter, for example with a radius of 9 to 10 pixels. After that, reduce the opacity until the rays shine through subtly. With the Eraser, remove rays that interfere with the flippers or the body. This leaves only a slight shimmer on the turtle, and most of the rays run in the background.


Summary ??? Underwater scene in Photoshop Elements: Cutting out, compositing, and setting light
You cut out a turtle with Quick Selection, Lasso, and "Refine Edge" and placed it on its own layer. Then you adjusted the background colors, composited a coral landscape, and blended the transitions using the Eraser. Dark rocks, a glow of light, and sunrays complete the scene. The key is to check each layer individually and to harmonize edges, colors, and light with one another. Then the image looks believable instead of cut out.
FAQ
Which selection tool should you use first?Start with Quick Selection because it detects edges automatically, and then refine the selection with the Lasso and brush.
How do you add areas to a selection or remove them?Hold down Shift to add areas, and Alt to subtract them.
Why should you check the selection with "Refine Edge"?On light and dark backgrounds you can immediately see whether superfluous pixels are still clinging to the edge.
Why is the cut-out subject on its own layer?This way you can replace the background or move the subject without losing the cutout.
How do you make a subject fit more realistically into a new environment?Soften the transitions with the Eraser, adjust hue and saturation, and set light and shadow to match the scene.
How do you create sunrays in water?Draw triangular selections with the Polygonal Lasso, fill them with a white brush, apply the Gaussian Blur, and reduce the opacity.

