
Imagine you have to write a text for every new product in your online shop. With a self-built workflow in Google Opal, you handle this task automatically. You enter the product features, and the AI delivers a finished description. In this guide, you build your first own workflow step by step.
The video is only loaded from YouTube when you play it – data (including your IP address) is then transmitted to YouTube/Google. More in the privacy policy
Key Takeaways
- A workflow in Google Opal consists of three core components: Input, Generate, and Output.
- Each building block must be connected to the next. If a connection is missing, the workflow produces no result.
- The prompt determines the quality of the text. The more precisely you describe the role, target audience, and product features, the better the product description will fit.
- You can write your inputs in German; the system recognizes the language on its own.
- With test runs in the Application, you can see immediately whether your workflow works.
Step-by-Step Guide
Step 1: Create a New Workflow
On the overview page with the templates, you will find the "Create" or "Create new" button. Behind it is simply "Create new Workflow". Click on it to open an empty workflow. This way you start without a ready-made template and keep full control over every single building block.

Step 2: Name the Project
At the top of the editor, you enter the name of your project. Choose a term that makes the purpose clear, such as "Product Description". This way you will immediately recognize the workflow later in your overview, even if you have created several projects in parallel.

Step 3: Add the Input Block
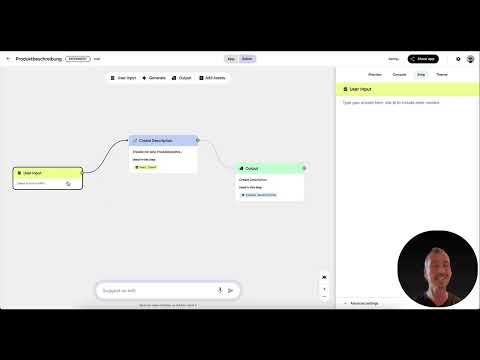
Click on "User Input". This block is the entry point of your workflow. It signals that a user will enter something here. On the right side, a note appears explaining how to add more content. For this example, however, you only need a single input point, so you don't have to add any additional content.

Step 4: Connect the Generate Block to an AI
For a text to be created from your input, you need an intermediate step that uses an artificial intelligence. So add a Generate block. On the right side, you select the model. The options are Gemini Flash, Gemini Pro, and Plan and Execute with Gemini. In the example, you stay with Gemini 2.5 Flash because this variant works the fastest.
Then connect the Input block to the Generate block. This connection is important: it tells the Generate step that data is arriving and needs to be processed.

Step 5: Write the Prompt
In the prompt field of the Generate block, you explain to the AI what it should do. The first draft in the example reads roughly: "Create a product description for my online shop." Then add the reference to the user's input so that the AI can process exactly the text the user entered. A prompt doesn't have to be perfect, because you can improve it at any time later.
Step 6: Set Up the Output
Click on "Output" and connect the Generate block to the output block. Here too you can define your own prompt, but for this example you skip it. Instead, you select the layout. The options are Manual Layout, Webpage with Auto Layout, Save in Google Docs, Save in Google Slides, and Save to Google Sheets. Choose "Manual Layout" and connect the block. An element called "Create Description" then appears in the Output, which displays the finished text.
If the editor is too large for your screen, you can reduce the view or zoom in on individual elements.

Step 7: Test the Workflow
Open the Application via "Preview" or the "Application" button and click "Start". In the input field, you now enter your product information, for example "Men's shoes, waterproof, blue". With "Submit", the workflow starts. The loading indicator shows you that a description is currently being created. The finished text then appears in the Output, for example: "Stylish and waterproof men's shoes in elegant blue." With that, your first workflow is fully functional.

Step 8: Refine the Prompt
A good prompt can be improved in a targeted way. Open the Generate block and add a role for the AI. In the example, the instruction reads: "Put yourself in the position of a marketing manager specializing in creating product descriptions." This gives the AI a clear context.
Next, you define the target audience, for example by writing that the product descriptions are intended specifically for runners. Also mention important product features such as fit and weather resistance. The more specific this basic information is, the more focused the result will be.

Step 9: Check the Result with a New Input
Reload the Application and start it again. This time, enter for example "women's shoes, waterproof, pink" and let the workflow run. The resulting description differs significantly from the first version. It emphasizes the fit for every kilometer and is aimed specifically at female runners. You can see that targeted prompt changes can significantly increase the quality and uniqueness of the texts.

Step 10: Identify Sources of Error
An important learning effect occurs when something doesn't work. In the test, remove the connection between Input and Generate and start the Application. Nothing happens because no information is passed on anymore. In the console, you can trace the error. Even if you then reinsert the missing block, the workflow only works once the connection is established correctly. Therefore, whenever you make changes, make sure that all blocks are linked to each other.
Step 11: Rebuild the Workflow Yourself
Now delete all the blocks one after another and build the workflow from scratch. This exercise is the best way to internalize the process. If your workflow reliably delivers a product description in the end, you have understood the basics of Google Opal.
Summary – Google Opal: Build Your Own Workflow for Product Descriptions
You have learned how to build a workflow consisting of Input, Generate, and Output in Google Opal. With a precise prompt that specifies the role, target audience, and product features, you automatically create suitable product descriptions. Test your workflow regularly in the Application and pay attention to the connections between the blocks. This way, you build the foundation for further, more complex workflows with images, audio, or video.
FAQ
Do I have to write my inputs in English?No, you can write your inputs and prompts in German; the system recognizes the language automatically.
Which AI model should I choose to get started?Gemini 2.5 Flash is well suited for getting started, as it works quickly and is ideal for tests.
Why isn't my workflow working even though all blocks are present?Check whether all blocks are connected to each other. If a connection is missing, no data is passed on and no result is produced.
How do I improve the quality of the product descriptions?Add a role for the AI, a specific target audience, and important product features such as fit or material properties to the prompt.
Can I convert the output into a different format?Yes, in the Output block, in addition to the manual layout, options such as Google Docs, Google Slides, or Google Sheets as well as an automatic web page layout are available.

