
Imagine pasting in a long text and shortly afterward receiving a structured summary that automatically lands in a Google document. That is exactly what you will build in this hands-on workshop with Google Opal. You will learn how to link multiple workflow steps together: input, analysis, summary, and output. In the end, you will have a complete process that you can reuse at any time.
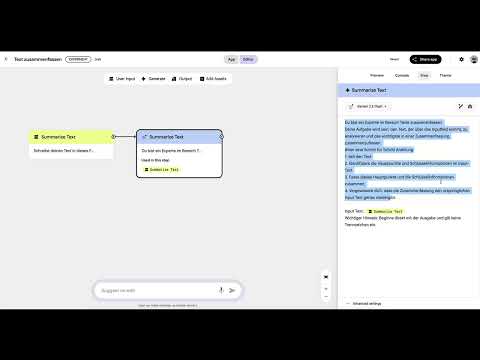
The video is only loaded from YouTube when you play it – data (including your IP address) is then transmitted to YouTube/Google. More in the privacy policy
This guide is suitable for anyone who has already gained some initial experience with Opal and wants to extend their automations with multiple steps.
Key Takeaways
A workflow consists of several building blocks that you connect to each other. The input field, AI step, and output work together, so that the result of one step is processed directly in the next.
Precise instructions determine the quality of the result. A clearly structured step-by-step specification for the AI ensures that it can read in the text, identify the main points, and cleanly summarize the key information.
The output can be written directly to Google Docs. Each test run creates a new document, so you should pay attention to the number of files created while testing.
Step-by-Step Guide
Step 1: Start and name a new workflow
Start with a completely new workflow. Your goal is to accept a text from the user, analyze it, summarize it, and then save it. Give the first module a clear name, for example "Summarize text". This helps you find the building block again quickly later, especially if you build several workflows over time.

Step 2: Create an input field for the user text
Next, you need an input field where the user pastes their text. Here you can also add a short instruction so it is clear what will happen to the text. A note such as "Write your text in this field to summarize it" is completely sufficient. In preview mode, you can then see what the field looks like to the user. Make sure the label is worded clearly, because it determines whether the user knows what to do.

Once the input field is in place, you return to your step and link it to the next task. The entered text is now available as a variable.
Step 3: Add an AI module for analysis and summary
Now artificial intelligence comes into play. Add a new step via the "Generate" area. As the model, you can use Gemini 2.5 Flash in this example. This model works quickly and is well suited for text analysis.

Arrange the modules so that the flow remains logical. It helps to first place the new step next to the existing one so that you can follow the data flow at your leisure.
Step 4: Formulate instructions for the AI
This is where the quality of the summary is decided. Start with a role description, for example "You are an expert in text summarization". Then you describe the task: the text from the input field should be analyzed and the most important points summarized.
Organize the work steps into a numbered sequence. The AI should first read the text, second identify the main points and key information, and third condense these points into a summary. Add a final check step in which the summary is compared with the original text so that no distortions of the content occur.
One detail is particularly helpful here: notes that are meant only for you and should not go to the model can be marked with a hash symbol. This way, the AI does not read them as part of its task.
Also define which text should be processed. A sentence like "The text that comes in via the input field" makes it clear that the user input is meant.
Step 5: Define the output formatting
Add a clear note that the response should begin directly with the output, without introductory sentences such as "Here is your summary". Also ask it to refrain from using special characters or Markdown formatting. Especially when the result later flows into a Google document, clean text output is important.
Step 6: Save the Output in Google Docs
Now you define where the result will be written. Connect the output point to the result of the summary. In the output format section, various destinations are available to you, for example Google Docs, Google Slides, or Google Sheets. For this tutorial, select Google Docs. Afterwards, the information is written directly into a new document.

The workflow is now basically finished: input, analysis, summary, and saving now work together seamlessly.
Step 7: Test the Workflow in the App View
The test is carried out in the app version. Open it, paste a text into the input field, and start the process. For the example, you use a document with suggested wordings for declarations of independent work when using AI. One advantage of Opal is that the text length is generally not limited. So you can also use more extensive documents.

After the start, the AI runs through the steps. The analysis usually runs very quickly, and shortly afterwards the output block is generated. A click on it takes you directly to the new document with the summary. There you can continue editing the text as in any other Google document, add headings, or rearrange paragraphs.

Step 8: Add a Status Message
So that the process remains clear to the user, you can add an additional output step. It displays feedback such as "Document created" and shows the link to the result below it. This way, the user immediately recognizes that the process is complete.

Note: With each run, a new document is created and the old one is not overwritten. If you test frequently, many files quickly accumulate in your Drive. Therefore, clean up regularly after testing or delete unnecessary documents right away.
Summary – Google Opal: Analyze Texts and Save Them Directly in Google Docs
You have seen how to build a workflow in Google Opal consisting of text input, AI analysis, summary, and output in Google Docs. The key lies in linking the modules logically and structuring the instructions to the AI clearly. With clean output formatting and a well-thought-out testing procedure, you get reliable results. In the next chapter, branching and other advanced features will follow, with which you can design your workflows even more flexibly.
FAQ
Do I need programming skills to build this workflow?No, the workflow is created entirely through the graphical interface of Google Opal. You connect building blocks to each other and formulate instructions in plain language.
Is there a limit to the length of the input text?According to the workshop, the text length in the input field is practically unlimited. Nevertheless, it is worth testing with your typical text size to check whether the results turn out as desired.
Why are so many documents created during testing?Each run creates a new Google document instead of overwriting an existing one. Therefore, delete test documents regularly or deliberately limit the number of test runs.
What is the hash symbol used for in the instructions?With a hash symbol, you can mark notes or hints that the AI should not read as part of its task. This is useful for internal explanations that are meant only for you.
Can I also save the result in Google Slides or Google Sheets?Yes, in addition to Google Docs, Google Slides and Google Sheets are also available in the output format. You simply select the destination when linking the output step.

