
Imagine you want to build an automation, but you don't yet know how the individual building blocks should work together. This is exactly where the templates in Google Opal come in. They are prebuilt workflows that you don't have to plan from scratch. You open them, adapt them to your data, and test them right away.
The video is only loaded from YouTube when you play it – data (including your IP address) is then transmitted to YouTube/Google. More in the privacy policy
In this guide, you will learn what templates are, which templates are particularly worthwhile, and how to tailor them step by step to your needs. You should already have a basic understanding of workflows and prompts, as this topic builds on them.
Key Takeaways
- Templates are prebuilt workflows that let you get started without building anything yourself.
- Usually, you only adjust the input and refine the prompts.
- Inputs, prompts, and outputs are already sensibly connected to each other in a template.
- Every template can be freely modified, extended, and saved as your own version.
Step-by-Step Guide
Step 1: Understand the Principle Behind Templates
Before you get started, it's worth taking a brief look at the basic idea. A template is a prebuilt workflow that makes getting started much easier. Instead of designing an automation anew building block by building block, you fall back on an existing structure and adapt it. This saves time and shows you right away what is possible with Opal.

Step 2: Recognize the Advantages of Templates
Templates offer three key advantages. First, you don't have to develop your own logic because the processes are already in place. Second, you can see right away how inputs, prompts, and outputs work together in a finished workflow. Third, you can freely adapt every template, for example by changing prompts, adding steps, or swapping outputs. The third point in particular makes templates a starting point for your own solutions and not just a copy template.

Step 3: Use the Content Analyzer
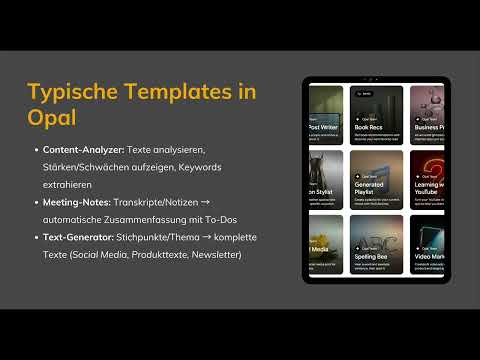
The Content Analyzer examines texts automatically. You can use it, for example, to work out the strengths and weaknesses of a blog article. It is also suitable for filtering keywords from a product description. To do this, simply insert your text as input and let the analysis run.

Step 4: Create Posts with the Blogpost Writer
If you want to produce content yourself, the Blogpost Writer is the right template. It creates blog posts based on your input. The real work consists of clearly formulating the topic and target audience in the input. The more precisely you do this, the more usable the draft will be.

Step 5: Get Reading Recommendations with Book Rex
The Book Rex template works with books. You enter one or more book titles, and the template analyzes their content and characteristics. In the end, you receive a list of what makes the books stand out, along with suggestions for what you could read next. This is a good opportunity to see how a template turns simple inputs into structured results.
Step 6: Discover Creative and Personal Templates
Besides the business examples, there are templates for creative tasks. These include the Business Profiler, the Fashion Style, and the Generated Playlist. With the latter, you can create your own playlists from YouTube links. Game Concept with AI-generated visuals also belongs in this category. Take your time to look at which template fits your project before you start it.
Step 7: Learn with Learning YouTube
Learning YouTube turns videos into learning content. You simply enter YouTube videos, and quiz questions are generated from them. This is excellent for reviewing what you've learned. Other learning templates include Spelling Bee, where you hear a word and an example sentence and then have to spell the word, as well as Social Media Plus for social media content.

Step 8: Understand Working with Templates in Practice
In day-to-day use, your effort is usually limited to two tasks. You adjust the input, meaning your own data or texts. You also refine the prompts so that the result matches your wishes. Everything else is already prepared. With this way of working, you can use a functioning workflow within a few minutes.

Step 9: Adjusting the Input
The input is the starting point of every workflow. Replace the template's sample data with your own content, such as your blog article, your product description, or your book list. Make sure that your inputs are complete and clearly worded. An unclear input almost always leads to an unclear result.
Step 10: Refining the Prompts
Prompts control how the template works. Adjust them if the result doesn't quite match your requirements. For example, you can specify a tone, set a length, or establish particular areas of focus. Only change one aspect at a time so that you can understand which adjustment has which effect.
Step 11: Understanding the Logic in the Background
Every template consists of logic steps that are already defined and a defined output. You don't have to build this structure yourself, but you should understand it. If you know which step handles which task, you can more quickly identify where to start if a result doesn't fit. In the end, the output shows you the result in the intended form.
Step 12: Extending and Saving Templates
The last step turns a template into your own solution. Add additional steps, swap out outputs, or adapt the process to your daily work routine. Save the modified version as a new workflow. This way, over time you build up your own library of automations based on your needs.

Summary – Using Google Opal Templates: Quick Start for Workflows
Templates are the fastest way to become productive in Google Opal. They provide ready-made processes, show you how inputs, prompts, and outputs work together, and can be fully adapted to your requirements. For everyday use, it is usually enough to replace the input and refine the prompts. Afterwards, you can extend the template and save it as your own version. In the next step of your course, you will create an automation from scratch yourself so that you understand every building block precisely.
FAQ
What is a template in Google Opal?A template is a prebuilt workflow that you can use right away and adapt to your needs.
Do I have to develop my own logic when I use a template?No, the logic steps are already prepared and the output is defined.
Which details do I usually have to change?Usually you adjust the input with your own data or texts and refine the prompts.
Can I permanently modify a template?Yes, you can change prompts, add steps, or swap outputs and save the version as a new workflow.
What prior knowledge do I need?Basic knowledge of workflows and prompts will help you, but getting started with templates is also quite doable without any automation experience.

