
Many everyday tasks repeat themselves every single week, such as transferring data or forwarding messages. With the automation platform Make, you can build these processes visually, even if they consist of several steps and branches. Note in advance: The video title mentions Google Opal, but the tutorial is entirely about Make (make.com). The following guide therefore takes you through pricing, the interface, your first scenario, and the platform's most important features.
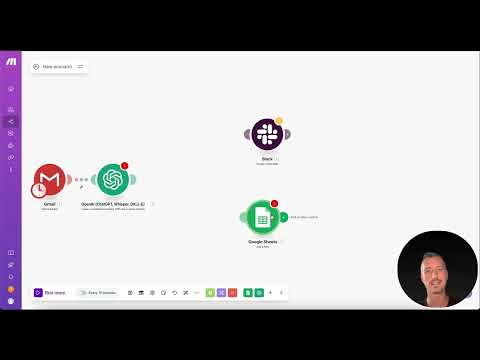
The video is only loaded from YouTube when you play it – data (including your IP address) is then transmitted to YouTube/Google. More in the privacy policy
Key Takeaways
- Make is especially well suited for processes that go beyond two to three steps, and it offers a visual router with branches, filters, and conditions for this purpose.
- The free plan with 1,000 operations per month is enough for trying things out, but scenarios there only run at 15-minute intervals.
- A scenario consists of modules, that is, triggers, actions, and AI steps, which you connect to each other via drag and drop.
- You set up connections to Google services, spreadsheets, or AI models such as OpenAI directly in the scenario.
- Templates and the AI assistant give you a quick start, but they do not replace testing and checking the results.
Step-by-Step Guide
Step 1: Check the right plan
Before you get started, you should take a look at the pricing. The Free version costs nothing and includes 1,000 operations per month, the visual workflow builder, routers, filters, and a minimum interval of 15 minutes between runs. The Core plan costs around $9 per month and allows unlimited active scenarios, scheduling down to the minute, and access to the Make API. The Pro plan costs about $16 per month and adds prioritized execution, custom variables, and full-text search in the logs. Teams starts at about $29 per month and adds team roles. To get started, I recommend using the free version first. Prices may change, so check the current information on the website.

Step 2: Register and get to know the dashboard
Start with "Get started free". You can register with your Google account or with an email address and password, and then log in. After that, you land in the Make backend. The dashboard is clearly organized: At the top you see your operations usage, followed below by active scenarios, recommendations, and trending templates. In the menu you find areas such as Scenarios, AI Agents, Templates, Connections, Webhooks, Keys, Data Stores, and Custom Apps. As long as you haven't created any scenarios yet, these lists remain empty.

Step 3: Start a new scenario with a trigger
A scenario always begins with a trigger. Open the "Scenarios" area in the menu and click "Create scenario". As an example, you choose Google Sheets with the action "Watch New Rows". This trigger automatically checks whether a new row is added to a spreadsheet and then starts the process. The modules appear on a canvas where you can arrange them freely and connect them with lines.

Step 4: Establish the Google connection and select the spreadsheet
The first time, you have to set up a connection to your Google account. Make asks you which data may be accessed. For this example, access to spreadsheets is enough, but you can expand the permissions later. If the file selection doesn't load, it is often due to missing permissions in the "My Drive" area. Check this setting and try again. Then you select your spreadsheet and the desired sheet. Also specify which row the trigger should work with.

Step 5: Add an AI step and define the target spreadsheet
Now you want an AI model to summarize the text of the new row. To do this, add an OpenAI module, for example the action "Create a Completion". For the connection, you need your credentials or an API key. Then you add the module "Google Sheets: Add a Row". It enters the result of the summary into a second spreadsheet. With that, you have a complete process: input, processing by the AI, and saving the result.

Step 6: Test and check the scenario
Before you activate the scenario permanently, you should run it manually once. To do this, click "Run once" at the bottom. Make shows you which data each module received and passed on. Check whether the summary ends up correctly in the target spreadsheet. Only when everything is right do you activate the scenario. This step prevents errors from being repeated unnoticed.

Step 7: Extend Branches with the Router and the AI Assistant
If a result should go to multiple destinations, such as Slack and a spreadsheet, you add a router. It splits the data flow into several branches, which you can extend as you like. In this way, workflows can be built up step by step without the logic becoming confusing. You can also use the AI assistant: describe your desired result in simple words, and it creates a draft of the scenario. However, always review this draft before you adopt it. When planning the schedule, also note the difference between the plans, because in the Free version scenarios only run every 15 minutes.

Step 8: Use Templates as a Starting Point
Make offers a large library of templates. You can filter by apps, for example by everything that works with Gmail. Many templates already contain ready-made steps, such as summarizing website content with ChatGPT and then creating social media posts. Each template comes with instructions that show you which connections you still need to set up. Therefore, use templates as a starting point and adapt prompts and targets to your audience.

Step 9: Implement a Practical Example for a Social Media Workflow
A typical flow looks like this: A new file in a Google Drive folder triggers the workflow. Then ChatGPT summarizes the text. In the last step, you publish the post on LinkedIn. Optionally, you can send a status report by email so that you stay informed. If you would rather have the AI create the flow, you describe the three steps in the assistant. Afterwards, compare the result with your own setup, because that is how you learn the most.

Step 10: Follow Best Practices for Stable Scenarios
Use Make primarily for more complex automations that go beyond two to three steps. Build your scenario step by step and test each module individually before adding further branches. This way you find errors faster and don't lose track even with large workflows. If you integrate an AI into the flow, first collect all the necessary data and only then pass it on to the AI step. The more steps an AI has to guess on its own, the less reliable the result becomes.
For comparison with other tools: Zapier and Make are similarly easy to use, but Make offers more logic and branching. n8n is open source and can be run on your own servers, but requires more technical knowledge in return.

Step 11: Try It Yourself with a Small Exercise
The best way to understand the platform is to build on your own. Therefore, try to create a small scenario without the AI assistant. An example: A new email in Gmail triggers the flow, and its content is automatically saved in a Google Docs document. In doing so, you get to know the visual logic and how to handle Google credentials. If you then compare the result with the assistant's, you will quickly see which areas you can improve.

Summary ??? Creating Make Workflows Visually: Beginner's Guide to Automations
Make is a flexible platform with which you automate recurring processes via drag-and-drop. You start with the free version, connect your apps, test each scenario, and extend it step by step with branches and AI modules. Templates and the AI assistant help you get started, but the responsibility for the results remains with you. If you carry out the exercise yourself, you will quickly gain confidence in using the platform.
FAQ
Is Make really free to use?Yes, the Free version costs nothing and includes 1,000 operations per month. Scenarios run there at 15-minute intervals.
What is the difference between Make and Zapier?Make offers more logic, branching, and filters in its visual setup. Zapier is considered simpler, but is often more limited for complex workflows.
Can I integrate AI models like ChatGPT into Make?Yes, OpenAI and many other AI models can be integrated via their API. You need credentials or an API key for this.
Do I need to know how to code?No, Make is a no-code tool. For simple scenarios, basic knowledge of working with apps and spreadsheets is enough.
What do I need to keep in mind when testing?Run each scenario manually first and check the data in each module. Only then should you activate it permanently.

