

Imagine a new customer enters their details into a form, and shortly afterwards they are already in the CRM, receive a confirmation email, and you get a WhatsApp notification. No retyping, no forgotten entries, no stack of paper. That is exactly what I'll show you in this guide.
The video is only loaded from YouTube when you play it – data (including your IP address) is then transmitted to YouTube/Google. More in the privacy policy
This is an advanced workflow. You should already be familiar with the basics of triggers, actions, and connections. The process is built in two variants: one with Zapier and one with Make. Both tools achieve the same result but differ in operation and presentation. So you can build the steps yourself by hand or let the integrated AI prepare the workflow.
Key Takeaways
Key Takeaways
- An automated onboarding consists of four building blocks: form, email, CRM entry, and WhatsApp notification.
- In Zapier, you build the process as a chain of steps that you can extend at any time with additional actions such as Slack.
- In Make, you work with a visual interface in which you connect modules with a click and, if needed, can address several targets in parallel.
- Both tools offer AI support that speeds up the setup. According to the video, it is still in the beta phase, but already works reliably.
- You must authenticate each connection step properly once before the workflow runs in everyday use.
Step-by-Step Guide
Step 1: Creating the Form in Zapier
The process begins with the form. In Zapier, you create an interface through which your customers can enter their details. This form is the trigger for all further steps. Make sure that all fields you will need later in the CRM and in the message are already requested here, for example name, address, and phone number.

Once you have defined the fields, you save the form. Every submission triggers the workflow, so you no longer have to take care of data collection yourself.
Step 2: Configuring the Welcome Email
After the form is submitted, an email should be sent automatically. To do this, you add the module for outgoing emails in Zapier. In the subject field, you enter a meaningful text, such as "Welcome as a new member". This looks professional and gives the customer immediate orientation.

In the text field of the email body, you insert the data from the form. Zapier allows you to take over the fields from the previous steps as placeholders. This way, name, address, and everything else is automatically filled in with the customer's actual details, and every email looks individual.

When you have entered all the details, you click "Continue". Zapier then generates the email based on your template and checks whether all fields were transferred correctly. Check the result once with a test entry before you activate the workflow.
Step 3: Creating the Customer in the CRM
Now the workflow ensures that the customer is recorded in the CRM. To do this, you select the appropriate CRM module in Zapier. You can use a different system at any time later by swapping the module. You establish the connection to your account via the authentication dialog.

In the "Event" field, you specify what the CRM should do. In the example, this is the action "Create Client", i.e. creating a new customer. The data from the form is assigned to the corresponding fields in the CRM. Pay close attention to this mapping, because mistakes here lead to incomplete customer records.
Step 4: Setting Up the WhatsApp Notification
As soon as the new customer is created in the CRM, a message should reach your phone. Triggering this notification is the last step in the core workflow. For this, you select the WhatsApp module in Zapier and "Send Message" as the event.

Then you enter your connected WhatsApp account. Once the connection has been established, you do not need to renew it. The message is now sent as soon as the CRM entry has been completed successfully. With this step, the process from the form to the notification is complete.


Step 5: Add Slack as an additional channel
If you often set your phone to silent during your workday, a second channel is worthwhile. In addition to the WhatsApp message, you can send a Slack notification. To do this, click the plus icon at the end of your workflow and search for Slack in the module list.

Select the desired action, for example sending a message, and connect your Slack account. Here too: after the one-time authentication, the connection remains permanently active. This way you reliably receive the information, even when you are not looking at your phone.

Step 6: Create the workflow in Zapier with AI
You don't have to set up every step manually. Zapier offers an AI feature to which you describe in plain language what the workflow should do. The feature is currently in beta but works reliably. For example, specify that a form should trigger an email, a CRM entry, and a WhatsApp message.

The AI then drafts the steps. Afterwards, you can adjust them, add further actions, or change the order. The Copilot can also be specifically instructed to insert additional steps. Nevertheless, always check the result before you activate it.

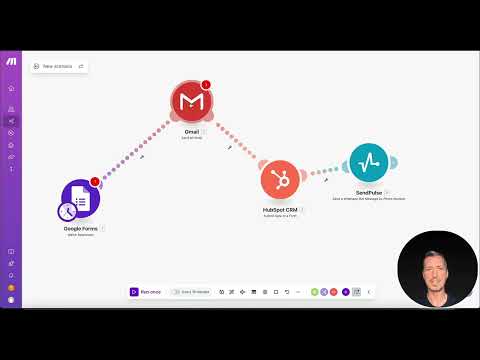
Step 7: Connect Google Form and Gmail in Make
Now on to the second variant in Make. Here too, everything begins with a form, this time a Google Form. You create the connection via the form ID and set the limit for the number of responses. As soon as the customer submits the form, the workflow is triggered.

In the next step, you forward the data via Gmail. To do this, you need to connect your Gmail account to Make. In the video, this part is set up as a placeholder, but the way it works can be transferred just the same. Make sure you take over the correct fields from the form.
Step 8: Create the customer in HubSpot
The information from the form then ends up in the CRM. In the example, HubSpot serves as the destination. You add the HubSpot module, connect your account, and choose the action that creates a new contact. Then you map the individual fields to the details from the form.

Step 9: Add WhatsApp and Slack message in Make
Once the contact is saved in HubSpot, Make sends a WhatsApp message to your phone number. The process is the same as in Zapier: you select the module, connect the account, and define the message text. Afterwards, you can add a Slack message via the plus icon, for example as a private message to yourself.


Step 10: Build and extend the workflow in Make with AI
Make also offers AI support. You create a new scenario and describe in the AI feature field what the workflow should do. Make then creates the modules and connections for you. This feature is also marked as beta.


Afterwards, you can extend the process at any time. A click on the plus adds a new module. Connections can be removed and reset if your process changes. The visualization keeps the structure clear, even if the workflow becomes more complex later.

Step 11: Serving Multiple Destinations in Parallel
A workflow doesn't have to run linearly. In Make, you can branch the flow and feed several endpoints at the same time. This means that the WhatsApp message doesn't necessarily have to be triggered only after the Slack channel, but both actions can run in parallel. You achieve this branching via the router element that Make provides for this purpose.

Summary ??? Automated Customer Onboarding with Zapier and Make
You have seen how a customer onboarding process can be fully automated, from the completed form to the first WhatsApp message. Zapier is well suited for a clearly structured flow that can be built quickly using AI. Make scores with its visual representation and the ability to address destinations in parallel. What matters is that you test each connection cleanly once and map the fields correctly. The next video covers automated research tasks, also with Make and Zapier, and advanced mechanisms that you can process further later on.
FAQ
Do I need to know how to program to implement this onboarding?No, both tools work with graphical interfaces and modules. You connect accounts and select actions without writing any code.
Can I swap out the CRM later?Yes, you can replace the CRM module with another one at any time. Afterwards, make sure to re-map the fields.
Do I need a specific account for the WhatsApp notification?You need a connected WhatsApp account, which you authenticate in the respective module. The connection remains in place after setup.
Is the AI function for building the workflow reliable?The AI features are in the beta phase in both tools and deliver good suggestions. However, always check the result before you activate the workflow.
Can I also send a Slack message?Yes, you add Slack as an additional step and connect your Slack account. This way you receive the information even when you're not keeping an eye on your phone.
How do I avoid incorrect customer data?Test the workflow with a sample entry and check whether all fields arrive correctly in the CRM. Errors in field mapping are the most common cause of incomplete records.

