
The camera in your pocket can do far more than the standard app shows you. Exposure, focus, white balance, and frame rate are usually controlled automatically there, and you can barely intervene. With a third-party app like FiLMiC Pro, you take that control back. In this guide, you'll learn the most important settings, find out in which order you should set them, and get tips on what to watch out for with older devices.
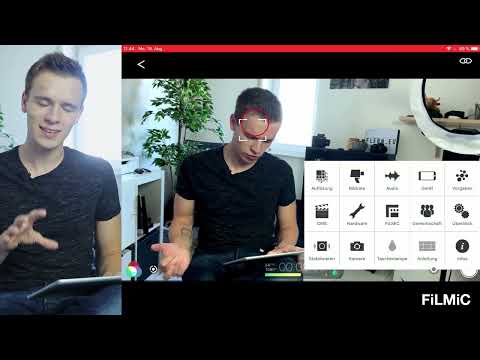
The video is only loaded from YouTube when you play it – data (including your IP address) is then transmitted to YouTube/Google. More in the privacy policy
Key Takeaways
- Good light remains the foundation, no matter how many settings you change.
- Focus and exposure can be set and locked separately. This keeps the image stable when you move.
- Shutter speed determines motion blur. At 24 frames per second, about 1/48 of a second is a proven starting point.
- White balance can be fine-tuned so that skin tones look natural.
- A flat profile like Flat gives you more room for post-processing than a high-contrast image.
- High resolutions and bitrates do not turn a smartphone into a DSLR camera.
Step-by-Step Guide
Step 1: Position the Smartphone Securely
Before you start adjusting settings, make sure the phone is stable. A tripod prevents camera shake and gives you time to check the framing and values in peace. Only once the camera is standing securely is the fine-tuning worthwhile. A tablet that shows you the live image is a helpful addition, especially if you want to monitor yourself in the frame.

Step 2: Set Exposure and Focus Separately
In standard mode, the automatic system decides how bright and how sharp your image will be. In FiLMiC Pro, you control both yourself. Tap on your face to align the exposure to it. Afterwards, the skin no longer looks blown out but correctly exposed. You set the focus using the second control element by tapping the area that should be sharp.

Step 3: Lock Focus and Exposure
If you shift back and forth while speaking, the camera will otherwise quickly jump to the background or readjust the brightness. So tap the field once until it is marked red. Focus and exposure then remain locked, even if you move to the right or left. Tapping the focus field twice hands control back to the automatic system.

Step 4: Set Shutter Speed and ISO
Press and hold the control area for longer, and the manual controls will open. At the bottom you see the shutter speed, at the top the ISO value. The lowest possible ISO value delivers the cleanest image, so you should keep it low and adjust brightness primarily via the shutter speed. If you first tap one of the two values to lock it, the slider only changes the other one. That way you keep control and the operation becomes clearer.

Step 5: Use Motion Blur Deliberately
Shutter speed influences how movement looks in the video. At 24 frames per second, a shutter speed of about 1/48 of a second produces a natural motion blur, as known from the cinema. With a shorter shutter speed, on the other hand, fast movements look choppy. With the standard app, you can hardly control this setting on smartphones, but with FiLMiC Pro you can. So try out different values while shooting and compare the results directly on the screen.

Step 6: Adjust the White Balance with Sensitivity
The automatic white balance doesn't always match the mood of your scene. Open the white balance display and move the slider toward cooler or warmer. You can also shift the tint toward green or magenta. With a swipe of your finger, this can be readjusted live, both directly on the smartphone and via the tablet over Wi-Fi. The preview on the tablet may be slightly delayed, so you should check the result once more on the device itself at the end.

Step 7: Set Resolution, Frame Rate, and Aspect Ratio
In the settings menu, you set the resolution, which can go up to 4K. You also choose the frame rate, such as 24 or 60 frames per second. The aspect ratio can also be set directly. A cinema format like 2.39:1 saves you from cropping later, which can reduce image quality. Keep in mind, though, that not every device can do everything. Older iPhones such as the iPhone 6 do not support 4K at 60 frames per second. So check beforehand what your model is capable of.

Step 8: Put Bitrate into Realistic Perspective
A high bitrate gives the image more room for information, and the video becomes correspondingly larger. However, it does not automatically make your footage better, because the sensor and lens set the limits. In a direct comparison, a DSLR camera still delivers the better image in many cases, even if you push all the settings on your smartphone to the maximum. So choose the bitrate to suit your project and keep an eye on your free storage space.

Step 9: Adjust Sound and Image Stabilization
You can also control the sound yourself in FiLMiC Pro. Specify which of the smartphone's microphones should record, such as the bottom or the top one, depending on how many microphones your device has. Turn off automatic level control if you would rather control the level yourself. Stabilization can also be adjusted. Turn it on or off depending on the situation, since strong stabilization can be unnecessary with a fixed tripod.

Step 10: Display Histogram and Warnings
FiLMiC Pro also shows you displays such as histograms, which depict the color and brightness distribution of your image. With them, you can immediately see whether highlights are blowing out or shadows are being crushed. You can likewise display warnings for overexposure and underexposure. Focus aids, such as green lines, also show you which areas are sharp. On the small smartphone display, these aids are often hard to see, so they offer a clear advantage on a larger screen.

Step 11: Choose a Profile and Shoot Flat
In the profile menu, options such as Neutral, Dynamic, Flat, and Log are available. A dynamic profile looks high-contrast right away, but is hard to edit afterward. Log delivers a very flat image that offers a lot of leeway in post-processing, but looks extremely low-contrast while shooting. For getting started, Flat is suitable as a compromise. It holds bright areas such as windows together somewhat better, and you still retain enough color information for later editing. The Log profiles are part of the paid Pro version.

Summary – Manually Controlling Smartphone Videos with FiLMiC Pro
With FiLMiC Pro, you get on your smartphone the control that otherwise only large cameras offer. You stabilize the device, set exposure and focus deliberately, lock them when needed, and adjust shutter speed, ISO, and white balance to your scene. Added to this are resolution, frame rate, aspect ratio, sound, and profile. It remains important to remember that a smartphone is a camera with limits and that good light makes the biggest difference. Try out the features at your leisure and compare your results, and you will quickly become more confident.
FAQ
Do I absolutely need an iPhone to use FiLMiC Pro?No, the app is available for both iOS and Android, and on both systems exposure and white balance can be set manually.
Is the free version enough?The basic functions for exposure, focus, and white balance are usable, but the professional version with Log profiles and further options costs extra.
Should I always shoot in the Log profile?No, Log is mainly suited for later color correction. For getting started, Flat is usually the better choice, because the image already looks usable while shooting.
What does the shutter speed of 1/48 second at 24 frames mean?This value corresponds to a shutter angle of about 180 degrees, which provides natural motion blur and creates a film-like look.
Why shouldn't I simply choose the highest resolution and bitrate?Higher values only increase the file size and storage requirements. They do not automatically improve the image if the smartphone's sensor and lens limit the quality.


