

A boat that looks good in the light but shows no highlights on the tower, gun and pressure hull quickly looks flat. This is exactly where this tutorial comes in. You will learn how to aim an area light from the left at the boat in Cinema 4D, limit it so that only the ship is illuminated, and set it up so that its reflections become visible in the details.
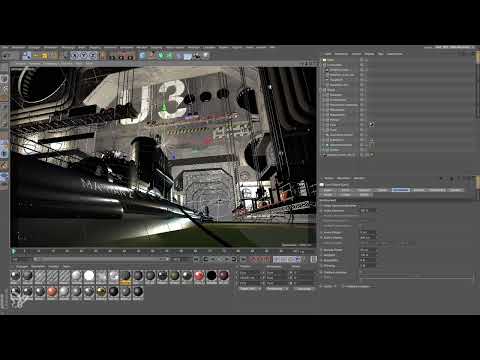
The video is only loaded from YouTube when you play it – data (including your IP address) is then transmitted to YouTube/Google. More in the privacy policy
Unlike a point light, an area light has physical extent. This comes closer to reality and produces softer transitions as well as reflections that a point light cannot deliver. The path there is shorter than it first seems, but it requires a few settings that are easy to overlook.
Key Takeaways
- An area light produces softer transitions and more realistic highlights than a point light.
- The light source should be large enough so that round components such as the tower and superstructures can reflect it.
- Via the Project tab and the "Include" mode, you restrict the lighting to the boat.
- The checkmark at "Show in Reflections" decides whether the light itself appears in reflections.
- With Inverse Square and an outer distance, you control the falloff of the light.
Step-by-Step Guide
Step 1: Check the Starting Point
Before you place new light, you should prepare the existing scene correctly. The existing grazing light on the left has already been named and placed together with its target in a light source folder. For visibility, make sure not to use volumetric visibility. It is computationally intensive and brings little in this scene, as long as no shadow is cast into the light path. The default visibility is sufficient. In this example, I reduced the brightness to about 50 percent because the scene otherwise looks too harsh.

Step 2: Insert the Area Light and Position It Roughly
Create an area light and wait until it appears in the viewport. With a scene of this size, that can take a few seconds. First, align the light roughly the way you imagine it. It should be very large, similar to a softbox in a photo studio, and extend over the entire length of the boat. Drag it so that it reaches from the rear part of the tower to the front midship.

Step 3: Adjust the Size via the Handles
With the handles on the light source, you change the width and height without having to type in values. Drag the first handle in the desired direction and then the second to stretch the surface up or down. Even after this step, you can see that the scene responds and the boat receives light in the right places.

Step 4: Check the Alignment in the Top View
The top view shows you best how the light is positioned relative to the boat. Use the rotation tool to rotate the surface so that it hits the ship from the side. Then tilt the light forward by about 20 to 30 degrees. This way the light does not land too flat on the boat but visibly models the surfaces.

Step 5: Move the Position with the Object Coordinate System
When you work with the move tool, the world coordinate system is active by default. This means that for a simple movement in the X and Z directions, you have to switch back and forth several times. Therefore, switch to the object coordinate system. Then you move the light in the direction in which you have rotated it and reach the desired position in one go. Pull the light a bit closer to the boat, but not so close that the ship is lit straight through the middle. The goal is side lighting.

Step 6: Widen the Surface
Round components on the upper part of the boat only reflect if they see a portion of the light surface. The larger the surface, the more likely it is that the light will be found in these parts. Therefore, enlarge the light slightly in width until it reliably covers the superstructures.

Step 7: Limit the lighting to the boat
Now you make sure that only the ship is lit and not the surroundings or the bunker. To do this, open the settings of the light source and select the ship in the Project tab. Then drag the "Submarine" folder into the list. It is important to switch the mode from "Exclude" to "Include". This way only the included object is lit, and everything else deliberately stays dark. This is exactly what prevents the entire scene from being brightened unnecessarily.

Step 8: Enable shadows and avoid light leaks
Without shadows, light can shine through in places where it doesn't belong. This is called light leaks. Therefore, enable the shadow in the general settings of the light source. An area shadow looks the nicest, but it calculates significantly more slowly. To start with, the normal soft shadow is entirely sufficient. You can refine it later if needed.

Step 9: Set the light falloff
At the moment, the light does not yet fall off with distance. Switch the falloff to Inverse Square. Then set an outer distance, in this example 500 cm. This setting ensures realistic behavior in which the light becomes weaker with increasing distance. This makes the boat look more three-dimensional, and the background separates better from the foreground.

Step 10: Enable reflection of the light source
For the light source itself to become visible in the reflections, you have to set this explicitly. Check the box "Show in Reflection" in the settings of the light source. Without this checkbox, the light does shine, but it cannot be seen as a reflection in the surfaces of the boat. This is the point that is easiest to overlook and that causes the most trouble later.

Step 11: Evaluate the result and check details
Render a preview and compare the image with the state before the new light. You should see that the tower looks metallic and the superstructures catch highlights. Reflections also appear on the pressure hull. Whether you want all of them exactly like this only becomes clear in the details. It may be that you will want to make small changes to the light source later. It is therefore worth not letting the render run to completion at first, but instead calmly assessing what the light source does.

Summary – Area light in Cinema 4D: Placing highlights on the boat precisely
You have aimed a large area light source at the boat from the left, rotated it in the top view, and moved it in the object coordinate system. Via the Project tab with the "Include" mode, you limit the lighting to the ship, while the soft shadow prevents light leaks. With Inverse Square, an outer distance of 500 cm, and the checkbox at "Show in Reflection", highlights appear on the tower, gun, and pressure hull. The scene thereby looks significantly more three-dimensional, without the surroundings being brightened unnecessarily.
FAQ
Why should I use an area light source instead of a point light?An area light source has extent and therefore produces softer transitions and more realistic reflections, which work particularly well on round surfaces.
Why is my environment being brightened despite the light source?The mode in the Project tab is probably still set to "Exclude". Switch it to "Include" and drag only the ship or the "Submarine" folder into the list.
Why can't I see the light itself in the reflections?You probably haven't checked the "Show in Reflection" box. Without it, the light does shine, but remains invisible in the reflections.
Do I have to use an area shadow?No. The area shadow looks nicer, but requires significantly more computing time. The normal soft shadow is sufficient to start with and prevents light leaks.
What does the Inverse Square setting do?It ensures that the light decreases realistically with increasing distance. Together with a defined outer distance, the scene becomes more three-dimensional.
Why the object coordinate system instead of the world coordinate system?In the object coordinate system, you move the light in the direction in which you rotated it. This saves you detours across multiple axes.

