

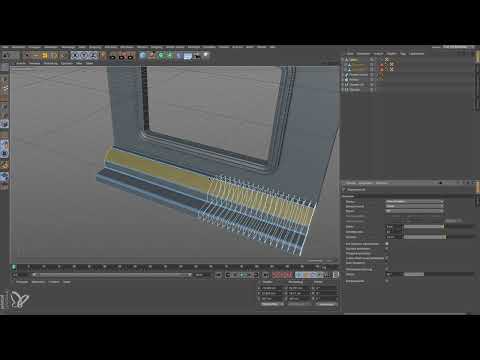
A room only looks finished once the transition between floor and wall has been cleanly resolved. This is exactly the transition you create in this section of your space station. You build a baseboard from a spline, extrude it, round off the edges, and get to know the newly split Knife tool of Cinema 4D along the way. The baseboard is therefore not just decoration, but also offers space for functional details such as ventilation slots.
The video is only loaded from YouTube when you play it – data (including your IP address) is then transmitted to YouTube/Google. More in the privacy policy
Key Takeaways
- A spline with a slope results in a transition element that can later be easily extended with details.
- Extruding directly from the spline is the fastest way to a body whose length you can then freely adjust.
- With the "Restrict Selection" option, you prevent the Knife tool from cutting through the entire object and generating an unnecessary number of polygons.
- The Knife tool now consists of Line Cut, Plane Cut, and Path Cut. However, the classic cutting techniques remain the core of your daily work.
- You can set roundings for cap surfaces and edges first via Bevel values and only refine them later with the Bevel deformer, if you really need it.
Step-by-Step Guide
Planning the Room's Lower Termination
Before you get started, think about how the floor of the room should end. The lower termination is a small baseboard that you recreate with a spline. You can trace the shape of a reference image or design your own contour. The only important thing is that your profile forms a kind of transition element and does not simply run in steps. A slightly sloped surface later gives you the option of sensibly attaching further functional elements.

Drawing the Spline as a Transition Profile
Draw the spline so that it combines a step with a sloped surface. This slope is crucial, because it later gives you a surface on which you can place ventilation slots or other details. Make sure the profile is closed and cleanly set, because you will process it directly in the next step.
Extruding the Spline
Select your spline and then choose the Extrude. The shortcut gets you there quickly. The profile is converted directly into a three-dimensional body, so you save yourself a separate working step. In this case, the extrusion is already ready in the tool, so you only need to set the length.
Adjusting and Checking the Length
Pull the object to the length your room needs. The exact value is less important than the right proportion to the room size. Afterwards, move a little closer to the baseboard and check the shape up close. This way you can see early on whether the profile looks even everywhere.

Reducing Intermediate Points
If you look at the baseboard more closely, you may notice too many intermediate points. Switch to Points mode and modify the points selectively to simplify the object. Modifying the points only works in Points mode, so you may need to switch there first. A lean object is much easier to edit later.


Closing the Shadow Gap at the Lower End
At the lower end of the baseboard, a shadow gap is created that visually finishes the transition to the floor. This area is exactly what you need at this spot. You do not have to change it any further as long as it achieves the desired effect.

Creating Roundings on the Cap Surfaces
So that the baseboard does not look too harsh, you need rounded edges. The cap surfaces can be quickly rounded with a Bevel value. In the video, you work with 0.8 cm and 5 cm as the values you use for the rounding process. You apply the same procedure to the other side, so that both ends are rounded equally. The result looks much softer as a consequence.

Thinking of Ventilation Slots as a Later Extension
The finished strip is perfectly suited for functional details. Ventilation slots would be a fitting example, as they represent air supply and match the setting of a space station. You can place the slots in one small spot or distribute them over the entire length. For more variety, it is worth adding them on only one side of the strip.

Converting the Object into Editable Polygons
The extrusion is still a parametric object that you cannot cut directly. Therefore, convert it into an editable object. It is important that you convert only the extrusion itself and not the caps or the roundings. Then name the strip so that you can easily find it again in the Object Manager. After that, switch to Edge mode.

Getting to Know the New Knife Tool
The Knife tool has changed significantly in the new version. It is now divided into Line Cut, Plane Cut, and Path Cut. The tool could already do many of these functions in earlier versions, only in a much more limited way. Feel free to play around with the new options, as most of them become clear when you try them out. For most work, however, the classic cutting techniques remain the most important.


Selecting a Single Polygon
You do not want to cut the strip everywhere, because a cut all the way around would create an unnecessary number of polygons. Therefore, activate Live Selection and select only the polygon you want to edit. Only then do you start the Knife tool. This way you keep control over the number of faces.

Setting the Plane Cut
Select the Plane Cut to apply several parallel cuts to the selected polygon. In the video, 19 to 20 cuts are the focus, which gives you a good starting point. You can adjust the number of cuts at any time until the result matches your expectations.


Activating the "Restrict Selection" Option
The checkmark at "Restrict Selection" is very important. If it is not set, the tool cuts the entire object, which creates an unnecessary number of polygons. Therefore, check before cutting that the checkmark is set.
Separating Parts and Removing Them Selectively
With the Plane Cut, you can split the object into Part A and Part B. You can then delete one of the two parts. If you remove Part A, Part B remains, and vice versa. Try it with and without the checkmark for the selection so that you see the difference clearly. Without the restriction, you can cut larger areas out of the object.

Reducing the Spacing and Setting the Cut
The spacing of the cuts was initially too large at 8 cm. Reduce it to 7 cm until the slats look narrow enough. Then set the cut at the spot where you want the ventilation slots. Afterwards, move closer to select the area precisely.

Creating the Ventilation Slots with Inner Extrusion
Select the desired area by using the 9 key together with Ctrl. Remove superfluous parts until only the piece remains from which you want to build the slots. For the Inner Extrusion, use the shortcut M and W. Make sure that the "Preserve Groups" option is not activated. Then pull the face inward a bit with the D key. Remove the rest so that the slots remain as a recess.


Cleaning Up and Deciding on Beveling Later
The remaining cut edges can additionally be beveled, preferably using the Bevel Deformer. In the video, however, you initially skip this step. The reason: the detail is far enough away that the straight edges are sufficient. Only if you notice that you are missing highlights should you round off the edges afterwards. This saves polygons and keeps your scene organized.


Summary ??? Baseboard in Cinema 4D: Modeling with the New Knife Tool
You have created a baseboard from a spline, extruded it, brought it to the right length, and added roundings. Then you used the new Knife Tool to cut polygons precisely, separate parts, and create ventilation slots using Inner Extrude. With the "Restrict Selection" option, you keep control over the polygon count. The baseboard is now ready for the further development of your space station.
FAQ
Does the baseboard have to look exactly like the one in the video?No, you can design the shape of the spline freely. The only important thing is that the profile contains an angled surface on which you can later place functional details.
Why should I enable the "Restrict Selection" option?Without this option, the Knife Tool cuts the entire object. This creates an unnecessary number of polygons and makes the scene harder to edit.
Can I add the roundings later as well?Yes, that is possible. You can leave the edges straight at first and only round them off with the Bevel Deformer if needed, when you are missing highlights.
Which cutting techniques are most important in the new Knife Tool?The video makes it clear that the classic functions still cover most of the work. However, the new options such as Line Cut, Plane Cut, and Path Cut are worth trying out.

