

You're working on a flyer, and the client is missing the right photo. Instead of falling back on gray placeholders, you can access the Adobe Stock image database directly in InDesign. The service is part of Creative Cloud and is integrated into many Adobe applications. This guide shows you where to find Adobe Stock, how to search for images, and how they then get into your layout.
The video is only loaded from YouTube when you play it – data (including your IP address) is then transmitted to YouTube/Google. More in the privacy policy
Key Takeaways
- Adobe Stock can be opened in InDesign in several ways. So you can reach the goal via different routes.
- In the browser, you can search for images and save them as layout images or license them directly.
- The CC Libraries are the most convenient method. You find images via instant search in the panel and drag and drop them into your document.
- The preview images are free, but watermarked and unlicensed. Only purchasing makes them usable for print.
- You can store previews in your own libraries to present drafts to clients.
Step-by-Step Guide
Step 1: Open Adobe Stock in the browser using the command
The first way is via the "Browse Adobe Stock" command in the upper area of the interface. Click on it, and InDesign opens your web browser. A prerequisite is that you are signed in with your Adobe ID. You can tell by your account being displayed at the top of the browser.

In the browser's search field, you now enter a term, for example "Tattoo". The results appear immediately. You can save the preview images directly as layout images. However, these have a lower resolution and are not licensed. Alternatively, you purchase an image and save the full version on your computer.

Step 2: Open the Adobe Stock dialog via the icon
Besides the browser route, there is an icon in the top bar. Click on it to open a dialog within InDesign. The result is the same as with the command from Step 1, except that you don't have to leave the program.

Step 3: Use the search directly in the dialog
In this dialog you will find a search field. Enter a term there, such as "Cat", and confirm the search. Here too, you get matching results. The dialog thus offers the third way to reach Adobe Stock without opening the browser.

Step 4: Access Adobe Stock via the lightning command
Another option is hidden behind the lightning icon. Click on it, enter the term "Stock", and then select "Browse Adobe Stock". This gives you a command that leads to the search without detours.
Step 5: Find Adobe Stock in the dialog for new documents
You can also access Adobe Stock when creating a new document. In the "New Document" dialog, you will find the option "Browse on Adobe Stock" among the templates. Use this route if you want to have image material in view right from the start of a project.

Step 6: Use the CC Libraries as the most convenient solution
The most pleasant way is via the CC Libraries. These are libraries that are stored in the Creative Cloud and work across programs. There you can store colors, fonts, graphics, paragraph styles, character styles, and vector files. For images from Adobe Stock, the CC Libraries are particularly practical because you can reuse them in all Adobe programs.
Step 7: Work with the instant search in the panel
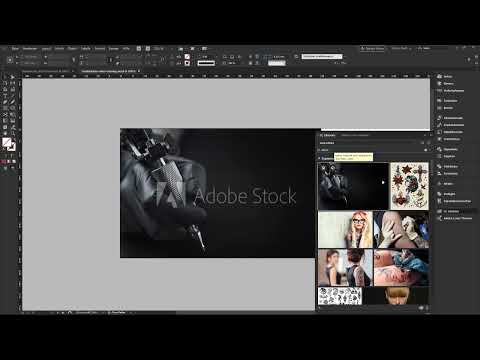
Enlarge the CC Libraries panel by dragging the window edges. Then enter your keyword. The panel starts an instant search, so you don't have to leave InDesign. You drag and drop a suitable image to the desired spot in the layout. The result is a layout image that you can process further immediately.

If you don't like an image, you simply remove it from the layout and insert another one. This workflow is particularly well suited to making quick progress in the layout process.

Step 8: Show the panel again via the Window menu
If the panel is not visible, open it via "Window" and then "CC Libraries". This is how you bring the library back if you have closed or moved it.

Step 9: Check preview images with the free number
If you want to look at an image more closely, Adobe Stock shows you a free preview. There is also a number below the image. If you are looking for a specific number, simply enter it in the search field. You will then get the same result. Many designers use this function when they show drafts to the client before images have been delivered. In the presentation, the stock images look much more convincing than gray placeholders.

Step 10: License an image
If you want to use a preview image, click the shopping cart icon. There you buy the license and receive the full resolution. A note from the video: The service is paid, but the quality usually justifies the price, because inexpensive alternatives rarely deliver comparable results.

Step 11: Save a preview in your library
Without purchasing, you can also save the image as a preview in one of your libraries. To do so, click "Save". You will then find the image in the selected library. There you can see the reduced dimensions, for example 1000 x 668 pixels, and the note that the image is unlicensed. Multiple libraries help you sort images by topic or project.

Summary – Using Adobe Stock in InDesign: Bringing images directly into the layout
Adobe Stock can be opened in InDesign in various ways, such as via the command in the browser, the icon, the lightning command, or the dialog for new documents. You work fastest with the CC Libraries. There you search via instant search and drag images directly into the layout. Free previews help you with client presentations, and images are only licensed via the shopping cart. It's best to try out the functions yourself, because the integration into the Adobe interface is very convenient.
FAQ
Do I need an Adobe account to use Adobe Stock in InDesign?Yes, you must be signed in with your Adobe ID for searching and purchasing to work.
Are the preview images suitable for print?No, the preview images have a lower resolution and are not licensed. For print, you need the licensed image in full resolution.
Can I insert images from Adobe Stock into the layout without a browser?Yes, via the CC Libraries and the panel with instant search, you drag images directly into the document using drag and drop.
Where do I find the CC Libraries panel if it is not visible?You open it via the "Window" menu and the "CC Libraries" entry.
Can I search for an image if I only know the number?Yes, if you enter the number in the search field, you get the same result as with a keyword search.
What happens if I only save a preview image in my library?The image is saved as an unlicensed preview. You can use it for planning, but you must license it before using it in the final product.
Are stock images suitable for client presentations?Yes, if the client has not yet delivered their own images, a suitable stock image looks much better in the presentation than a gray placeholder.

